I bought a secondhand model of Chelfham station building (ex Lynton & Barnstaple) on eBay for a reasonable price with a view to using it on the railway. It was constructed from a GRS kit. In the end, I opted to standardise on wooden buildings constructed mostly for T&M Models resin kits (see How I assembled the station buildings). So the model of Chelfham had been languishing on the shelf for a year or so before I decided to put it back on eBay. Before, welling it I decided it would benefit from some tidying-up - or rather a complete refurbishment. The exterior was painted with acrylics in the same way as the T&M models and then sealed with matt varnish.
Then, for reasons I cannot really fathom, I decided it might sell better if I detailed the interior. having not done this for my other models, this would act as a test-bed.
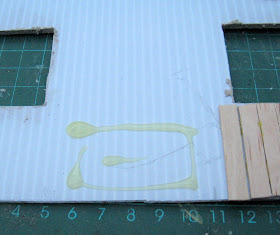
Firstly a base for the interior was cut from corrugated plastic board:
The walls and ceiling were then cut out:
The idea was to make a completely separate box for the interior so it could be removed for more detailing. Next, I filled the surrounds of the doors and windows with flexible filler:
... and then cut a load of planks from coffee stirrers for the panelling - I found a pair of scissors was perfectly OK for this job.
After smearing some Evo-stick adhesive on the walls, the planks were stuck in place, leaving a slightly over-scale gap between each one.
Architraves were made for the doorways by cutting coffee stirrers down the middle longitudinally, and then mitring the corners:
Once all the interior walls had been panelled in this way......
..... they were painted. Cream gloss paint for the wall (left over from painting the garage door), and chocolate brown for the panelling using acrylics:
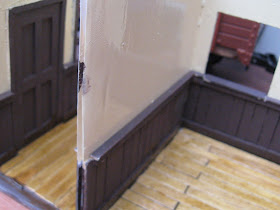
The walls on all but the front of the model were then hot-glued in place:
.... and more coffee stirrers were glued to the floor as floorboards - again the gaps were slightly exaggerated. The floor was varnished with an antique pine stain and window sills and a sill for the panelling were added:
The interior was then furnished with benches around the walls of the waiting room and the booking hall:
... and a table and desk made from off-cuts of timber and whittled lolly sticks:
These were varnished with antique pine stain and fixed into place with Evo-stick. Finally, the inside of the window frames and doors were painted and clear plastic was glued into the shell of the building across the windows and the interior was eased into place to check clearances.
Lighting
Next, I turned my attention to interior lighting; no point in detailing the interior if no one can see it. I cannibalised a solar rock light. I bought a set of these a while back and was never really that impressed by them. The circuit and components were carefully removed:
...... and then the LEDs were unsoldered from their circuit board. This was a bit fiddly, but they came out quite easily with the minimum of heat (I didn't want to fry them!).
The LEDs were then soldered to lengths of fine wire from an earpiece. This was the finest wire I could find. The wires were interwoven with strands of nylon thread which were teased out and melted with the iron before solder was applied to the copper strands.
Shades for the lights were cut from circles of card which were folded into cones and glued above the LEDs.
The LEDs were then 'hung' from appropriate places in the ceiling of the inner box.
As the LEDs were wired in parallel, the leads from them were gathered together and then soldered to the original leads from the solar light circuit board (blue and white in the photo). The base of the battery box was hot glued to the upper side of the ceiling and the wiring was fixed in place with some white Gaffa tape.
NOTE: I realised after two of the LEDs failed to light that I had got the polarity of their leads wrong. Swapping them over soon fixed the problem.
The wires to the photo cell were snipped and extended with a suitable one metre length of two core cable. This was threaded through a hollow stake ('borrowed' from another solar garden light). The top of the stake was cut at an angle of 45 degrees, the cable was then soldered to the leads from the photocell and insulated with tape before the solar cell was hot glued to the top of the stake.
The other end of this lead was then hot glued to the side of the inner box and soldered to the charge leads (making sure I got the polarity right this time!).
More Gaffa tape was applied to the edges of the ceiling and the front wall to act as hinges so that further detail could be added at a later date.
A dolls house coffee table was bought to act as a table in the waiting room, some figures were glued into the rooms to give a little more atmosphere, and then the lighting was tested after dark just to make sure everything was functioning as expected.
Although I am aware of some imperfections in my modelling, I and pleased to say this approach passes muster and will be used to add detail to the other buildings on the line. Hopefully, as everything has been constructed in plastic or treated with varnish, it should survive the damp conditions which prevail in our climate.


