Pages

Friday, December 29, 2017

How I made a sluice gate for the mill stream

After having complete the mill (see How I made a mill from foamboard) and giving it a test run ......

..... I felt that, in real life, the mill stream would have had some sort of sluice gate to control the flow of water on to the wheel.

After sketching a very basic design, I decided to use some offcuts of foamboard for its construction. I did consider using wood (too prone to rotting) and plasticard (too flimsy) but decided the 5mm thickness of the foamboard would give the gate a fairly substantial, chunky appearance.

The first task was to make the lower guides for the sliding gate. Four pieces of 5mm x 60mm and two 18mm x 60mm lengths of foamboard were cut out.

Two of the narrow pieces were glued on to each of the wider pieces, 5.5mm apart to act as guides for the sluice gate


A 30mm x 150mm piece of foamboard was cut out to act as the platform. A 45mm x 5.5 mm slot was cut into the centre of the platform to allow the sluice gate to rise through it.


The sluice guides were glued .....

...... either side of the slot in the platform.

A 85mm x 40mm piece of foamboard was cut out for the sluice gate.

The gate was then slotted into the guides to check it was the right size. A small amount was shaved off the edges to ensure it slid smoothly.


The upper guides for the gate were mades from four 65mm x 5mm and two 70mm x 25mm pieces of foamboard.

These were then glued above the platform and a 25mm x 52mm piece of foamboard glued across the top.

The semi completed sluice gate was then test-fitted into its location to make sure it fitted and also to determine the size and shape of the blanking pieces which were required either side of the gate.

These were cut from offcuts of foamboard and glued either side of the sluice gate guides.

A couple of sets of plastic spur gears and racks were ordered from Technobots.

The rack was detached from the sprue .......

..... and the moulding reduced in depth with a craft knife.

A slot was cut into the platform to accommodate the rack......


...... and the rack was glued to the centre of the sluice gate.

Once the glued had dried, the sluice gate was fitted back into the guides.


A figure of eight link was drilled and filed from a piece of 1mm thick brass shim, 13mm x 5mm with 2mm diameter holes near each end.

2mm diameter brass rod was soldered into the holes.


..... and the excess solder filed smooth.


A couple of 3mm diameter holes were drilled in the upper sluice guide and the crank handle assembly was inserted. A small spur gear was positioned midway along the longer shaft on the crank to engage with the rack.


A small spur gear was positioned behind the crank handle and a pawl fashioned from an offcut of 1mm thick plasticard.


A 5mm diameter brass washer was then soldered on to the other end of the shaft to retain it.

Two 75mm long posts were cut from 4mm diameter brass rod. The lower 20mm of each post was bent through 90 degrees. Three 2mm diameter holes were drilled through the longer section .......

..... and three 75mm lengths of 2mm diameter brass rod soldered into the holes. The posts were then glued into 4mm diameter holes dtilled into the edges of the platform.

The whole assembly was then given a couple of coats of Halfords red oxide primer.

Once the primer had set, the sluice gate assembly was then touched up with various shades of brown acrylics and then sealed with a couple of coats of matt varnish.

A layer of concrete, into which had been mixed some black cement dye, was then smeared over the mill stream area to even out some of the inconsistencies in its finish.

Slabs were scribed into the 'green' concrete on top of the wall dividing the main stream from the mill stream..

Once the concrete had set, the sluice gate was tested.

The height of the gate was adjusted using the rack and pinion until the wheel was rotating at what seemed like a reasonable speed.


There seemed to be a compromise between the ideal speed and a slower speed which meant friction would sometimes stop the wheel.

I am pleased with the outcome.  The mill seems to fit in well with its surroundings and the sluice gate does an effective job of restricting the flow of water over the wheel.

There is still a little more detailing to be done. I would like to add some general clutter around the mill and maybe a wooden footbridge linking the mill to the mainline trackbed on the opposite side of the stream. Otherwise, the stream and the mill are now more or less complete.

For more information about how I made the stream see - How I constructed the stream


Tuesday, November 28, 2017

How I constructed the mill

Contents


Introduction

Since the Peckforton Light Railway gained its identity, I have been planning to build a mill beside the stream (see Progress Report 41 and How I built the mill siding). The two narrow gauge railways which I most admire are the Southwold and the Welshpool & Llanfair and both of these featured mills adjacent to their tracks, with the Southwold featuring a siding to serve the mill and so there are precedents.

After having to revamp the part of the stream beside which the mill would be located I took the opportunity to landscape the area in which the mill building would be located and so, at last, I had no excuse not to start building the mill.

For inspiration, I visited the water mills which are still accessible in the locality in which my imaginary railway is set. A couple of them (Bunbury Mill and Walk Mill) have been reconstructed and are open to the public so these were visited. I also took photos of the other remaining mills in the area to get some idea of the local architecture.

Although they are not identical in design, they all seem to share common features and so, using this information - and taking account of the size and shape of the site - I drew up some sketch plans of my own mill building.

The main structure

 For the main structure, I decided to experiment with what is a new material for me - PVC foamboard. I have been impressed by the quality of model buildings which I have seen constructed from this material (eg Ray Dunakin's In-ko-pah garden railroad and Mike Duffy's Lazy Grange Bay).

I sent off for a pack of 5mm thick A3 PVC foamboard sheets and set about transferring my ideas from my sketch to the board.

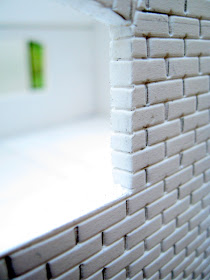
 The next stage was to mark out the brickwork. I decided to go for a brick size of 4mm x 12mm which, in 16mm scale would represent a 3" x 9" brick. Although this is not a present day 'standard' brick size my argument is that, when the mills would have been built, the bricks would have been made locally to the builder's specification. Also, I liked the idea of the length being a multiple of the width. I also assumed the bricks above the window arches would have been laid end-on and so made these 4mm x 6mm.

After marking out the brick courses, the horizontal courses were scribed with the blade of a flat-bladed screwdriver .....

The vertical courses were impressed with the same blade, which was 4mm in length. First, inserting one corner of the blade into the horizontal course,........

...... and then applying downward pressure to impress the vertical mortar course.

I was quite pleased with the result. Although it takes a while, I found the process to be quite therapeutic with the satisfaction that the courses can be tailored to suit the model - and is considerably cheaper than buying embossed plasticard.

To accommodate the 5mm thickness of the sides, the gables for the ends were extended ......

Where I knew the building would be abutting the raised embankment and a small extension, I did not bother to scribe and emboss the mortar courses.

Once all the sides had been scribed, the shell of the building was glued together with medium density superglue.

The floor for the upper storey was cut to size and glued into place ........

....... with battens of 5mm x 5mm foamboard to reinforce the joints.

The roof

Two pieces of foamboard were cut to size for the roof - with a 7mm overhang in each side.

The longer outside edges of the roof panels were chamfered by propping each panel on a pile of books and running a craft knife along the edge.

This will be to take the barge boards when the roof is finished.

The slates

 I decided the slates would be 10mm x 20mm in size, which approximates to 'Ladies' slates in 16mm scale (ie 8" x 16"). I could have made them larger, but decided to keep things simple. The slates were marked out on a sheet of 1mm thick plasticard, .......

........ with additional lines at 12mm across the length of the slates to mark where they would overlap.

The slates were then cut into strips ..........

...... and the divisions between the slates were cut (to the 12mm mark) with two cuts, approximately 1mm - 1.5mm apart. A single cut would have become easily filled with paint and so the divisions would have become obscured.

The strips were then glued to the roof panels, with staggered overlaps between each row.

The front-facing roof panel was then glued to the shell of the building but, as I wanted to have access to the interior (for later detailing), I decided to leave the rear-facing roof panel loose. As the front panel needed to fit around the lucam, a slot was cut to fit around it.

Walls were added to the sides of the lucam

.... and roof pieces were cut out of foamboard.

Their position was marked ......

..... and they were glued into place .....

...... before being slated in the same way as the main roof.

Foamboard battens were glued to the underside of the other half of the roof so that it could be slotted into place.

The extension

 The walls for the extension were marked-out and then cut out .......

..... with windows, doors and brickwork being marked on.

 The brickwork courses were then scribed on. Unfortunately, I made an error when scribing one of the horizontal courses and so ........

..... the accidental score mark was filled with White Putty filler.......

...... and then sanded smooth before being scribed and impressed correctly.

Once the pieces for the extension were scribed ......


...... they were glued together with thick superglue ......

...... and attached to the side of the main building.

Foamboard roof panels were then cut out and glued on to the roof.

Barge boards

10mm wide strips of 1.5mm thick plasticard were cut .......

..... and then trimmed to size to fit below the roof sections.

An accelerator spray was used (just visible in the background) to avoid having to hold the barge boards in place for a long time while the superglue set.

Filling and scribing the corners

Because the corners of the building were butted together rather than being mitred, the mortar courses needed to be carried around the corners to make them look more realistic. Before the scribing could be done, I needed to carry out some filling - with the best will in the world, trying to ensure there were no gaps when these large sections of foamboard were glued together, was something I found impossible.

Squadron White Putty is my filler of choice. This was applied liberally to all the exterior corner joints and allowed to set.

In some places, a second layer of filler was needed to bring the edge of the wall up to the level of the other wall.

Once dry, the filler was smoothed off with medium and then fine grade emery papers and the mortar courses scribed on, to continue around the corners.

In a similar way, the mortar courses were continued around the edges of the window .........

..... and door apertures.

The windows and doors

Windows

Although my photos showed various arrangements for the windows on the local mills, I decided the small square paned windows would be the most likely to have been original, and so cast about for some way of representing them. Eventually, I happened to come across some plastic badminton racquets in my local £1.00 shop which seemed to have mesh of approximately the right size.

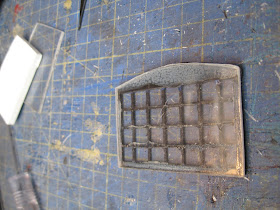
 The mesh was removed from one of the racquets and the blank from one of the windows was laid over it........

...... so a piece of the mesh could be trimmed to size.

As the mesh was too thick for window bars, it was carefully sliced in two with, initially a slitting disk, ......

...... and then a razor saw, ...........

...... giving two pieces of mesh for the price of one.

The burrs from the cutting process .........

.... were then trimmed off with the blade of a craft knife.

The grids were then given a couple of coats of Halfords' grey primer followed by a coat of Halfords' Satin Black from an aerosol rattle can.

Using the window blank as a template, a piece of 2mm thick clear acrylic sheet was cut to shape to exactly fit the window aperture.

3mm wide strips of 1mm thick black plasticard were cut, plus a 10mm wide strip of 1mm thick plasticard. The 10mm wide strip was glued across the top of the clear acrylic window using Uhu clear glue and the 3mm wide strips were glued down each side and across the bottom of the window. The window mesh was then trimmed to size and glued into the middle of the window.

Once the glue had set, the excess from the uppermost 10mm wide frame .was trimmed off with a craft knife ........

...... and finished off with a file.

 The outer frames were given a coat of red oxide primer .......
.... followed by a coat of black acrylic paint, before being fixed into place in the relevant window aperture. A few dabs of Evostik contact adhesive were used to fix them in place.

NOTE: I tested various adhesives before opting for Uhu and Evostik. These included superglue, Gorilla Glue, PVA and canopy glue. Evostik proved to be the most effective at fixing the frames to the clear acrylic, followed closely by Uhu.

Doors

I decided that simple cross-braced wooden doors were likely to have been used and so cut out some rectangles of 1mm thick plasticard approximately 10mm wider than the door apertures. Planks were scored on at 5mm intervals (Two doors here, joined end to end).

The planks were scribed with the blade of a razor saw to simulate wood grain, and the door was then edged with 3mm wide frames cut from 1mm thick plasticard.

A 1mm thick curved upper frame was cut out, using the blank from the doorway as a template, and a striking plate cut from 0.5mm thick plasticard.

A latch was shaped from another piece of 0.5mm thick plasticard and inserted into a hole drilled in the striker plate.

The bottom edges of the doors were distressed with a craft knife ........

..... and then the doors were given a couple of coats of red oxide primer.

They were then given two coats of black acrylic paint (matted down with talcum powder) before being fixed into place.


The wheel

A couple concentric of circles of radius 80mm and 65mm were marked on to 1.5mm thick plasticard.

 These were carefully cut out .......

...... as were two smaller 10mm radius circles with 4mm diameter holes drilled into their centres.

 The disks were then placed on a card template and eight 70mm x 8mm spokes of 2mm thick plasticard were glued on, evenly distributed around the circumference.

 Nut and bolt heads from Cambrian Models were then glued on to the spokes.

 Twenty four 50mm x 13mm blades were then cut from 2mm thick plasticard ......

 ...... which were then glued on to the inside of the wheel.

 The other edge of the wheel was then glued on to the blades and the whole thing left overnight for the solvent to harden.

The following morning, twenty-four 50mm x 15mm x 1.5mm thick pieces of plasticard were glued on the inside of the wheel with their centres behind each blade. This not only reinforced the structure of the wheel it also created a scoop to hold the water as the wheel rotated.

 Painting

Before the windows and doors were fixed into place, their apertures were masked internally with masking tape and the shell and roof given a couple of coats of Halfords' grey primer from a large aerosol rattle can.

Once this had hardened off, a mix of white, yellow ochre, lemon yellow and cobalt blue acrylic paints were mixed (roughly in proportions of 8:2:2:1).

This mix was then daubed liberally over the walls ........

..... before being wiped off diagonally with a dry paper towel, leaving a generous deposit in the mortar courses.

When this had dried, a mix of dark red, burnt sienna and yellow ochre (roughly 2:2:1) was dry-brushed on, again brushing diagonally to avoid depositing paint into the mortar courses.

NOTE: Dry-brushing involves applying a small amount of paint on to a wide brush and then wiping the excess off on a paper towel before lightly dragging the brush across the surface, thereby leaving only a thin layer of paint behind on the raised surfaces. I found it necessary to practise on a scrap piece before touching the model.


Occasionally, despite my best efforts, some of the brick colour seeped into the mortar courses.

This was easily remedied by waiting until the brick colour had dried and then using a small brush to re-apply mortar colour to the offending courses.

The excess mortar colour was wiped off before it dried with a dry paper towel (I get through a lot of paper towels when painting models).


The roof was tackled in a similar way. First, a layer of black acrylic paint was applied in sections over the roof, wiping off the excess to leave the paint in the nooks and crannies between the slates.

Once this had dried, individual slates were painted with varying shades of a mix of black, white, blue and green acrylics to represent variations in the colours of the slates covering the roof.

The wheel was first given a couple of coats of red oxide primer and then a couple of coats of dark brown enamel paint.

The site

The section of the stream on which the mill would stand had already been remodelled (see How I revamped the stream), but the actual site of the mill was a mess of rubble and soil. This was dug out and part of the trackbed for the mill siding was chiselled away to make room for the building.

The section of the site on which the building will be positioned was filled with concrete (a 2:2:1 mix of sand, gravel and cement) to which a small quantity of black cement dye had been added.

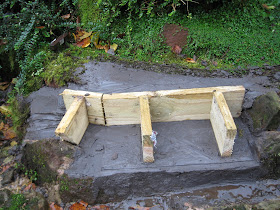
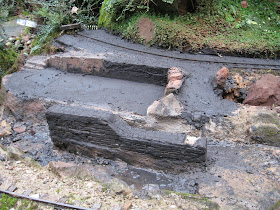
Once the base had more or less set, some shuttering was constructed from offcuts of timber and the upper section of was cast using a mix of sand and cement (4:1) plus some black concrete dye.

When this had set to a 'green' state the shuttering was removed.

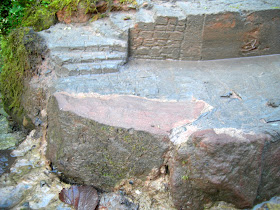
Stonework was then scribed into the 'green' concrete ........

.... and the steps between the lower and upper sections were carved out.

Once the concrete had set fully, the chunk of sandstone which would impede pedestrians moving between the doors and the steps .....

...... was ground down with an angle grinder.

The rocks in the stream dividing the main stream from the mill stream were also ground down to provide a level base ......
Pre-cast Jigstones sections of dressed stonework were test-fitted .........

....... before being glued together with exterior PVA.

After more testing, the gap between the two Jigstones walls was filled with a sloppy mix of concrete (3 parts sand to 1 part quick set cement). This not only will provide a level surface to the top of the wall, it will also help to bind the blocks together (and fill some of the gaps). Although it was exterior grade PVA, I was not convinced it would survive repeated immersion in running water!


Conclusion

 The model is now almost finished. The main structure is complete, though some of the detailing has yet to be completed.

 The most significant detail is to finish off the wall between the mill stream and the main stream channel. The gap between the inner and outer walls has now been filled with concrete (see above) to reinforce the PVA and to provide a platform on which the sluice gates can be fixed.

The ground between the stream and the mill siding needs to be landscaped and an access path constructed for the miller to reach the sluice gate mechanism.

The raised area behind the building needs detailing. Eventually I plan to add some mill related clutter such as bags of grain and flour, and maybe some mechanical clutter. 

The steps linking the lower and upper sections need to be tidied up and a handrail added. The building needs to be bedded into the base more convincingly and some handrails added to prevent staff falling into the stream.

I might even make a footbridge across the stream linking the mill to the trackbed of the railway - a small halt could then be constructed for the staff and customers.

One of the things which concerned me was whether the wheel would rotate at a crazily unrealistic speed once the stream was in operation so I decided to test the wheel before I completed the detailing. I was pleased to find that (probably because of my inefficient design) the wheel rotates at a quite realistic speed - even when I simulated the effect of the sluice gates by restricting the flow with my hand.

I still need to construct some more lineside buildings - the timber yard and sawmill at Peckforton is next on the list and various structures and buildings are needed at the stations - but I am pleased that this omission has now been rectified