Pages

Monday, April 29, 2019

How I constructed a set of coal scales

Having recently constructed some coal bins (see How I constructed some coal bins) and a coal yard How I constructed a coal yard - pending) for Beeston Castle station, I decided to add some relevant details to the yard. Consulting the internet, I discovered that many coal yards had sets of scales for weighing the coal which were purpose-made for the job. So, it seemed sensible for me to find or make some suitable scales.
(see

There were various designs, including this one which, coincidentally, was up for auction at Beeston Market - adjacent to the hypothetical site for my station.

Unfortunately, it had been sold last year and so was no longer available for my scrutiny. I therefore had to estimate the dimensions for my set of scales. I decided that my scales would be far simpler in design.

Three pieces of 3mm square section plasticard were cut - 35mm, 35mm and 25mm long. These were then shaped to fit together in an isosceles triangle.

On top of this triangle, a piece of 20mm x  5mm x 2mm thick plasticard was glued.

 Two 23mm long legs were cut from the 3 x 3 square section. Their ends were given a half-round indent with a needle file.

Two three-hole 00 scale wagon wheels were de-flanged .......

..... and glued on to then ends of a 32mm long piece of 3mm OD plastic tube.

The axle and wheels were then glued to the bottom of the legs.

Two 5mm square pieces of 2mm thick plasticard were half-rounded to act as the pivot for the balance arm.

The balance arm (45mm x 3mm x 2mm thick) was cut and glued above the cross-piece. The pivot pieces were then glued either side of this.

  A 30mm long third leg was then glued to the third corner of the triangle and three pieces of 2mm x 2mm plasticard (cut from a 2mm thick sheet) were glued to provide struts for the legs. A 20mm piece of 1mm brass rod was glued into a hole at the end of the balance arm and a 6mm disc added to its base.
 
 The disc was made from the wheel of a model skateboard picked up up in my local 50p shop.

The wheel was filed down to half its width, to act as support for the weights on the end of the balance arm.

Another wheel was given a slot with a file to act as a weight.

The scuttle for the coal on the other end of the balance arm was made from a 20mm OD piece of plastic pipe, 30mm in length.

This was cut in half, length-ways and glued (with superglue) to a piece of 1.5mm thick black plasticard. The end of the scuttle was filed to give the distinctive scoop shape.

When the glue had set, the plasticard was trimmed close to the end of the tube with a pair of scissors .....

.... and then sanded to the right profile. A 40mm long piece of 1mm thick black plasticard (3mm wide) was then cut and 1mm holes drilled near each end. This was then fixed to 1mm holes drilled mid way along the scuttle with dress-making pins.

These were glued into place with superglue, before being snipped flush.

The scuttle was then glued to the end of the balance arm.

The scales were given a coat of pale blue acrylic paint, the wheels and weights picked out in black and the scuttle painted light grey. When this paint had dried, a wash of mucky brown paint was applied to simulate light weathering.


I think the scales are (ironically) slightly under scale and so, if I was going to make another set, I would increase the dimensions by around another 25%. However, they will look very much at home in the coal yard at Beeston Castle station (see How I added a coal yard to Beeston Castle - pending).


Tuesday, April 23, 2019

How I made some coal bins / staithes

Some of the first wagons I constructed for my railway were open wagons to transport coal down the line (see How I constructed some open wagons and How I constructed some open wagons from resin castings). A common feature in station yards during the steam era would have been coal bins, sometimes called 'staithes'. In the UK they were often constructed from old wooden sleepers.

My first attempt at making some coal bins has not been 100% successful as I inadvisedly made them from balsa wood (see How I made coal bins from balsa). Despite treating them with preservative,  they have disintegrated over little more than a couple of years, and so I wanted to find something which was a bit more durable. Having recently discovered PVC foamboard and constructed a couple of buildings from this versatile material, I decided it would be more than suitable for my next set of coal bins (see How I constructed the water mill and How I constructed the Brewery (pending). These would be situated at the intermediate stations on my railway - Beeston Castle, Peckforton and Bulkeley.

The first two sets of bins were made from scraps and offcuts of 3mm and 5mm thick foamboard left over from making the brewery. I get my supplies of PVC foamboard from Simply Plastics, who supply it in pre-cut sizes such as A2, A3 and A4.

I started off by measuring and cutting a piece of 3mm thick foamboard for the base. Its size was dependent on the site it would occupy. This particular structure would be situated at Peckforton Station, where I had identified a space 220mm x 90mm.

 The front edge of the base was bevelled with a craft knife to allow the finished model to be more easily bedded into to its eventual site.

I then started creating the wall sections. I decided to make the back wall 70mm tall - representing 4' 4½" in 16mm scale, which seemed about right, assuming the bins would have been made from redundant sleepers from my 3' gauge railway. These were cut from 5mm thick foamboard.

The various sections (their lengths dependent on what scraps I had available) were divided into 10mm wide vertical 'sleepers'.

A craft knife was used to cut into the divisions between the sleepers about 6mm down.

The knife was then used to cut horizontally into each sleeper end to give the impression they were of different heights.

 I found that flipping the job over enabled me to make fairly clean cuts on both sides.

The divisions between the sleepers were then scored with a flat bladed screwdriver.

 The same was done on the reverse side, using a tri-square to keep things vertical.

The surfaces were then scored with the teeth of a razor saw, to give the impression of wood grain.

Additional deeper score lines were made with the tip of a round file.

The top ends of the sleepers were then 'distressed' by hacking them about with a craft knife.

The pieces which would become the sides and central divide for the bin were shaped, with increasingly lower sleepers down to 60mm or 55mm.

 These processes were repeated until I had sufficient pieces to make the bin.

The various pieces were then glued to the edges of the base with thick superglue (I use Vitalbond which can be bought in 50g bottles reasonably priced on eBay). I started with the rear section .....

..... and then the sides and the central divider.

The bins were then set aside for the glue to set........

....... before being given a brush-painted coat of red oxide primer.

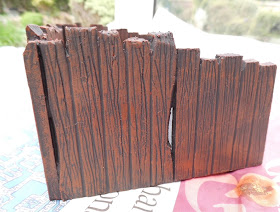
Once this had dried, the whole thing was given a coat of very dark brown acrylic paint, to represent creosoted timber.

It was important to ensure the paint found its way into every nook and cranny.

Once this had dried, the woodwork was dry-brushed with a mid-brown colour.

Once this had dried a silver-grey colour was very lightly dry-brushed over the previous coat.

The brown highlights the larger grain effect while the grey highlights the finer grain (well that's the theory!).
 
Dry-brushing
A broad brush is lightly dipped into the paint which is then mostly removed on a paper towel. The residue clinging to the brush is then very lightly wiped over the surface of the timber so the paint is transferred only to the upper surfaces.

This was left to dry.

Off-cuts and chunks of foamboard were glued into the corners of the bins .......

...... and then painted black ........

........ before being coated in exterior PVA and sprinkled with crushed coal.

The bins need to be properly bedded into the surfaces of the yards at the stations and a few other details added, such as coal sacks, scales, shovels and maybe a workman shovelling.

Hopefully, these bins will be a lot more durable than their balsa predecessor. I will leave them outside over the summer but probably bring them in during the winter months to prevent moss growing on top of the coal. However, they do seem look OK and ought to be weather-resistant.