 I was asked by a couple of traders if it would be possible to convert a Piko DB BR80 Tank Locomotive (37202) to battery power and so I was loaned one on which to experiment. I hasten to add that I used lithium-ion batteries for this conversion, if I was going to do this commercially, I would use NiMh batteries, as these are less volatile and easier to recharge by those unfamiliar with battery technology.
After examining the loco and its exploded diagram closely, I realised that it was very cunningly contructed to ensure that very few of the screws holding the loco together were visible. The first job was to remove the four screws holding the side tanks on to the running plate.
This allowed the side tank mouldings to be removed. There is a lug on the rear of the mouldings wwhich slots into the front of the cab. This just pulls out.
With the tanks removed, the red plastic underframe mouldings could be removed. These simply slot into the running plate and into the rear underside of the cab.
Once the lug on the moulding was pulled out from the running plate, the moulding was then moved forward to slide out the lug from the cab underside.
The six screws holding the cab to the footplate were now visible. These were unscrewed .....
...... to allow the cab to be removed.
The two seats for the driver were then removed. Normally these slot on to pegs on the floor of the cab, but on this loco, the driver's seat was also glued down and so the peg had to be removed as well.
With the cab removed, the two screws holding the firebox to the cab floor were now exposed. These were unscrewed.
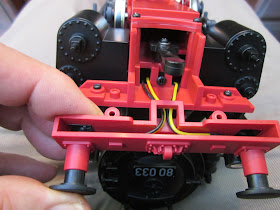
It took me a while to figure out how the front of the boiler was fixed in place. To access the single screw holding it, the buffer beam was removed by unscrewing the two small screws which secure it.
As you can see from the photo, the buffer beam sits on two lugs and so, once the screws were removed, the buffer beam needed to be prised upwards (with the loco inverted) away from the lugs. The screw holding the boiler in place now became visible.
This screw was removed .......
.... and then the boiler was lifted up at the rear, and slid backwards slightly to free the lug from the front fixing point.
With the boiler removed the wiring now became accessible. Normally, when I convert locos to battery power, I remove the wheel pickups and skates, but on this loco I decided to leave them in place - and add a switch to enable the loco to be run either from track power or from battery. If you were intending to run the loco solely on battery power, I would suggest you remove the skates and pickups at this point as they do add unwanted (and unneeded) friction.
The leads from the track and to the motor were unplugged .......
and the link between the two plugs was severed.
To follow my normal conventions for wiring, I soldered white wires to the motor leads .......
..... then shrouded these in heatshrink sleeving for insulation.
Brown wires were soldered to the plugs for the track pickups .......
....... and similarly insulated with heatshrink.
The plugs were then re-inserted into their sockets - brown (track) leads into the outer sockets and white (motor) leads into the two inner sockets.
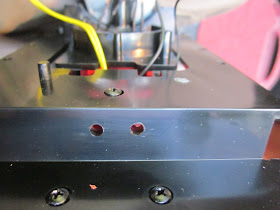
Two 3mm diameter holes were then drilled into the stepped rear section of the cab floor .......
.... and the four new wires fed through.
Now the interesting bit could begin. Sorting out the batteries and the control system. After carefully examining the cab and trying various options, I decided that the easiest way to instal the additional electrics was to put the switches and charge socket into the coal bunker so they could be accessed by removing the coal moulding. Rather than fixing them in permanently, I felt it would be better if the whole assembly could be removable. To this end I constructed a box from 2mm thick black plasticard which would fit snuggly inside the cab without the need for being glued in.
Before gluing the box together, an overlay was printed out on to self adhesive vinyl showing the positions of the switches and socket. This was attached to the 35mm x 95mm panel and holes of the relevant diameter were drilled (6.5mm for the switches, 8mm for the socket and 6mm for the LED).
A DPDT switch was mounted into the lower left hole (as the on/off/charge switch), a 3PDT switch was mounted into the right hand hole, a 2.1mm DC socket mounted into the middle hole and bezel-mounted LED fitted into the upper left hand hole:
................ as per this diagram.
The LED was wired up to pad 4 of an RCT/Deltang Rx65b receiver/controller. The pad was then reprogrammed to provide the LED2 function (which mirrors the onboard LED flashes).
A 3S li-ion battery protection board was purchased (via eBay) .......
... and wired-up before being connected to three 18650 tagged li-ion batteries.
The batteries, together with the battery protection board, were then loosely taped together.
The plasticard box was then glued together with solvent and positioned in place on the footplate.
The driver was then stuck in place (using a double sided sticky pad) on top of the plasticard box.
After testing, the loco was then reconstructed. The boiler was attached first ......
Followed by the buffer beam, .......
............. cab and side tanks.
The controls and charge socket are conveniently accessible though the coal bunker by removal of the coal moulding.
Following testing, I decided to add a balance charge socket to the battery protection board, leading to a trailing JST four pin socket which is accessible in the cab. Not very elegant, but I had been unable to track down a panel-mounted 4 pin socket - besides which there was little space left on the board inside the bunker.
I have not added this loco to my fleet - it's not an appropriate prototype for my UK based three foot narrow gauge railway. It has now been returned to one of the traders as a demo to show what is possible with a little imagination and a modicum of ingenuity.


No comments:
Post a Comment