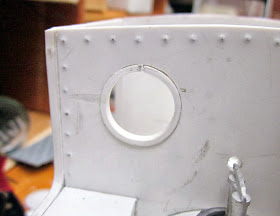
So far, I have used this technique for making the boiler of a locomotive and the spectacle rings for a loco cab but it could be used for anything where a curved surface was required (eg a saddle tank, cab roof, diesel bonnet etc.).
For the loco boiler, I used a former (a plastic waste pipe) which was just too small in diameter. Around this I wrapped a layer of 1.5mm (60 thou) thick plasticard which was the right length and approximately the correct width for the calculated circumference of the boiler (pi (3.142) x the diameter (44mm) = 138.248mm). However, as it is easier to trim back than extend, I increased this to 145mm to be on the safe side.
The plasticard was then wrapped around the plastic pipe and held in place with cable ties. Wooden coffee stirrers were inserted along the edge of the plasticard to keep it flat. The first time I tried this I omitted the coffee stirrers and ended up with an undulating, wavy edge).
This was then placed in a washing-up bowl and boiling water from a kettle was poured over it until the assembly was submerged. It was left in the water for ten minutes and then removed. When the cable ties were slipped off, the plasticard retained its tubular shape.
The process was repeated to give me two tubes, which were then glued together using liquid poly MEK glue (with the joints on opposing sided of the tube for greater strength). Elastic bands being used to keep the laminations tightly bound together while the solvent did its work.
A similar approach was used to make the spectacle surrounds for the cab. In this case, 3mm wide strips of 2mm thick plasticard were cut out, their length being considerably more than the circumference of the spectacles.
After considerable fiddling, I found the easiest way to coil them was to loosely insert them into a looped cable tie (the same ones I used for the boiler) ..........
... and then slip them over the former (in this case a felt tip marker pen was about the right diameter).
This was then placed in a small bowl and covered with boiling water from a kettle. The spoons were used to keep the whole thing submerged.
After ten minutes, the felt tip was removed from the water and the cable ties slipped off. The rings now retained their shape.
Each one was then inserted into the spectacle opening and carefully marked, before being trimmed to the right size. It was then glued into place using liquid poly solvent (MEK) applied with a small paintbrush.
Before priming and painting, any gaps will be filled with filler and smoothed off with fine emery paper. here is the completed loco prior to being painted.
For more information on the complete loco build see - How I constructed a 2-4-2T locomotive based on Southwold Railway Sharp Stewart loco No. 1 - Southwold.
For the loco boiler, I used a former (a plastic waste pipe) which was just too small in diameter. Around this I wrapped a layer of 1.5mm (60 thou) thick plasticard which was the right length and approximately the correct width for the calculated circumference of the boiler (pi (3.142) x the diameter (44mm) = 138.248mm). However, as it is easier to trim back than extend, I increased this to 145mm to be on the safe side.
The plasticard was then wrapped around the plastic pipe and held in place with cable ties. Wooden coffee stirrers were inserted along the edge of the plasticard to keep it flat. The first time I tried this I omitted the coffee stirrers and ended up with an undulating, wavy edge).
This was then placed in a washing-up bowl and boiling water from a kettle was poured over it until the assembly was submerged. It was left in the water for ten minutes and then removed. When the cable ties were slipped off, the plasticard retained its tubular shape.
The process was repeated to give me two tubes, which were then glued together using liquid poly MEK glue (with the joints on opposing sided of the tube for greater strength). Elastic bands being used to keep the laminations tightly bound together while the solvent did its work.
A similar approach was used to make the spectacle surrounds for the cab. In this case, 3mm wide strips of 2mm thick plasticard were cut out, their length being considerably more than the circumference of the spectacles.
After considerable fiddling, I found the easiest way to coil them was to loosely insert them into a looped cable tie (the same ones I used for the boiler) ..........
... and then slip them over the former (in this case a felt tip marker pen was about the right diameter).
This was then placed in a small bowl and covered with boiling water from a kettle. The spoons were used to keep the whole thing submerged.
Each one was then inserted into the spectacle opening and carefully marked, before being trimmed to the right size. It was then glued into place using liquid poly solvent (MEK) applied with a small paintbrush.
Before priming and painting, any gaps will be filled with filler and smoothed off with fine emery paper. here is the completed loco prior to being painted.
For more information on the complete loco build see - How I constructed a 2-4-2T locomotive based on Southwold Railway Sharp Stewart loco No. 1 - Southwold.


No comments:
Post a Comment