This project has been languishing on a shelf in my workshop for a couple of years, while I tried to figure out what to do with it. I had bought the railcar on eBay but wasn't really happy with the way it had been adapted and motorised. The whole thing sat very high above the track and had a large bogie at the front. While tidying up the workshop, I took it off the shelf and started tinkering. Unfortunately, I didn't take any photos at the beginning as I had no idea whether it would work out, and so we pick up the story after I had solved the problem of how to install the motor and replace the bogie so the body was now much more realistically closer to the rails.
The front wheels were supplied from an old pony truck which I picked-up in a bits-box at the Llanfair Show. At the time, I had no plan for its use but thought that one day it might come in handy.
The rear motorised wheels were mounted on the axle of a cheap gearbox motor, which can be bought from Rapid Electronics among other places.
The motor was replaced with a smaller 6v motor and attached to a bracket made from aluminium sheet ...
..... with a couple of M4 screws and nuts.
This was then attached to the rear of the car body with a couple of M2 bolts
In the meantime, you may have noticed that the car body had been given a couple of coats of Satin Black from a Halfords aerosol rattle can.
The rear wheel arches had also been shaped by drilling holes in an arc ....
.... and filing the arch smooth.
A miniature single pole two way slide switch was attached beneath the footwell .....
.... with a couple of M2 screws and nuts.
A DC power socket was wired-up and attached to a piece of 1.5mm black plasticard .....
.... which was then glued beneath the car body.
Two 14500 (AA sized) li-ion batteries with solder tags were acquired from Ecolux ......
.... and a 2S li-ion battery protection board was bought on eBay, .....
...... together with a 3 pole JST connector.
These were wired-up and strung beneath the car body using some cable ties to secure them.
A Deltang Rx60 receiver/controller was also wired into the system and connected to the motor ....
.... together with a couple of surface-mount pre-wired warm white LEDs (also from eBay), which were glued into the headlamp casings.
I followed my usual wiring set-up, though I decided to wire the LEDs directly to the on/off switch rather than through the Rx60 as I didn't feel there was any need to have the headlamps switchable. They also provide an indicator as to whether the power is on.
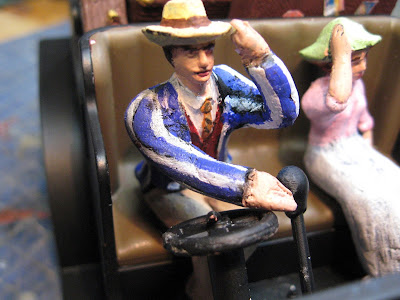
A brake wheel and column from Cambrian Models was used as a steering wheel, with a piece of bent copper wire in its centre to represent a hand throttle. The gearstick was a piece of plastic from my bits-box.
I checked my box of seated figures to see if I had something suitable, but none seemed to be appropriate, so I raided my box of cheap Chinese figures and found a couple which I thought could be adapted to give poses which could suit their intended location.
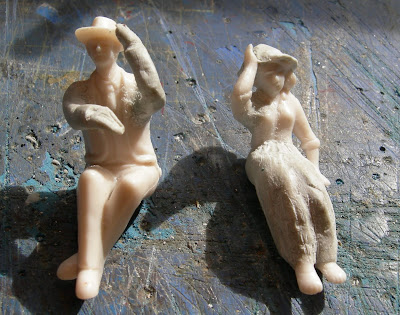
The female figure had her right arm excised and glued back in a position which I hoped would make her appear to be holding on to her hat.
The male figure had both arms removed......
.... and replaced with a wire armature.
Both figures then had Milliput applied to fill the gaps, give the male figure a new pair of arms and the female figure a skirt and hat.
They were then painted and glued to the front seat, ......
..... and the seat slotted back into the car to hide the Rx60.
Some luggage was printed out on the 3D printer and painted .......
The travel stickers were downloaded from the web, printed out and stuck to the cases.
The trunk was hollowed-out ........
...... so that it could be placed on the back seat and hide with motor, with the other cases wedged in to hide the fact there is no floor at the rear of the car.
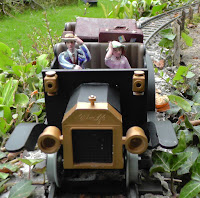
The car was then finished and ready for action.
I had already given it a few test-runs on my new test track in the workshop (see How I made a test track), so I knew it would work.
I did need to weight down the front of the car with a small amount of lead under the bonnet (hood) as the front wheels had a tendency to lift off the rails when going through pointwork.
But she seems to canter along at a reasonable pace. I just need to decide whether to add some sort of sound system .... if I can find space!
I have decided that the female figure will be one of the daughters of Lord Tollemache (from Peckforton Castle) and so the car depicts the Hon Frances Tollemache using the car to return in style from one of her foreign holidays with her new beau.
This vehicle is just a little whimsy which I felt might add a bit of interest to running sessions. In my hypothetical history of the Peckforton Light Railway, Lord Tollemache is a great supporter of and benefactor to the railway and so I can argue that he and his offspring would earn the right to run their own forms of transport on the line in between timetabled services.
The car runs remarkably smoothly given it has only a cheap mechanism. It doesn't have much pulling power, but then it doesn't need to.
Postscript
I have since discovered that the donor vehicle is a Sylvanian Figures Vintage Wedding car. Although no longer manufactured, it is possible to find them on eBay.


No comments:
Post a Comment