The genesis of a garden railway
This Blog describes the ongoing development of a G scale garden railway which has so far taken around five years to plan and prepare for the coming of the railway.
I have always wanted to build a garden railway since I first became interested in railway modelling (c1960). My dad was not best pleased when the Triang train set he bought for me ended up rusting in the garden! (see Railway Modelling and Me)
When eventually I had the funds and some stability, I started by buying an LGB starter set (two four wheeled coaches, a 0-4-0 Stainz loco and a circle of track). Four years later, a file full of tentative plans, several books, magazines and visits to numerous websites later, a plan was drawn up. (see Where did I get my ideas from? and Planning the Railway)
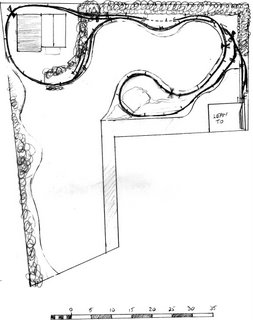
 We have an awkward L-shaped garden bordering a belt of trees and facing north. Several designs for the completed layout had been considered but eventually a looped figure-of-eight was chosen as it seemed to make the most of the available space.
After living for around twenty years with a very uninteresting design of garden the decision was made to re-model. Over the years, saplings had grown into large, awkwardly placed trees. These were 'removed' by a qualified tree surgeon - a tree fella!
Next came marking-out of the intended track-bed and flower-beds. This was done with a series of posts at around one metre intervals positioned using a spirit level to get some idea as to which soil needed to be moved from where to where.
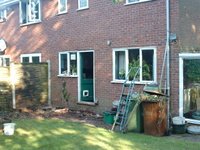
Before the landscaping of the garden could be started, a lean-to was constructed on the back of the house. This was intended to act as both a wellie store and also a safe haven for the trains when not in use. (see How I made some stock boxes)
After searching the pages of the local free ads paper some second-hand double-glazed windows were purchased; these dictated the size and shape of the lean-to. A few websites were visited to find out how to lay bricks. In the end I 'cheated' by buying a 'Bricky Tool' - a simple gadget which helped ensure the bricks were laid neatly.
 Construction of the lean-to was completed during the "Summer" of 2004 - which was one of the wettest in the North West of England since records began.
Maybe not the most elegant of structures - but it is functional! If you click on the photo of the lean-to you will see the 'portal' for the railway on the left of the front wall. A cat-flap was installed in this for times when it was not being used by the railway.

With the lean-to completed work could at last start on the landscaping.
In place of two clapped-out sheds and trailer-tent store, a new shed was constructed together with a new shelter for the trailer-tent.
Then, around three tonnes of soil was dug out and wheel-barrowed from one end of the garden to the other. My researches had shown that garden railways are better if they are mounted above ground level. The reasoning is that it involves less stooping (something worth considering as I totter into old age), the trains are easier to see, and maintenance is a lot less arduous. So, using the purpose-built 'train'flap' into the lean-to as the datum (see above - at the left-most end), the flower-beds were built up and the lawn area was lowered.
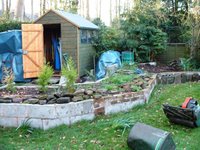 The edges to the raised beds were made using breeze-blocks. A foundation trench about a foot deep was dug and half-filled with rubble, stones, gravel, broken bricks and all sorts of detritus which was dug up from the garden. It seems that when the house was built twenty odd years ago, the garden was a dumping ground for all sorts of builders' rubbish - over 50 usable bricks were rescued
  in this way. The breeze-block walls were clad with chunks local sandstone which can be cleaved into thin slabs using a cold chisel and hammer. To help the sandstone adhere to the blocks, generous amounts of PVA were added to the mortar mix. (see How I constructed the raised beds)
[Update June 2009: So far only two pieces of sandstone have fallen off - I think this was because the concrete mix was allowed to dry out too much - I did it on a sunny day - we do have them in this part of the country!]
Once the raise beds had been constructed the trackbed was laid. Two 3' x 2' paving slabs mounted on brick based were used as the foundation for the main terminus station. It is certainly solid and secure (with storage beneath) but quickly blunts masonry drills! I decided to use breeze blocks for the trackbed. First, I had around a dozen left over after building the lean-to and the raised beds, secondly, they are easy to position and, if ever I change my plans, re-position. Thirdly, they are about the right width and lastly, they are easy to drill into for taking rawlplugs to fix the track. I had decided to use Tenmille and LGB flexible track which, unlike pre-formed track, needs to b e fixed down securely as, once curved, it likes to try straightening itself out again. Hence, the track-bed needed to be solid. (see How I laid the track)
By Autumn 2005, most of the landscaping had been done and the first foundations for the track were in place (see picture).
Go to Progress Report 1 >>
This Blog describes the ongoing development of a G scale garden railway which has so far taken around five years to plan and prepare for the coming of the railway.

I have always wanted to build a garden railway since I first became interested in railway modelling (c1960). My dad was not best pleased when the Triang train set he bought for me ended up rusting in the garden! (see Railway Modelling and Me)
When eventually I had the funds and some stability, I started by buying an LGB starter set (two four wheeled coaches, a 0-4-0 Stainz loco and a circle of track). Four years later, a file full of tentative plans, several books, magazines and visits to numerous websites later, a plan was drawn up. (see Where did I get my ideas from? and Planning the Railway)
 We have an awkward L-shaped garden bordering a belt of trees and facing north. Several designs for the completed layout had been considered but eventually a looped figure-of-eight was chosen as it seemed to make the most of the available space.
After living for around twenty years with a very uninteresting design of garden the decision was made to re-model. Over the years, saplings had grown into large, awkwardly placed trees. These were 'removed' by a qualified tree surgeon - a tree fella!
Next came marking-out of the intended track-bed and flower-beds. This was done with a series of posts at around one metre intervals positioned using a spirit level to get some idea as to which soil needed to be moved from where to where.
Before the landscaping of the garden could be started, a lean-to was constructed on the back of the house. This was intended to act as both a wellie store and also a safe haven for the trains when not in use. (see How I made some stock boxes)
After searching the pages of the local free ads paper some second-hand double-glazed windows were purchased; these dictated the size and shape of the lean-to. A few websites were visited to find out how to lay bricks. In the end I 'cheated' by buying a 'Bricky Tool' - a simple gadget which helped ensure the bricks were laid neatly.
 Construction of the lean-to was completed during the "Summer" of 2004 - which was one of the wettest in the North West of England since records began.
Maybe not the most elegant of structures - but it is functional! If you click on the photo of the lean-to you will see the 'portal' for the railway on the left of the front wall. A cat-flap was installed in this for times when it was not being used by the railway.

With the lean-to completed work could at last start on the landscaping.
In place of two clapped-out sheds and trailer-tent store, a new shed was constructed together with a new shelter for the trailer-tent.
Then, around three tonnes of soil was dug out and wheel-barrowed from one end of the garden to the other. My researches had shown that garden railways are better if they are mounted above ground level. The reasoning is that it involves less stooping (something worth considering as I totter into old age), the trains are easier to see, and maintenance is a lot less arduous. So, using the purpose-built 'train'flap' into the lean-to as the datum (see above - at the left-most end), the flower-beds were built up and the lawn area was lowered.
 The edges to the raised beds were made using breeze-blocks. A foundation trench about a foot deep was dug and half-filled with rubble, stones, gravel, broken bricks and all sorts of detritus which was dug up from the garden. It seems that when the house was built twenty odd years ago, the garden was a dumping ground for all sorts of builders' rubbish - over 50 usable bricks were rescued
 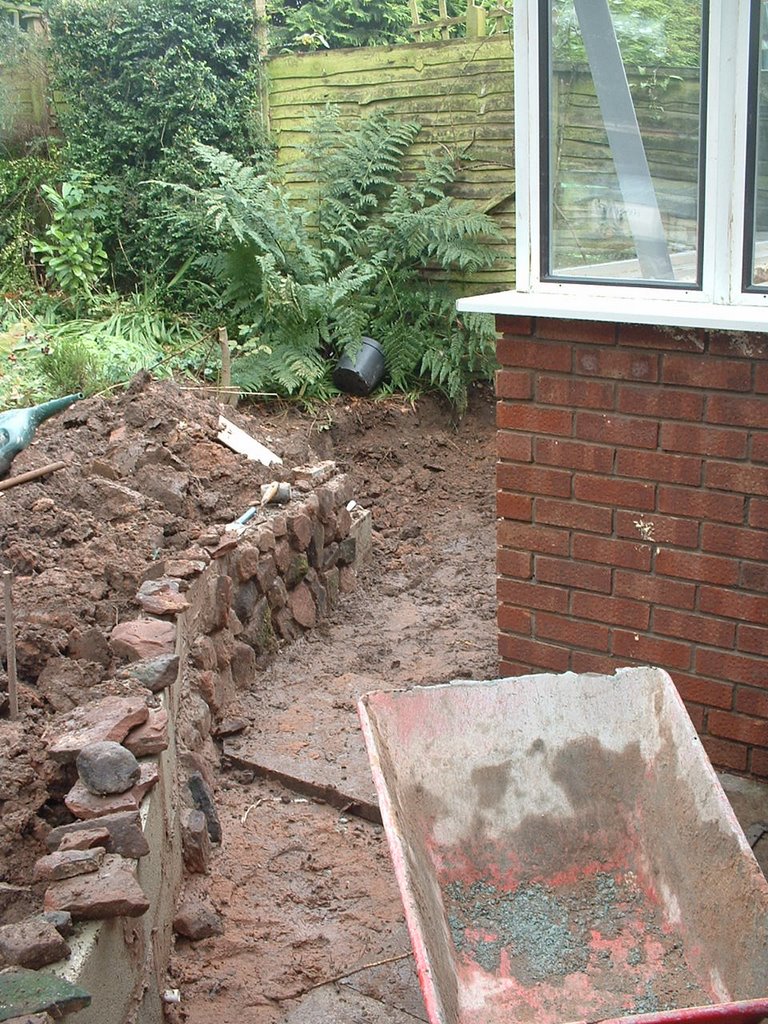 in this way. The breeze-block walls were clad with chunks local sandstone which can be cleaved into thin slabs using a cold chisel and hammer. To help the sandstone adhere to the blocks, generous amounts of PVA were added to the mortar mix. (see How I constructed the raised beds)
[Update June 2009: So far only two pieces of sandstone have fallen off - I think this was because the concrete mix was allowed to dry out too much - I did it on a sunny day - we do have them in this part of the country!]
Once the raise beds had been constructed the trackbed was laid. Two 3' x 2' paving slabs mounted on brick based were used as the foundation for the main terminus station. It is certainly solid and secure (with storage beneath) but quickly blunts masonry drills! I decided to use breeze blocks for the trackbed. First, I had around a dozen left over after building the lean-to and the raised beds, secondly, they are easy to position and, if ever I change my plans, re-position. Thirdly, they are about the right width and lastly, they are easy to drill into for taking rawlplugs to fix the track. I had decided to use Tenmille and LGB flexible track which, unlike pre-formed track, needs to b
 e fixed down securely as, once curved, it likes to try straightening itself out again. Hence, the track-bed needed to be solid. (see How I laid the track)
By Autumn 2005, most of the landscaping had been done and the first foundations for the track were in place (see picture).
Go to Progress Report 1 >>
4 comments:
Boy, it took me a good 10 minutes to find the very first post. Would be a nice touch to add a link to this, so any other nutter who wants to read it all comes along.
Starting to read through all of your blog... mark!
Will be in touch again, once I'm back in the present day.
Hi Frédéric
Now added a link to here from the 'About the Railway' page so hopefully should now be easier to find.
Rik
I must be a nutter. Starting from the begining.
Found your railway on youtube, never really imagined I'd ever consider a garden railway but SWMBO wants a 10 x 5 metre area of our garden remodelling and I saw another, less scenic garden line and as they say 'theres an idea' so I'll read through your blog as a starter.
Cheers, beautiful railway.
Andy
Thanks Andy
I hope your railway comes into fruition soon. Sounds promising to have already got OPP and a plot identified.
Good luck with ploughing through my ramblings. My suggestion is to read the Progress Reports and then follow any links in them to more detailed posts which catch your attention. That way you'll get a feel for how my railway has evolved.
TBH I really ought to read through my posts and update some of them.
Rik
Post a Comment