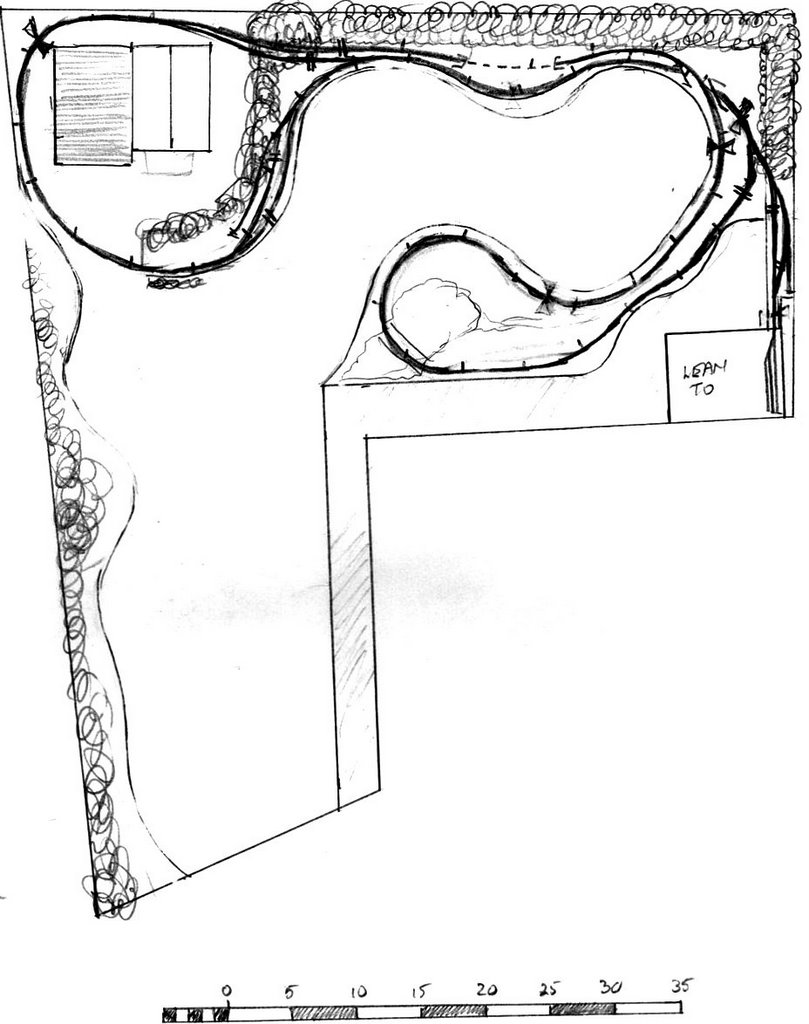
To bridge the gaps required to give access to the patio and the sheds I installed a couple of swinging bridges. Initially these were simply planks with a hinge at one end (see How I bridged the gaps),
........ but over time I improved the appearance of the planks with a girder swing bridge, based on the girder swing bridge at Southwold (See How I constructed a swing bridge from uPVC trim) and a simple viaduct (see How I constructed the viaduct).


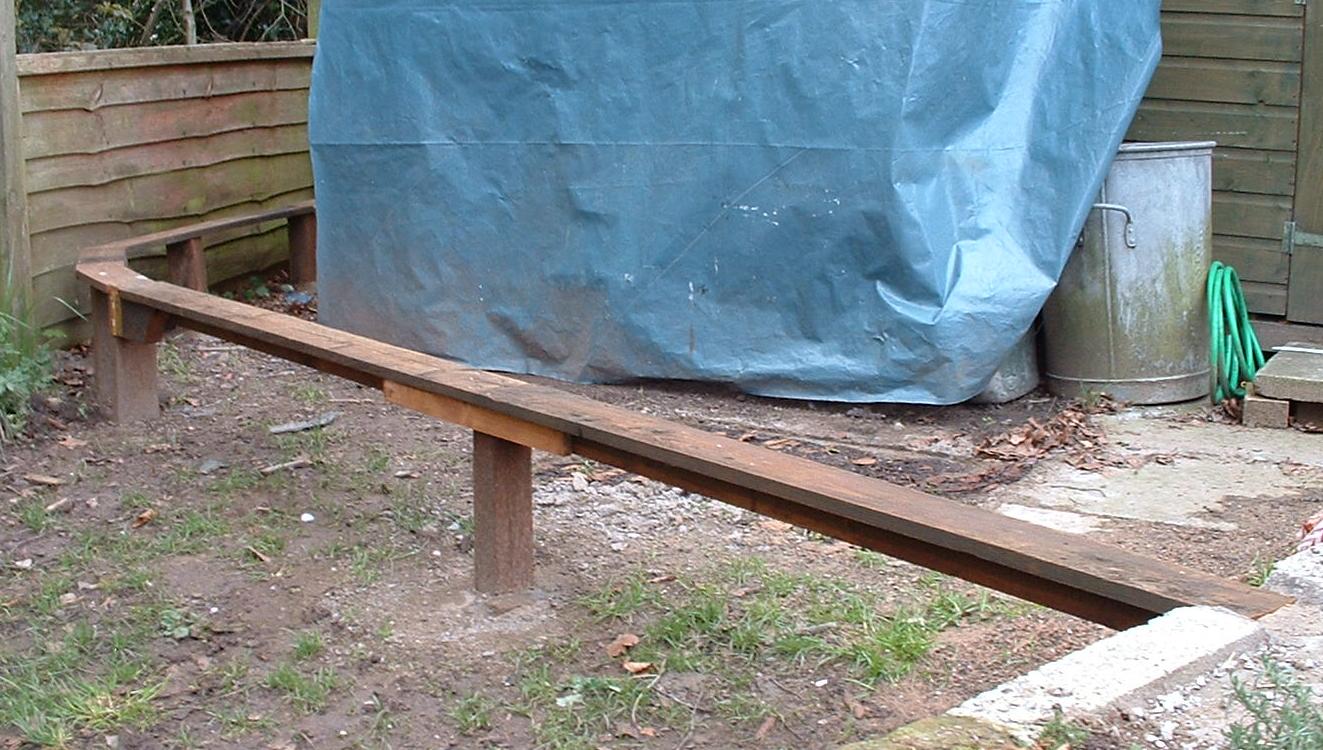
Despite these cosmetic enhancements, I had never paid any attention to the rail-joints between the fixed and swinging lengths of track. Before each running session I would spend ten to fifteen minutes fiddling about with wooden wedges, pieces of lolly stick and chunks of tarpaulin lining-up and securing the rail joints. From time to time during running sessions these would become displaced and various items of rolling stock would become derailed or occasionally crash to the ground. For about a year I had noticed that the wooden post supporting the hinged end of the swing-bridge had rotted through and was no longer providing reliable support and at the start of this season the brass hinges on both bridges finally fell apart - why they put a steel rod through brass hinges never really made much sense to me! Although I could still run stock over the bridges, the amount of tweaking and fettling required and the number of derailments at the rail joints spurred me into action.
 The replacement of the hinges was a relatively easy job, but the replacement of the post at the end of the swing bridge was a more involved process (See Progress Report 46). While I was waiting for the concrete to set I pondered how I might improve the joints between the rails at each end of the bridges. This posting describes the solution I deployed.

The first job was to provide some sort of catch for the swinging end of each bridge. Previously, I had relied solely on end of the bridge slotting into a chiselled groove and the weight of the bridge. Over the years, this system has become loosened by wear and in the case of the long swing bridge, the plank has warped slightly. To more precisely locate and lock the end of the bridge, brass door-bolts were attached to the end of the bridge and a hole was drilled into the facing blockwork to ensure firm and correct alignment.

Once the ends of the bridges had been sorted-out, I turned my attention to the more precise alignment of the rails themselves. Drawing upon several years' accumulated reading of model railway magazines I decided a similar sort of sliding bolt arrangement could be used for each rail - to ensure very precise alignment (I know from experience that a misalignment of even a millimetre or two is enough to deflect some flanges).
My rail-alignment-bolts comprise three components - two pieces of brass tubing and a bent galvanised nail. I would have used brass rod for the bolt but I didn't have any of the right size in stock and my local model shop was closed - so I improvised.

The bass tubes were tinned with solder, using my trusty 75watt soldering iron .....

... as were the ends of each rail.

I then sweated the tubing on to the rail. As the rail is a large conductor of heat I applied the iron firstly to the rail until the solder melted and then quickly replaced the iron with the tubing and applied the heat to the tube, running a fillet of solder between the two for good measure.

Once the two tubes had been successfully soldered into place, it was a simple matter of sliding the bolt into the tubes for pinpoint alignment.

You'll notice that I have also rounded the ends of each rail to help avoid the jolt if the looseness of the bolts causes the rails to slip a fraction of a millimetre out of true. To test the system, I ran my most fastidious rolling stock over the joints at breakneck speed - without mishap (so far).

This simple arrangement takes care of the need for the ends of the rails to be firmly fixed in place. I had tried that previously and in time, no matter which method I tried, the rails somehow became unfixed or the bridge itself moved out of line and so the tracks needed to be re-positioned. I am hoping that this method will prove more reliable

Once I have tested the system a few times I will re-ballast the track to improve its appearance and, to some extent, disguise the unprototypical hardware.

........ but over time I improved the appearance of the planks with a girder swing bridge, based on the girder swing bridge at Southwold (See How I constructed a swing bridge from uPVC trim) and a simple viaduct (see How I constructed the viaduct).


Despite these cosmetic enhancements, I had never paid any attention to the rail-joints between the fixed and swinging lengths of track. Before each running session I would spend ten to fifteen minutes fiddling about with wooden wedges, pieces of lolly stick and chunks of tarpaulin lining-up and securing the rail joints. From time to time during running sessions these would become displaced and various items of rolling stock would become derailed or occasionally crash to the ground. For about a year I had noticed that the wooden post supporting the hinged end of the swing-bridge had rotted through and was no longer providing reliable support and at the start of this season the brass hinges on both bridges finally fell apart - why they put a steel rod through brass hinges never really made much sense to me! Although I could still run stock over the bridges, the amount of tweaking and fettling required and the number of derailments at the rail joints spurred me into action.


The first job was to provide some sort of catch for the swinging end of each bridge. Previously, I had relied solely on end of the bridge slotting into a chiselled groove and the weight of the bridge. Over the years, this system has become loosened by wear and in the case of the long swing bridge, the plank has warped slightly. To more precisely locate and lock the end of the bridge, brass door-bolts were attached to the end of the bridge and a hole was drilled into the facing blockwork to ensure firm and correct alignment.

Once the ends of the bridges had been sorted-out, I turned my attention to the more precise alignment of the rails themselves. Drawing upon several years' accumulated reading of model railway magazines I decided a similar sort of sliding bolt arrangement could be used for each rail - to ensure very precise alignment (I know from experience that a misalignment of even a millimetre or two is enough to deflect some flanges).
My rail-alignment-bolts comprise three components - two pieces of brass tubing and a bent galvanised nail. I would have used brass rod for the bolt but I didn't have any of the right size in stock and my local model shop was closed - so I improvised.

The bass tubes were tinned with solder, using my trusty 75watt soldering iron .....

... as were the ends of each rail.

I then sweated the tubing on to the rail. As the rail is a large conductor of heat I applied the iron firstly to the rail until the solder melted and then quickly replaced the iron with the tubing and applied the heat to the tube, running a fillet of solder between the two for good measure.

Once the two tubes had been successfully soldered into place, it was a simple matter of sliding the bolt into the tubes for pinpoint alignment.

You'll notice that I have also rounded the ends of each rail to help avoid the jolt if the looseness of the bolts causes the rails to slip a fraction of a millimetre out of true. To test the system, I ran my most fastidious rolling stock over the joints at breakneck speed - without mishap (so far).

This simple arrangement takes care of the need for the ends of the rails to be firmly fixed in place. I had tried that previously and in time, no matter which method I tried, the rails somehow became unfixed or the bridge itself moved out of line and so the tracks needed to be re-positioned. I am hoping that this method will prove more reliable

Once I have tested the system a few times I will re-ballast the track to improve its appearance and, to some extent, disguise the unprototypical hardware.