Showing posts with label detailing. Show all posts

Saturday, June 24, 2023

Progress Report 97

This is an interesting time of year for Peckforton Light Railway. As the days grew longer, things started gearing up in preparation for the first full running session of the season. However, this was very much dependent on the weather. To set up the first full running session I really need to have a guarantee of three consecutive rain free days: half a day to clear the track and set up the buildings and other lineside accoutrements, half a day to deploy and check the rolling stock, half a day to prepare the running schedule and then a day and a half to run a full operating session. In actuality, I sometimes need four full days as a fair bit of time is taken up with caring for my 102 year old mother in the meantime, so I can't rely on having interrupted days for running trains.

However, running stock has been constructed, running sessions have been completed, visitors have been catered for, videos uploaded and some outdoor jobs completed.


Rolling stock

Hunslet - Hughie

Ever since I started with my garden railway, I have been intrigued by the 16mm scale card models produced by LocoLines - now produced by Rail-Road. After seeing an article in Garden Rail detailing how a modeller makes all his 16mm stock from card, I decided to give one of the Rail-Road card kits a try. In my previous Progress Report, I outlined construction of the basic kit - but since then I have enhanced the kit with a decent motor block, a new chimney, backhead detail, new springs and sandboxes and handrails and pipework.

The additional 3D printed detailing parts are available as free downloads on the Thingiverse.com website (registration required) and the GardenRails.org forum (registration required)

For more information see How I assembled a Rail-Road card kit

I am now in the process of producing a 3D printed version of a similar loco and am trying to decide whether to replace the card version or complement it.


GVT Glyn motor block

In my previous progress report I described how I had constructed a 3D printed model of a Glyn Valley Tramway Beyer Peacock tram loco. I was disappointed with the performance of the Bachmann motor block I had used to power it .....

..... and so designed and 3D printed a replacement using an MFA Como gearbox motor.


However, I was also disappointed with this motor block's performance and so have now designed and 3D printed a second replacement using a larger and more powerful gearbox motor.
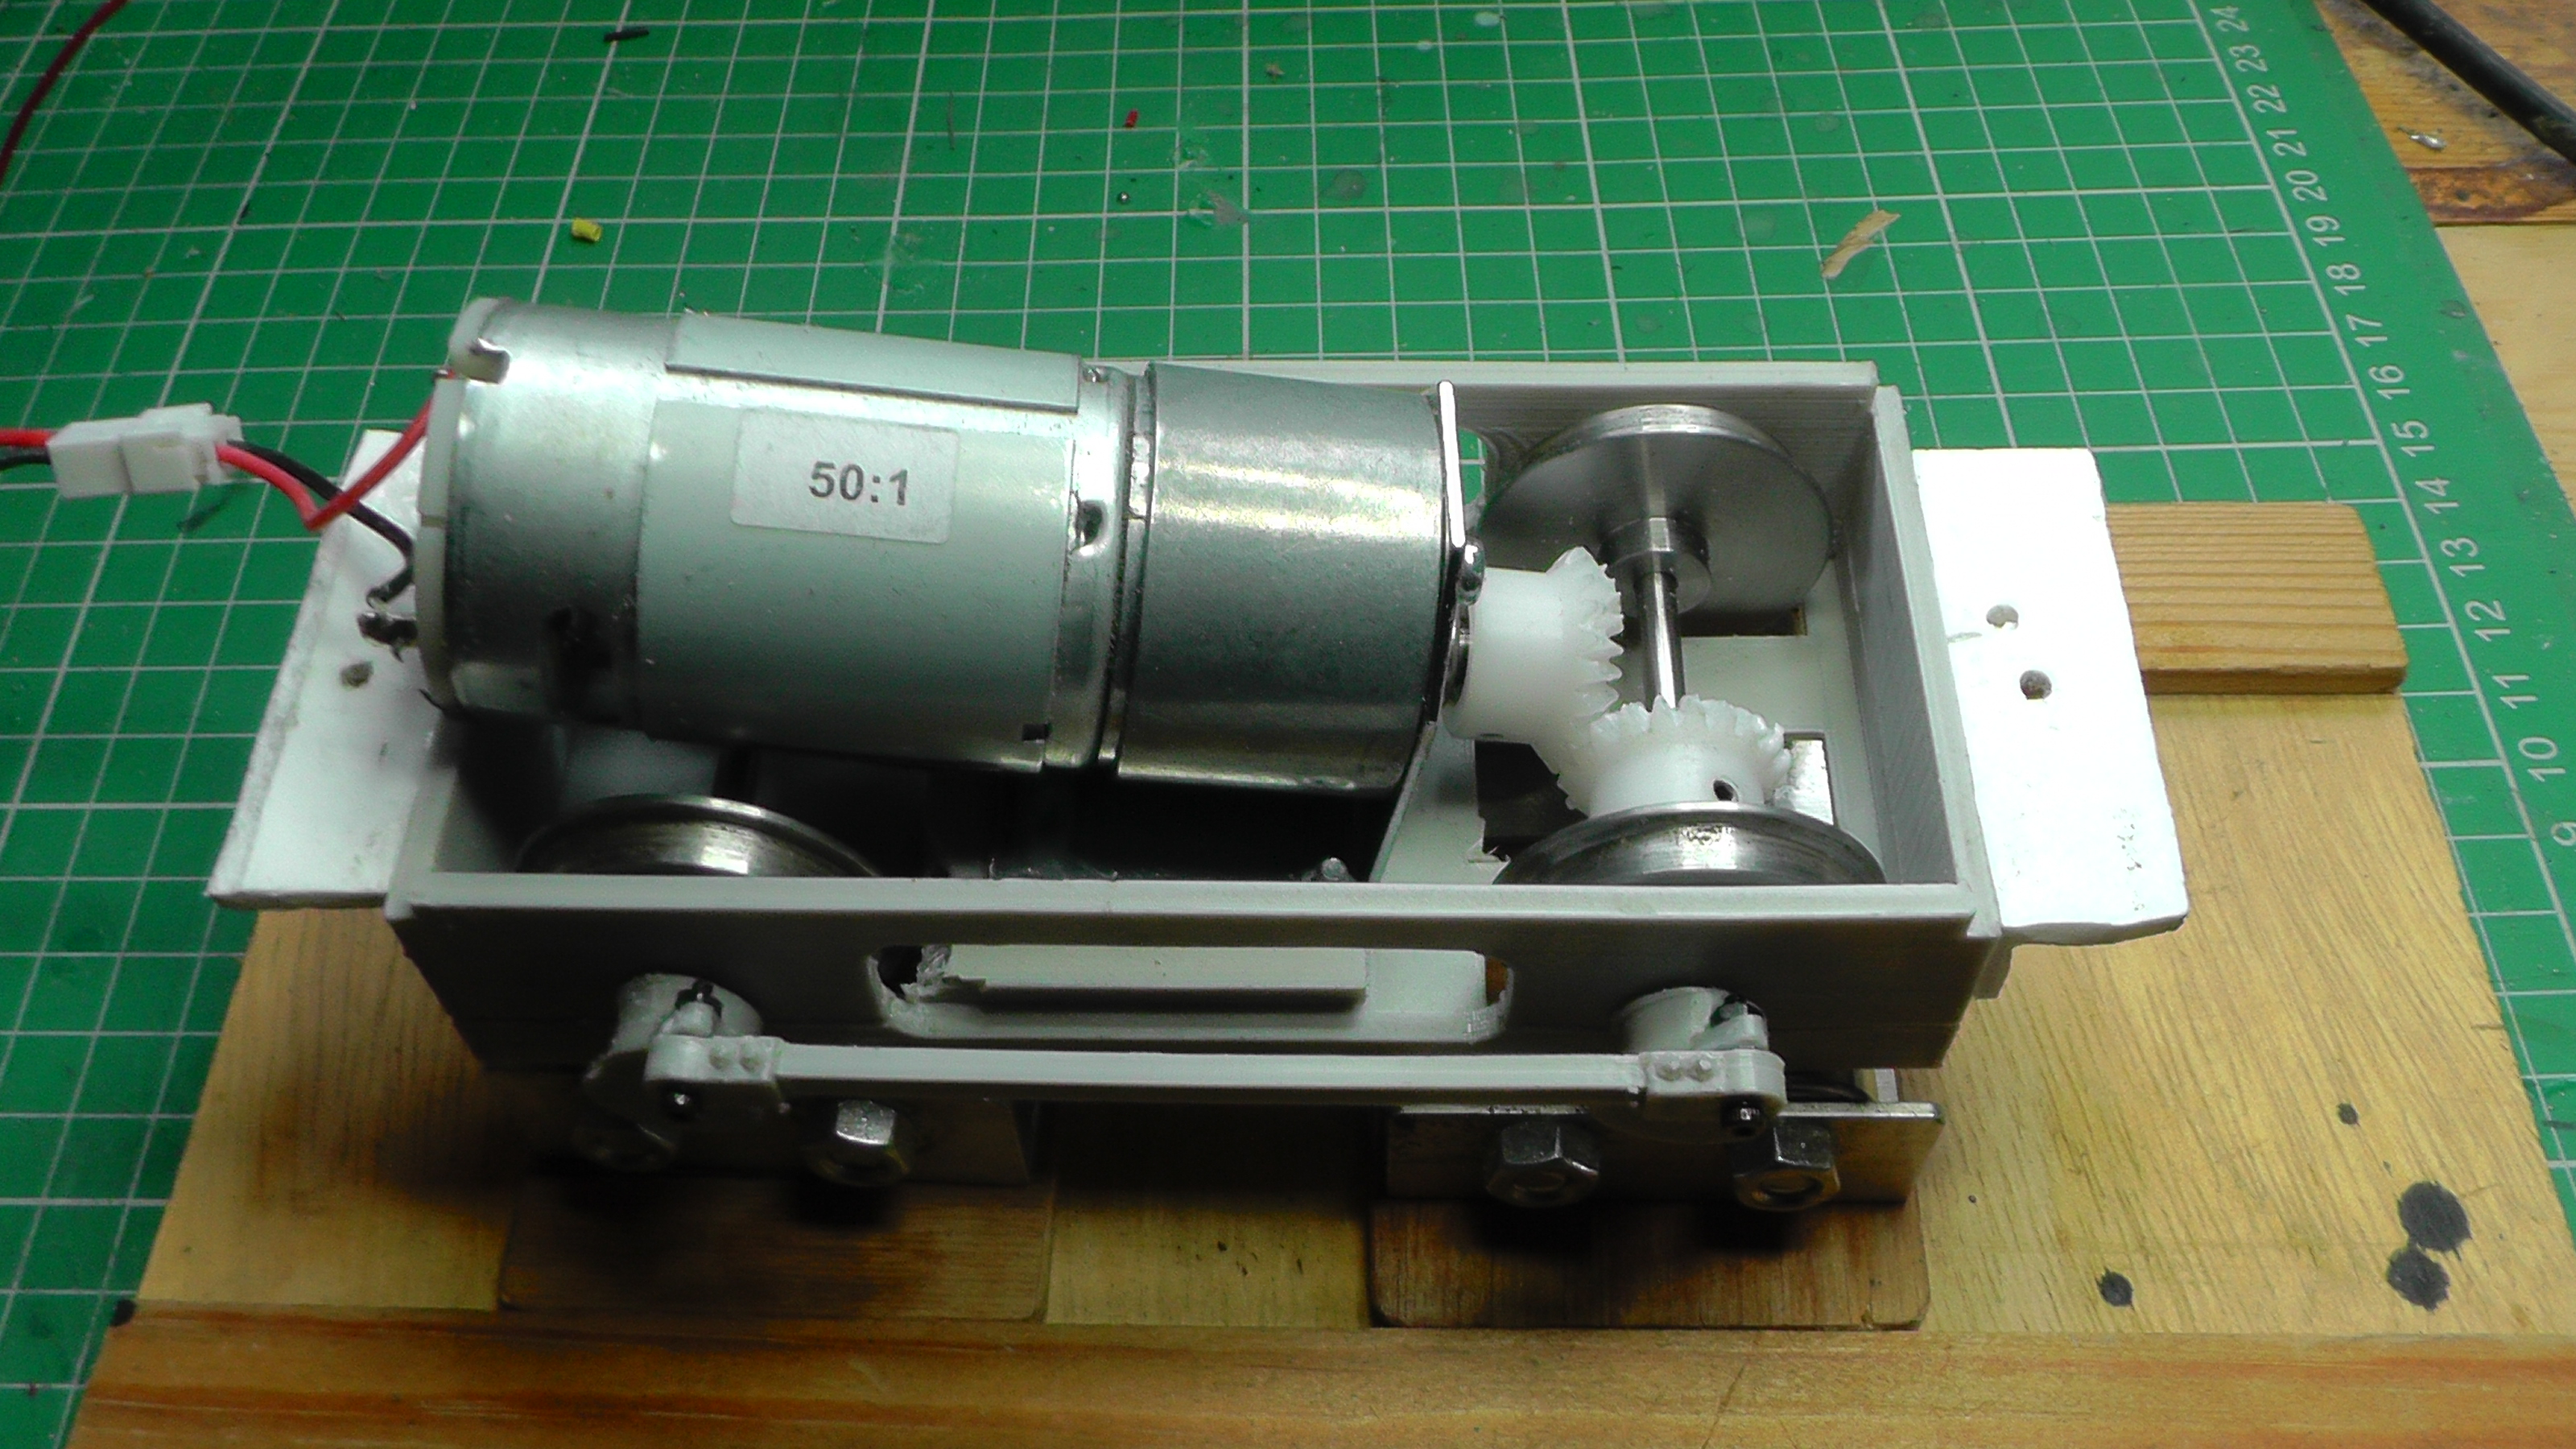

This has much better performance.


For more information, see How I created my own motor blocks (pending)


Directors' Saloon

This has been on my To-do list for many years but, having now completed the gatehouse for Peckforton Castle (see below), I felt it was time to make this plan a reality. The saloon is based on one of the various designs of Glyn Valley Tramway four-wheeled coaches (see How I constructed a GVT coach).


For more information see How I designed, printed and constructed a Directors' Saloon


Permanent Way and Infrastructure

Sand Quarry Extension

The siding for the sand quarry installed in 2018 (see Progress Report 75), was always slightly short - primarily because the space for it was quite tight.

I toyed with a few ideas for extending it, but eventually opted to turn the siding through 90 degrees and turn it into a link back to the mainline just outside Peckforton station. This provided an opportunity for me to designate this new junction as a siding to serve Peckforton Castle (bottom left on this plan).

The extension has now been constructed and its track tested and ballasted.


For more information see How I built the sand quarry extension


Lineside

Peckforton Castle Gatehouse

With the completion of the sand quarry extension and its incorporated junction for Peckforton Castle, I decided the entrance to this new siding needed to be recognised with a new structure. The resultant gatehouse was based on the gatehouse for real vehicular entrance to the castle.

My model was carved from four Thermalite blocks.


Operation

Operating sessions

As indicated above, my first operating session of the year has been delayed slightly by a range of conflicting factors. However, one full session has been run plus a couple of smaller scale partial operating sessions


Visitors

In addition, the railway has hosted a visitation by Zach Bond and his mate Theo who spent an afternoon (and evening) running live steam and a range of other scheduled and unscheduled train services.


Freight management Mk V

Over the years, I have produced four versions of my computerised freight management system:

They have each had their strengths and weaknesses. My favoured version (Mk III) was that which ran on my Psion 3a pocket computer but it's limitation was the 1Mb of RAM provided by the Psion - it would sometimes run out of memory half way through a running session.

So, I acquired a Psion Series 5 with a staggering (for 1997) 8Mb of RAM. However, because it's difficult to interlink Psions with modern computers, I had to hand type the code, copying it line by line from my old 3a to the Series 5. Some amendments needed to be made to the coding to take account of differences in the two machines' LCD displays and also some variations in the way the coding is handled but, after some cerebral effort and hard graft I now have a working version of the software on the Series 5


More figure scanning

Following Dean's (from DesignScanPrint3d) previous visit to 3D scan members of our local dramatic society in 1930s and 1940s costume - see Progress Report 95  


he paid us another visit to scan more figures, this time with more specific poses. I have now received the first batch of figures from him.


As you can see, these figures are more engaged in activities, rather than static poses. There will also be some seated figures to become passengers in my rake of recently finished GVT coaches (see Progress Report 95)


Other developments

Year long video

I am steadily working my way through my schedule to record the next monthly instalment of the Year Long Journey videos - depicting a mixed train travelling Down and back up the line in twelve monthly stages. 

June's Down sequence sees the train arriving at Peckforton and having some wagons shunted off and on by Doris, the timber yard's shunter.

While the Up shot is of the train passing the water mill on the approach to Peckforton.


By September the train will have completed its two journeys and I will be able to compile the two videos.


3D printer repairs

3D printers require a certain amount of nurturing to keep functioning successfully. My budget (£70) Anet A8 printer developed a fault which required the replacement of the heated bed.

Sometimes, it takes longer to track down the source of the fault than it does to repair it.

So, all in all, it has been quite a productive period since my last progress report. Despite not having had time to engage in more than one operating session, there have been plenty of other jobs to keep me actively involved. As the summer progresses, I aim to run quite a few more trains.


<< Previous Progress Report         -      Next Progress Report >>

Wednesday, May 01, 2019

How I detailed the coal yard at Beeston Castle

After making some coal bins / staithes from foamboard (see How I made some coal bins), I was faced
with the prospect of installing them at the stations on the Peckforton Light Railway. Whilst there was very little space at Bickerton, Bulkeley and Peckforton for any detailing beyond the bins themselves, .......

The bins at Peckforton Station
.... there was more scope for additional features to be added at the recently created goods yard at Beeston Castle (see Progress Report 74). I have already documented the development of the coal yard at Beeston Market station (see How I made some coal bins and Detailing the approach to the station and Progress Report 59).

Having created a small amount of additional space at Beeston Castle .....

 ...... I set about making a simple coal office (basically a shed) and added a few additional details such as a set of coal scales and other associated clutter.

The coal merchant's office

The structure for the office was mostly made from one A3 sheet of 3mm thick PVC foamboard purchased online from Simply Plastics. I needed an extra piece of 3mm foamboard to finish off the roof - which came from my stock of off-cuts.

The dimensions for the office were - sides = 192mm x 96mm; ends = 160mm x 96mm (128m to peak of gable); the roof panels were 200mm x 95mm. The door was 40mm x 102mm and the window in the centre of one side was 64mm x 40mm. Horizontal planking was marked at 6mm intervals along the sides and ends, with vertical planks on the door at 5mm intervals.

The horizontal plank divisions were then scored ......

.... with a flat bladed screwdriver .....

......... and weatherboarding simulated by dragging the 6mm wide blade of a screwdriver along the scribed lines at an angle.

 Wood grain was represented by dragging the teeth of a razor saw along each plank.

 a 3mm wide strip was left at each corner of the end pieces. This was given vertical wood grain with the teeth of the razor saw.

The window frame was made from 2mm x 2mm strips of plasticard (cut from a 2mm thick piece of plasticard) glued in place with thick superglue (I use VitalBond, available in 50g bottles from eBay).

The walls and roof of the office were then glued together with thick superglue. The ends butting on to the sides to give a 3mm square pillar in each corner. 8mm wide eaves were glued to the gable ends, using 1.5mm thick plasticard. A 3mm wide sill was glued beneath the window and a 3mm wide rainstrip was glued above the door. These were cut from a 2mm thick piece of plasticard. The structure was then given a coat of red oxide primer and left to dry.

 The interior

Although it will hardly be visible, I decided to add some interior detailing. A base for the office was cut from a piece of 2mm thick plasticard to fit snugly inside the building. At the midpoint, the base for the counter was made from 2mm thick plasticard. This was 40mm high and 35mm wide.

The counter top was then glued on to stretch across the width of the office (assuming there would be a lift-up flap at the end).

A 15mm deep bookshelf was made to fit across the back of the office, with shelves at 20mm intervals.

 Stacks of box-files for the shelves were made from 16mm x 8mm pieces of 5mm and 3mm thick foamboard. These were glued together in stacks with superglue.

The drawers for a desk were scored on to a 35mm x 20mm piece of 2mm thick plasticard. Drawer handles were made from mapping pins superglued into holes drilled into the centre of each drawer, the shank of the pin then being snipped off at the back.

 The structure for the desk was then made from pieces of 2mm thick plasticard, to fit into the space between the counter and the bookcase.


A chair was made from scraps of 2mm thick plasticard (1.5mm thick for the seat and backrests). The rear legs were 48mm x 3mm (with a 3mm indent in the middle) and the from legs 24mm x 3mm.The seat was 20mm x 20mm.

The rear legs were glued to the seat first with solvent adhesive. The backrest and lower strut were then glued into place.

The struts linking the rear and front legs were then glued .....

...... and then the front legs glued on.

It was then left for the glue to harden.

The interior was then given a coat of red oxide primer. Note, the underside of the base was also given a coat of primer to help prevent it from warping.

The floor and furniture was painted with varying shades of brown acrylics and the box files were painted with acrylics in various appropriate colours and white labels painted on. The log book was made from a square of 2mm thick plasticard, glued to a square of 0.5mm thick black plasticard.

 A seated figure was painted and glued to the chair which was then glued in front of the desk.

The outside of the office was given a coat of green acrylic paint and the roof painted mid-grey. The window and eaves were painted cream.

 The intended site for the office and coal bins was cast in concrete and, while the concrete was still in its 'green' state, a depression for the structures was hollowed out with a trowel.

A piece of Corriflute (also called Correx) was cut to fit the site ......

..... and given a coat of red oxide primer on both sides.

The office and some large barrels (of paraffin and fuel oils) was then glued to the corriflute.

The site was then sprinkled with coarse sand and sieved potting grit, before being soaked in SBR adhesive. Once this had set (after a couple of days), the site was flooded with a wash of black and brown cement dyes to tone down the 'newness' of the ground cover


Various other details were then added:
  • A nameboard for the roof of the office (created in Word and then printed out on Vinyl Sticker paper in an inkjet printer)
  • Resin cast coal sacks (bought on eBay)
  • A coal merchant figure (originally bought from Back2Bay6 before Steve Warrington's sad and untimely death)
  • A set of coal scales (see How I made a set of coal scales)
  • A gate (made from plasticard) 
  • A wagon crossing (made from some 5mm PVC foamboard)

The name for the coal merchant (William France) was taken from the 1911 census returns for Beeston. William's father was the coal merchant in 1911 and his son (then aged 21) was his assistant. I have assumed William will have continued the business in 1932, provided he was fortunate enough to survive World War I.


I will leave the office etc. out over the summer but will bring it in during the winter months). I have no concerns about the durability of PVC foamboard and its ability to withstand the weather, but I do not want to have to repaint the building each year.

The detailing at Beeston Castle station is now more or less complete. The brewery building has been added to the other siding (see How I constructed the brewery - pending) and the castle ruins have been upgraded (see How I constructed Beeston Castle). The cattle dock was moved from the old siding and repositioned in the new siding (see How I cast some loading docks). Whereas, previously, goods traffic to and from Beeston Castle was minimal (the siding could hold only three wagons), it will now feature more prominently in daily freight movements. The weightings for wagons in my home-grown computerised freight management program has been modified to ensure the level of traffic will increase. I look forward to shunting stock in and out of the sidings and such movements will no doubt feature in my next video.

I am gradually adding more detailing such as this to my railway - but with five stations and station yards to contend with, it is a slow and steady process. However, it is also very enjoyable to see each station gradually become more alive.