Showing posts with label painting figures. Show all posts

Wednesday, February 19, 2020

How I assembled and painted some whitemetal Perfect People figures

Over the years, I have acquired and deployed around a dozen whitemetal figures on my railway. Most Perfect People, which are now distributed by Trenarren Models.
of them are

I like the Perfect People range. The figures are mostly in keeping with the period in which my railway is set - ie early 1930s and the poses and quality of the figures is good. The only disadvantage is that some of the figures require a small amount of assembly - usually arms, legs and occasionally heads.

Having recently painted a batch of figures (see Progress Report 78), I discovered I had three Perfect People railway personnel tucked away which were in need of attention.

Previously, I have attached limbs to whitemetal figures with two-part epoxy adhesive, but have found it difficult to get a reliable bond. I decided that these figures would be soldered.

I acquired some 70 degree low melt solder from Eileen's Emporium .......

..... having already bought some flux paste from my local DIY store.


The first job was to clean up the mouldings to remove mould ridges and any other unwanted blemishes. This was achieved with a couple of needle files. The surfaces which needed to be joined were also cleaned up to remove any oxidised coating and also to help ensure they were flat or flush.

I then selected the first limb to be attached and drilled a 2mm diameter hole through it, at right angles to the surface which was going to be joined.

After positioning the limb where it was intended to be on the figure's torso, I then drilled through the existing hole and into the torso - to ensure the new hole was in the right place and at the right angle


A short length of 2mm brass or copper rod was then put into the hole in the torso.

The two surfaces requiring to be joined were then smeared with flux paste.

I use a fairly cheap heat-adjustable soldering station which I purchased on eBay for less than 20UKP.

There is no  temperature readout on my iron so I set it to about 1/3 of its full heat - hot enough to melt the solder but not hot enough to melt the whitemetal.

The limb was threaded on to the brass peg  ......

...... and then a piece of solder and the iron were applied to the joint until the solder melted and flowed into the joint (difficult to photo as two hands are needed for the job).

This process was repeated at other points around the joint until all the gaps had been filled.

It is probably possible to do this more precisely, but I prefer a belt and braces approach figuring that any excess solder can be filed away. Once any excess solder had been filed away, the figures were given a couple of coats of Citadel Chaos Black base coat.

 A Wargaming friend of mine taught me how to paint figures. Although I cannot profess to possess anywhere near his expertise, the principles which he outlined seem to me to be logical and seem to produce good results. The main principle which he instilled in me was to start from dark and work towards light with a series of dry-brush layers.

Dry-brushing involves taking a minimum of paint on to a brush and wiping the brush lightly over the surface of the figure to deposit paint only on the raised details. The amount of paint decreases as more layers are applied.

It's sensible to start with the lowest layers of clothing first. Some Wargamers advocate starting with the flesh colour first as this is clearly the lowest layer. However, arms and hands sometimes lay on top of clothing and so I tend to start with the lowest layer of clothing first, which in the case of these figures is the shirt and/or waistcoat.

The prancing ticket collector was given a light blue shirt his waistcoat was left black and his trousers and hat were painted dark blue.

The guard was similarly painted - his jacket was also painted dark blue.

Very little of the mechanic's shirt was visible but what could be seen was painted light grey and his overalls a mid-blue.

Note that the creases and crevices of the clothing retain the Chaos Black base coat so give the impression of shading.

NOTE: Some acrylic paints are translucent when applied, particularly blues and reds and white so, no matter how many coats you apply, the black base-coat shows through. Adding some white makes them a little more opaque but, of course, that lightens the colour. I have discovered the Pebeo Studio range of acrylics are designed to be opaque when applied and so use their Prussian Blue and Ultramarine, darkened with some black, to get a navy blue for uniforms.

The next stage in the process was to paint the base coat for the areas of flesh. I darkened some basic flesh colour slightly using a small amount of orange and an even smaller amount of blue.

Whilst this was drying off, I next applied the final dry-brush coat of colour for the clothing. This was a much lighter shade of the underlying colour which was applied very lightly so that only the most prominent areas of the clothing were touched with the colour.

 Thus is particularly effective at highlighting (quite literally) the raised areas of clothing to make them stand out.

Quite often, with a flat coat of colour, a lot of finer detailing such as pockets and collars are lost.

I find, the lighter dry-brushed coat brings them out.

At this point, some of the more prominent facial features were painted a lighter shade to bring them to the fore, and then the lips were painted. Unless lipstick has been applied, lips are generally a slightly darker shade of flesh colour. I usually add a very small fleck of blue and a tiny speck of dark red.


Eyes are tricky to get right. I'm not sure I have mastered them yet, but my technique is it paint a tiny dot of black or dark blue with an even smaller dot of white either side.

Finally, other features were painted, such as hair, shoes, buttons, ties, scarves, etc.

 The figures were left for a couple of days for the paints to fully harden off. They were then given a couple of light coats of matt varnish to tone down the brightness of the colours and help to prevent the paint from becoming chipped through handling.


NOTE I now use Windsor and Newton Galeria Matt varnish which is specifically made for acrylic paints

In the past, I have tried various other matt varnishes and found, to my cost, that some react badly with acrylics. The varnish on one set of figures, for example, continuously remained tacky after being sprayed. Eventually, I had to sprinkle them with talcum powder and then apply a coat of Galeria. Not ideal, but easier than repainting the figures.

I cannot profess to having completely mastered the figure painting process. Certainly, when I compare my outcomes to those achieved by my Wargaming mate and his friends, then mine pale into insignificance. However, the quality of the mouldings provided in the Perfect People range of figures does, in my mind, merit a little bit more attention being paid to ensuring those features are brought out.

I am constantly searching for good quality figures. There does not seem to be as many carefully crafted figures available for 1/19 or 1/20.3 scale as there are for Wargamers whose figures tend to be smaller and yet bursting with detail. I have bought some 3D printed figures which are based on scans of actual people and, whilst the quality of the clothing is generally good with beautifully accurate folds and creases, the technology does not yet appear to be sufficiently advanced to produce finer details such as faces and hands. However, technology is developing at such a pace that who knows what might be achievable within the next couple of years!
A 3D printed figure from DesignScanPrint3D

Sunday, May 14, 2017

How I modified some cheap figures for the 1930s.

 Preamble

Having just completed interiors for three of my coaches (see How I made interiors for my coaches), I needed to find some suitable figures to fit inside them. Not many commercially available 1:19 scale figures are appropriate for the 1930s, which is the period when my railway is set. This period was transitional between the distinctive Edwardian and Roaring Twenties styles and the postwar 1950s and so the styles were not particularly noteworthy or memorable. It was just after the Great Depression and so the everyday clothes tended to be less flamboyant and fairly drab looking. Certainly, the local population in my rural Cheshire community would not have epitomised haute couture, though some of the gentry and visitors to my hypothetical spa hotel near Bulkeley might have had the wherewithal to dress more elegantly.

One of the difficulties I found in trying to discover what ordinary folk would have worn at this time is that most websites and books on costume focus on high fashion rather than the everyday. Eventually, I tracked down some old newsreel films from the 1930s  (eg Chertsey General Election Result and Tower Bridge Road Market), which showed a selection of the ordinary people in their normal 'street' clothes.

 From these still images and from reading various bits of information it seems that in the early 1930s, the majority of the population would have worn hats - from the humble cloth cap to the top hat worn by the well-heeled on formal occasions. Ladies' hats seem to be variations on the cloche hat of the 1920s, brimmed hats and the occasional elaborate straw hat. Hemlines of dresses tended to be mid-calf and trousers generally had turn-ups. Men seemed to wear suits, mostly with a waistcoat and workmen might discard their jackets but keep their waistcoats on - even when the sun was beating down. Among these everyday clothes could occasionally be seen a gent in plus fours or a lady with a fur trimmed overcoat.

The figures

Armed with this information, I ordered some cheap plastic figures from China. Although advertised as 1:25 scale, the sizes seemed to vary dependent on which pack was bought. Although my coaches are modelled to a scale of around 1:19, the space between the seats was tight and so I needed figures which were slightly under scale.

Some of the figures were already appropriate for the 1930s, particularly men in suits wearing hats .....

However, the vast majority were unsuitable - for example, female figures wearing leggings, .....

...... and some of the male figures who were definitely wearing clothes out of keeping with the 1930s.

Modifications

Green Stuff

I ordered some lengths of Green Stuff from a well known online auction site. Green Stuff is a two-part epoxy putty ..............

.... which is sold in strips of various lengths. For adapting each figure, a section of the strip was removed (I found scissors ideal) .....

....... and then kneaded between thumb and finger .......

....... until it was a uniform green colour.

Green Stuff has a very fine texture which enables it to be moulded and even rolled to make very thin and fine features.

It is very sticky which means it adheres to even quite oily plastics but will also stick to fingers and to shaping tools while it is being manipulated.

I found that licking my fingers or dipping the tool into a pot of water stopped it from sticking to inappropriate places.

Making hats

By far the most apparent difference between modern and 1930s figures is the absence of hats in the former. In one of the stills from the 1931 election video, I counted only three bare-headed individuals (all men) out of just over one hundred people.

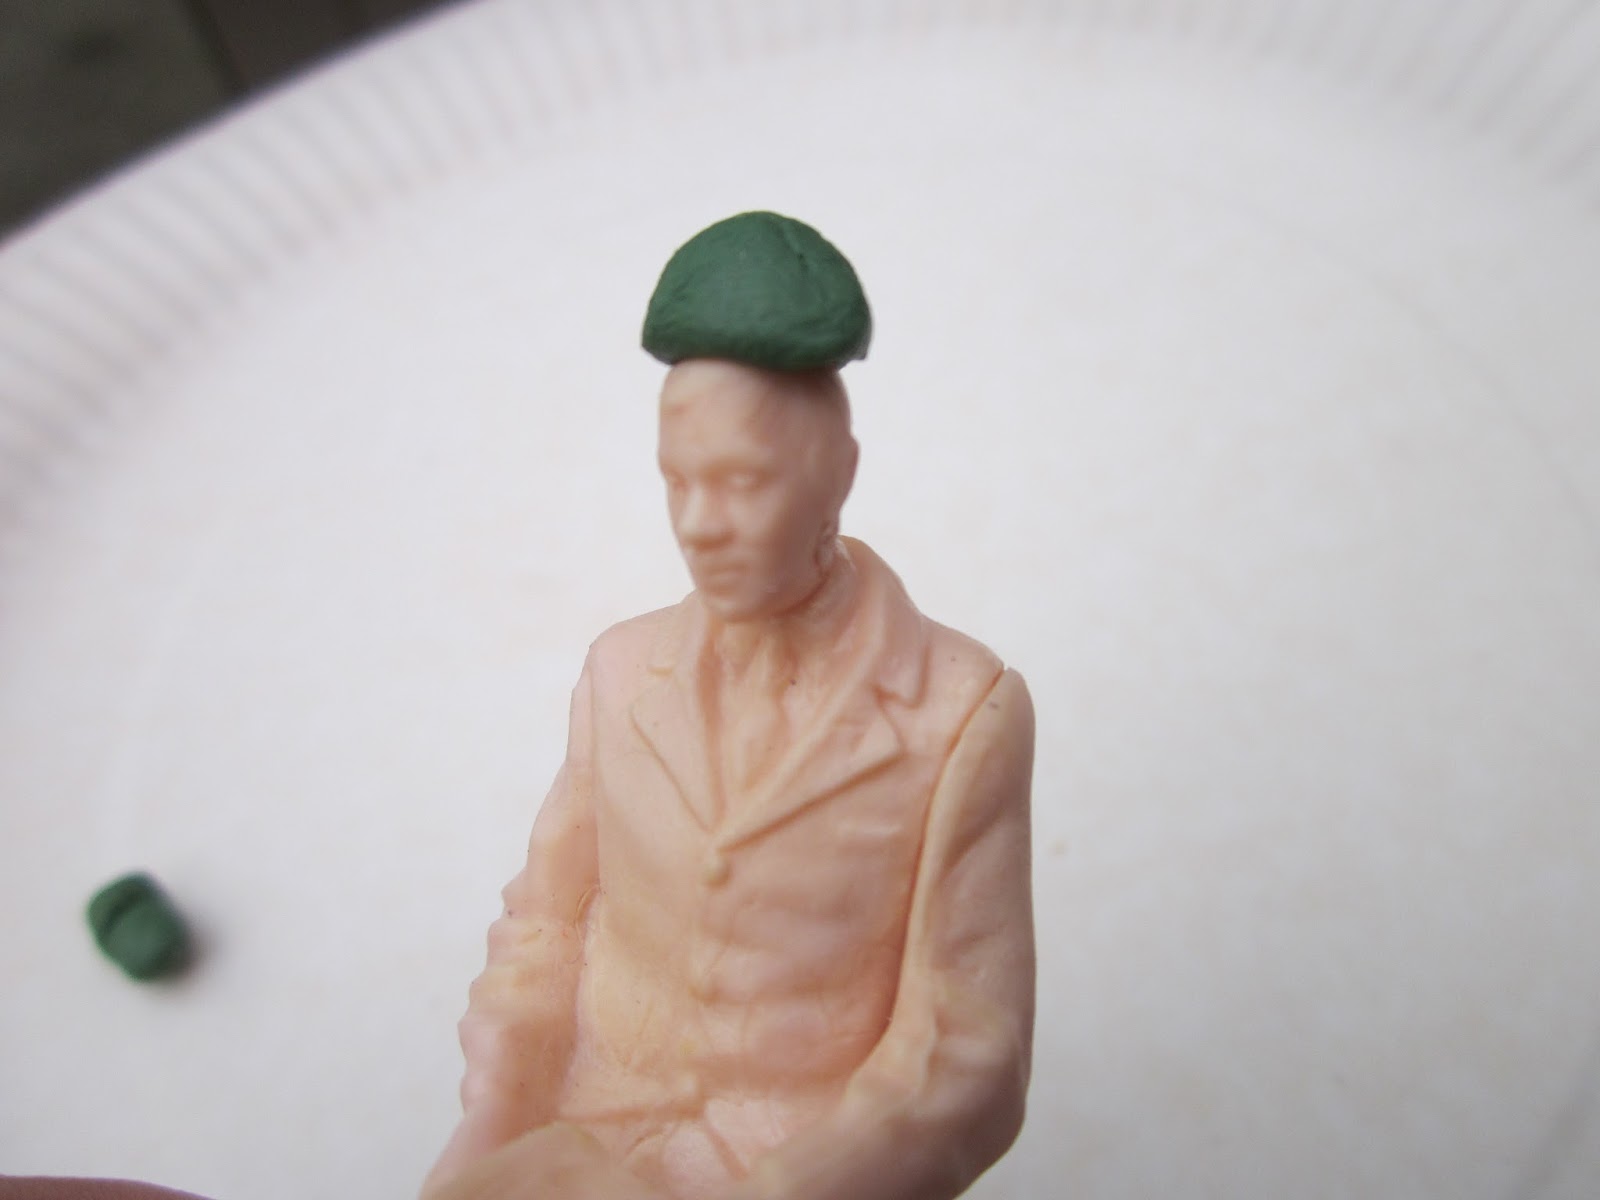
As the majority of male figures in the two batches I received from China were wearing suits, I felt that most of them would be wearing trilby hats, rather than flat caps. After some experimentation, I found the easiest way to make trilbies was firstly to apply a small pea-sized blob on Green Stuff on the figure's head .......

..... and then manipulate this between wetted finger and thumb until I had produced a brim. At this stage it didn't matter how big or regular the brim became as this could be trimmed back later.


Once I was happy with the brim, I applied another pea-sized blob of Green Stuff to the top of the figure's head and squidged it to make sure it adhered well to the existing brim.

I then used a rounded dentist's shaping tool, suitably wetted, to give the crown of the hat some shape.

Sometimes, I had to remove some of the Green Stuff if the crown was looking too large, and then use the shaping tool to make a depression in the crown.

Large-brimmed ladies' hats were made in much the some way, though these were left domed.

Cloche hats were made from just one blob, with the brim being pulled out to a far lesser extent.


Some of the female figures were given knitted woolly hats or berets .....

 and one was even given a Tam o' Shanta.

Skirts and dresses

As indicated above, many of the female figures seemed to be wearing leggings or tight trousers and so these needed to be covered up with skirts. I tried rolling Green Stuff into sheets and draping these over the figures' legs, but this method wasn't very satisfactory - it was difficult too mould folds in the fabric using this approach. Eventually, I found that pushing a large blob of Green Stuff on to the legs of the figures was more effective.

Once in place it could be shaped using the dentists' tools, giving the material pleats ......

and/or folds depending on the shape of the underyling figure's legs.


In a couple of cases, the figure's existing skirt was lengthened to take it to mid-calf length.

Trousers and jackets

Some of the more contemporary-looking male figures required a bit more attention. One chap who was wearing shorts and a short-sleeved shirt.......

...... was given long trousers (with turn-ups) ........

...... and a jacket. His baseball cap was turned into a trilby.

 When he was finished, I decided his upturned face, somewhat paunchy appearance and the fact he was clutching what could be interpreted as a bible, gave him the bearing of a clergyman - and so a dog collar was painted on and his suit painted black.

Another chap also needed a jacket to give him a more 1930s look.

As the sleeves of his shirt were already beautifully wrinkled, I used Green Stuff to give him a suitably tightly buttoned jacket to suit his somewhat corpulent appearance.

 To me he now looks like a farmer returning from a very successful day (and a wet lunch) at the market.

Case Studies

I ended-up modifying twenty seated figures - performing some surgery to re-position arms or legs and using a craft knife to give some of the more flamboyant-haired women a hair-cut.

The governess

 Straight-backed and modestly dressed, I felt this figure would be quite severe with her charges in the nursery.

I veered away from giving dresses patterned fabric and so opted for plain colours. 

 She started life wearing leggings and no hat.

The hat and long skirt were added to make her a lot more respectable.


Granny Smith

Clutching her handbag and gazing wistfully into the distance, she looks to me as if she was once in service, maybe as a cook, but is now retired and living on her own an a small pension.


I had to do very little to this figure which was very well modelled.She was given a woolly hat and had her skirt lengthened, adding a few extra folds to give it some body. Her clumpy looking sneakers were disguised with paint to give her more modest and 1930s looking footwear. Careful painting brought out her facial features which were otherwise a bit bland.


The Man from the Pru

This chap looks like a bit of a smooth operator. I imagine he's a travelling salesman who is no doubt visiting farms and large houses in the area, trying to persuade them to invest in one of his many insurance schemes.

I decided his coat owed its origins to the trench coat and so coloured it accordingly. 

He required very little modification other than a trilby hat and some turn-ups on his trousers.

Flighty Fanny

She's clearly in service as one of the maids at Peckforton Castle and has decided to go into Chester for some shopping on her day off.

I had several of these figures in the pack and so decided to change her posture, in addition to giving her a long skirt and a cloche hat.

Her raised arm was cut off and swivelled around.

 ..... to lie across her lap.

Her flowing locks were also trimmed back with a craft knife so her hat would fit more snugly. Her arm does look slightly awkward and so, if I was to do this again, I would take a little more time experimenting with other poses until I found one which was a little more natural looking. However, as she is going to be sitting inside a carriage, she will not come under close scrutiny.


Conclusion

I now have more than enough seated figures to populate the three coaches which have just had interiors added (see How I added some interiors to my coaches). Some of the figures which are more presentable slightly larger in scale, will be deployed elsewhere on the railway - awaiting trains on platform seating. This will leave more than sufficient for the seats in the coaches.

I am slowly perfecting my techniques for painting the figures. I think I am getting better at painting fabric and the faces on my figures look a lot less alarming than they used to. For more information on how I paint my figures see (How I paint my figures) - though this will now need some updating.