Preamble
 Lineside industries are quite important for my railway as I try to carry out reasonably realistic freight operations when I run full operating sessions (see Managing freight). I decided that, as the Peckforton Estate (through which my hypothetical railway runs) were early adopters of forestry, a sawmill at Peckforton would be a useful way to generate traffic. I recently extended the timber sidings at Peckforton (see How I extended Peckforton Station) which provided a little more space for the sawmill building.
 UPDATE: Interestingly, I have since discovered that a sawmill and timber works was indeed located at Peckforton to serve the output from the Peckforton Estate's forestry. The timber yard has now closed but I aim to investigate its former site and see if any photos exist.
Contents
Introduction
When I decided to finally to fill the space beside the sidings at Peckforton with a structure representing the sawmill, I did a fair bit of research on what sawmills would have looked like in the 1930s. Quite a bit of online information about sawmills originates from Australia or the USA where, of course, the logging industry was a lot better established (eg see Robinson's Sawmill). However, after a fair bit of digging, I did manage to unearth a few bits of information about sawmills in this part of the world - eg http://www.stroudlocalhistorysociety.org.uk/people-places/companies/saw-mill/. However, there seems to be a dearth of information about period mills - as suggested by this forum post from 2010
The structure
For the base of the sawmill, I used a piece of 8mm thick plywood, 62cm x 31cm. I marked the centres for eight 5mm diameter holes for the uprights at intervals of 75mm, 15mm from the edge of the base.
Sixteen 150mm long pieces of 8mm square stripwood were cut ........

...... and one end of each was rounded with a craft knife.

The other end was marked out 4mm x 8mm ........

.... and the ends were cut to form halving joints.

Four of the supports were further trimmed along one other edge to act as corner supports.

Four pieces of 8mm square stripwood were cut to a length of 530mm and marked at 75mm intervals to coincide with the vertical supports.

The supports were similarly marked out with 8mm x 4mm cut-outs 55mm from their bases to form halving joints.

The halving joints were firstly cut with a junior a hacksaw......

.... and then chiseled out with a Stanley knife.


The longitudinal beams were similarly given halving joints and the sides of the structure assembled and glued together with exterior PVA.

The posts were then glued into the holes in the base and 65mm long pieces of 8mm square stripwood glued between each post at the base of each vertical post - as can be seen, I used off-cuts of stripwood to patch-fill some of the gaps (waste-not, want-not).

55mm long pieces of coffee stirrer were then cut ..........

.... and glued along the base of the sides.

Once the cladding on the lower part of the building was completed, the roof was the next part to receive my attention.
The roof
I looked at several online images of sawmills but I was captivated by a 4mm scale model shown in a back issue of Railway Modeller (January 1995, pp 30-32) which showed a structure sporting a curved roof constructed from Belfast trusses. After carrying out some research into Belfast Trusses, which was facinating (eg see https://www.arct.cam.ac.uk/Downloads/chs/final-chs-vol.17/chs-vol.17-pp.75-to-87.pdf), I drafted some rough sketches based on the dimensions of my sawmill and set to work.
Belfast trusses
My first job was to produce the curved upper members for the trusses. For these I drew a series of 37mm and 32mm diameter curves on to 4mm thick plywood using a compass fashioned from a strip of card..

Once sixteen curved members had been marked out ........

...... they were cut-out using a coping saw, together with sixteen straight 255mm x 10mm cross beams. One of each pair of curved beams was then marked out in ten equal divisions (numbered 1 to 9, ie ignoring 0 and 10 at each end) and one of each pair of straight beams was marked out in thirteen equal divisions (numbered 1 to 12).
 The two beams were placed on a cutting mat with a distance of 1cm between their ends and coffee stirrers were cut to length to firstly, span 1 to 3 and 9 to 10 on the upper and lower beams (the photo shows more clearly what I mean). The stirrers were glued into place with thick superglue as PVA would have taken too long to set.

Once sixteen curved members had been marked out ........

...... they were cut-out using a coping saw, together with sixteen straight 255mm x 10mm cross beams. One of each pair of curved beams was then marked out in ten equal divisions (numbered 1 to 9, ie ignoring 0 and 10 at each end) and one of each pair of straight beams was marked out in thirteen equal divisions (numbered 1 to 12).


Next, coffee stirrers were trimmed to fit between 2 and 5, and 8 and 8 on the upper and lower beams.

Then came 3 to 6 and 7 to 7 .......

..... followed by 4 to 7 and 6 to 6.

Then came 5 to 5 and 5 to 8. The trusses were beginning to take shape.

Next came 4 to 4 and 6 to 9......

.... followed by 3 to 3 and 7 to 10.

Finally, struts were glued from 2 to 2 and 8 to 11 ......

..... and four diagonally trimmed stirrers at each end othe truss.

Once all the glued joints had set, a curved and a straight cross member was glued on top of the completed truss, using various clamps to hold them in place until the glued had fully set.

Once all eight trusses had been completed .......

...... two pieces of 35mm x 750mm x 4mm thick ply were cut out ......

..... and one side of each truss was glued to it, using the same spacings as used for the supports for the roof.

To help speed-up the glue setting period, an accelerator was used in conjunction with the Superglue. This meant the glue set almost immediately and each truss needed only to be held in place for around a minute before moving on to the next.

Once one side had been secured, the same process was repeated for the other side.

The roof was now ready to be covered.
Before tackling the corrugated iron, I added some purlins to the trusses to provide more support for the roof sheeting. Firstly, a single purlin was fixed across the apex of the roof, ......

..... and then two further sets of purlins midway down each side. 8mm square stripwwod was used for them.

Corrugated iron sheeting
I had originally intended to use aluminium drinks cans for the corrugated sheeting, but these proved difficult to indent without being tempered beforehand and so I resorted to using disposable aluminium foil roasting tins. The foil used for these is quite thick, but not too thick to pass through my paper corrugator.
The roasting tins were opened out and smoothed as much as possible.
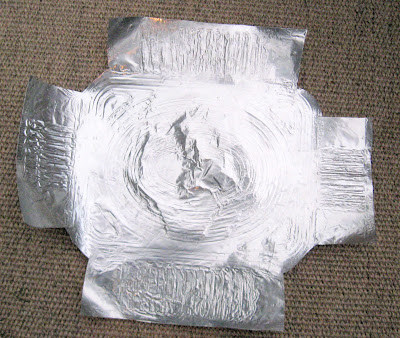
Individual sheets, 45mm x 140mm were then cut out .........

..... and passed through the paper corrugator.


When sufficient sheets had been produced, I started laying them on the roof. I quickly realised that the purlins would be insufficient to support the sheets which were quite flimsy, even after receiving their corrugations. So, a couple of sheets of very thin obeche board were fixed over the roof and the corrugated sheeting panels were glued to this.

Initially, I used gap-filler adhesive, but after a while I realised it was difficult to keep the surface beneath the sheets even and so impact adhesive was used instead.
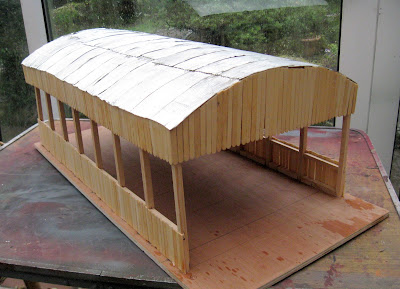
The entire roof was then covered with overlapping sheets and left overnight for the adhesive to harden off.

These were glued on with external PVA, ......
......using a tri-square to ensure the cladding remained vertical.

The ends were also covered in coffee stirrer cladding......
...... with each piece being measured in situ .........

...... and then trimmed to size with scissors.

The completed roof section was then test-fitted to the base to ensure all was well.

The roasting tins were opened out and smoothed as much as possible.

Individual sheets, 45mm x 140mm were then cut out .........

..... and passed through the paper corrugator.


When sufficient sheets had been produced, I started laying them on the roof. I quickly realised that the purlins would be insufficient to support the sheets which were quite flimsy, even after receiving their corrugations. So, a couple of sheets of very thin obeche board were fixed over the roof and the corrugated sheeting panels were glued to this.

Initially, I used gap-filler adhesive, but after a while I realised it was difficult to keep the surface beneath the sheets even and so impact adhesive was used instead.

The entire roof was then covered with overlapping sheets and left overnight for the adhesive to harden off.
Cladding
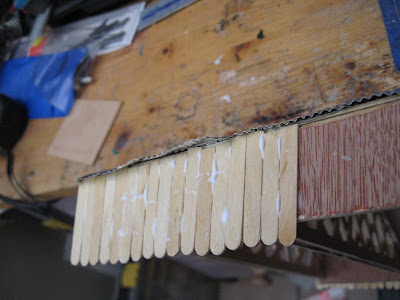
To finish off the roof section, 40mm lengths of coffee stirrer cladding were cut.
These were glued on with external PVA, ......

......using a tri-square to ensure the cladding remained vertical.

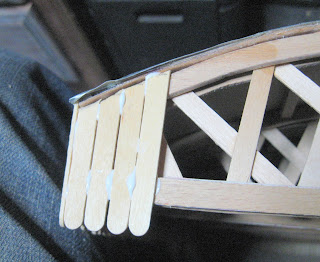
The ends were also covered in coffee stirrer cladding......

...... with each piece being measured in situ .........

...... and then trimmed to size with scissors.

The completed roof section was then test-fitted to the base to ensure all was well.

The guttering
I wanted the roof to be removable so that I could detail and maintain the interior (see How I created the sawmill interior). This meant that I would have to make the guttering bridge the divide between the roof section and the lower structure. I make my guttering from brass and/or copper as I am concerned that plastic would be too vulnerable to accidental damage.The guttering channels were made from 4mm brass U-shaped sections designed for edging leaded window panes (available from Tempsford Stained Glass) . I find these to be cheaper than normal brass U-channel.
As the sides of the sawmill are longer than the 300mm sections of brass channel, two pieces of channel needed to be joined, using my 70W soldering iron and multicore solder.

The channels were then cut to length, 10mm longer than the sides of the building. The ends of the channel were then snipped 4mm along each of the creases ......

..... and the resulting three tabs folded up .......

....... before being soldered .........

....... and tidied up with a file, to form the ends.

20mm long brass nails had their heads snipped off and the top 5-7mm flattened with a file.

The nails were inserted into a hole in the workbench and soldered at regular 90mm intervals to the underside of the channel.


The solder and ends of the nails were then tidied up with a file.

For the downspouts, two 130mm long pieces of 3mm copper tube were cut, together with two 40mm pieces.

Two 55mm long pieces of 2mm diameter copper wire were cut and inserted into the shorter pieces of tube.

The two short sections were then kinked by about 10mm (the copper wire inside the tube helps to prevent it from creasing at the bends).

A 3mm hole was then drilled in the bottom of the channel at each end .......

.... and the kinked copper tubes were soldered into the holes.

and the protruding copper wire at the other end soldered into place.
The brackets for the downspouts were made from 60mm lengths of 1mm diameter copper wire.

Each piece was flattened with a hammer ......

..... and then folded around the downspout.

The brackets were then soldered into place and trimmed to leave around 20mm .......

....... and tidied up with a file.

Three brackets were soldered on each lower 130mm section of downspout at equal distances.

A vee was filed into the longer sections of downspout, 5mm from the end.

The end was then folded by about 45 degrees .....

..... and soldered. The angled end was then tidied up with a file.

The guttering was painted, initially with a coat of with red oxide primer followed by a couple of coats of black acrylic.

2mm holes were then drilled in the fascia of the roof section and the endmost pillars of the main structure to take the brackets. The guttering was test-fitted and then removed to allow the building to be painted.
Painting
The roof and main structure were given a coat of red oxide primer .........
and then given a wash of mucky black acrylics (a mix of black and brown).


..... and the corrugated iron sheeting was dry-brushed with a mix of red and brown to highlight peaks in the corrugations.


A nameboard was created in MicroSoft Word using the name John Naylor whom I discovered was a timber merchant in the 1911 census for the area served by the railway. Although John Naylor was given the age of 64 in the census, I have assumed that his 23 year old son (also John Naylor) would have taken over the family business and hence would be in charge in 1932, the period my railway is depicting.
The 40mm x 150mm nameboard was printed on to inkjet glossy vinyl self adhesive sticker paper and then covered with a layer of self adhesive clear film. It was then stuck to a piece of 1.5mm thick plasticard and given a border of 2.5mm wide x 1.5mm thick plasticard before being fixed to the ends of the roof section.


The guttering was then glued into place.

..... the upper section of downspout being slotted into the lower section .......

..... to allow the roof to be removable.

Conclusion
Although it looks flimsy, the building is actually quite robust and fits the intended site neatly.


As indicated above, there seems to be very little information available about sawmills in the UK during the period modelled by my railway and so I have had to use a degree of modellers' licence - drawing on the few images and bits of information I have managed to glean about UK sawmills combined with photos and information about sawmills in the rest of the world.
