Showing posts with label landscaping. Show all posts

Tuesday, February 11, 2020

Progress Report 79

It has actually been quite a mild winter so far in this part of the North West of England and so I have actually had time to get out into the garden and do some civil engineering and tracklaying. I have also spent a fair bit of time in the new workshop painting figures and getting the workshop sorted out.

Permanent Way

 The most significant job has been to add a new siding to Bulkeley Station (see How I remodelled the layout at Bulkeley Station).

Bulkeley Station has been in situ for around fifteen years and, apart from adding a new siding last year (see Progress Report 75), it has remained untouched. After adding a half relief brewery building to one of the sidings at Beeston Castle (see Progress Report 76), I decided I would like to do something similar at Bulkeley. The problem was that both sidings at Bulkeley were to the front of the station and there was insufficient room for a building. If I could move one of the sidings to the rear of the station then there would be space for a half relief building.
The half-relief brewery at Beeston Castle Station

 I have now more or less finished re-landscaping the area, having decided the raised bed was now too narrow for the new arrangement of tracks ( see How I re-landscaped Bulkeley Station).


  I am in the process of cladding the new retaining wall with sandstone ....

 .... and trying to decide how best to make use of the newly acquired strip of real estate. All I need is a spell of decent weather to finish off the job but Storm Ciara seems to have intervened!
Lineside

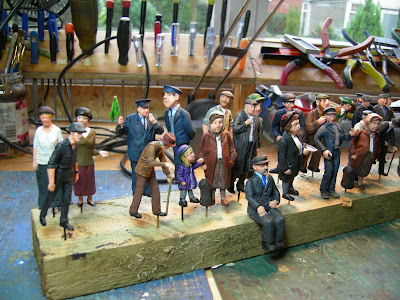
Having recently detailed and painted 30 figures (see Progress Report 78),

 I realised there were a few more figures in my 'spare people' box awaiting similar treatment. These are now in the process of remodelled and painted (see How I prepared and painted some Perfect People metal figures and Where do I get my figures?).

 I think, once these figures are finished, the population of the area served by the railway will be more or less complete - though, of course, there may be an influx of tourists during the summer!

Workshop

I am slowly reorganising the storage spaces in the workshop which I built in the autumn (see How I constructed the workshop). As I am in the process of painting figures, I decided the drawer in which the acrylic paints were stored was in need of a bit of rationalisation and so added some Correx dividers and now store the paint tubes according to colour - which makes finding them a whole lot less frustrating.

The newest addition has been a sink, which I recycled from our caravan. It was much too large for the toilet cubicle in the caravan and so I took it out and replaced it with a much smaller one. However, waste-not-want-not and so the fixture has now been transferred to the workshop.

The water is pumped up from the 25 litre container below via a 12v pump and the waste drains into a soakaway which also serves the guttering for the workshop. At present, the pump is powered via a small lead acid battery housed under the sink, but eventually, I will find a suitable 12v transformer.

I had intended to store rainwater from the gutters in a butt and use this as a naturally replenishing supply, but then decided I would probably want to make hot drinks from the water and so opted for a more potable supply.

Saturday, January 18, 2020

Progress Report 78

I have decided (call it a New Year's Resolution), that this year I am going to try posting Progress Reports more frequently. They tend to be quarterly unless I feel I have a number of developments to report but this means I often end up writing quite lengthy reports which I am sure most of you loyal followers will be reluctant to read. So, I'll try shorter, sweeter and more frequent updates to see if that is easier for you to digest (assuming anyone actually does bother to read them.... 😏 ).

My last Progress Report was in October (ie three months ago) which seems to have reported quite a few developments - mainly because the previous report had been 7 months earlier. This is not the best time of year for garden railway modelling, but there do seem to have been a few developments to report.
  • The track behind the workshop has been relaid and partly landscaped
  • I have written-up how I constructed the Snailbeach hopper wagons
  • I have started painting the figures mentioned in the last progress report
  • I am working on a Bluetooth version of the 2.4gHz transmitter
  • The workshop has now been completed and used for various projects
  • I have had another couple of articles published in Garden Rail

Permanent Way

The trackbed behind the old sheds has never been a high priority and so, over the past fifteen years, has been allowed to slowly deteriorate. Despite that, it was never sufficiently neglected that it caused derailments, presumably if it had I would have attended to it sooner. However, the blocks in the middle of the section had sunk over the years and so what should have been perfectly level had developed a couple of undulations.

 Furthermore, the new workshop which replaced the sheds (see How I constructed the Workshop) was lower than its predecessors and so the track was now mounted on top of an embankment which, over time, would probably have led to further deterioration of the trackbed.

The old track was removed, a new retaining wall was constructed from bricks and the blocks replaced. The track was then reinstated.

The erection of the workshop also resulted in the six foot high hedge of conifers being reduced to around two feet. There was no longer a need for the rickety sheds to be hidden and the hedge prevented me having a view from the workshop of my railway and the rest of the garden. It also reduced the amount of light entering the window. With the removal of the hedge, one section of the railway now became more visible, the area around the junction of the copper mine branch (shown above).

This area was landscaped and will eventually be planted with suitable shade-loving foliage.

This area will no doubt feature in future videos and photos of the line in action. For more information see How I improved the trackbed behind the workshop

Rolling stock

 Snailbeach hoppers

As mentioned in the previous progress report, the Snailbeach hopper wagons have entered service and have now all been fitted out with brake gear and weathered. The process has been written up in detail (see How I constructed a rake of Snailbeach-like hopper wagons).

It was interesting to see how I could integrate the additional traffic movements to and from the sand quarry into my usual operating sessions which aim to represent a typical day's running on the railway. I've not perfected it yet, but have decided that, whereas the copper mine usually has three trains Up and Down the line each day (because the spoil is transported as well as the ore), the sand quarry will only require one train in each direction per day. See from 4m 54s onwards....

Infrastructure

 Figures

The figures purchased at the Llanfair Show mentioned in the previous Progress Report are now in the process of being painted, together with others which I have acquired over the past year.

It takes me quite a while to paint figures. I tend to do this job at intervals. I find it very time consuming, particularly as I have had 30 figures to paint. I tend to mix one blend of colours - for example blue and/or black and then paint all the bits of figures which need colours. On another occasion, I might focus on flesh colour, and so on.

Finally, I will add the fine details to the figures such as hair, facial features and shoes.


Operation

 Operating sessions

Interestingly, I have had very few full operating sessions this year. This is partly because when some of the spells of fine weather occurred I was not available and partly because I have been focusing on sorting out the Arduino control systems which has proven to be very time consuming (see How I control locos with Arduino and a phone app). However, a few part-sessions have been run and various individual trains have been run at intervals.
Manning Wardle loco No. 6 departs Beeston Market with the Down pickup goods
No 6 shunting the pickup goods at Bickerton
No. 6 approaching Peckforton with the Up afternoon mixed

Arduino based control systems

As was mentioned in the previous two Progress Reports, I have been investigating Bluetooth phone app and 2.4gHz based radio control systems (see How I control locos with Arduino and a phone app).   I have gained a great deal of satisfaction in getting to grips with Arduino programming and understanding the basics of interconnecting Arduino modules, I have been disappointed with the level of control which the approaches have given. I suppose I have been spoiled by using the Deltang system which is very reliable, easy to use and provides a very good level of control, especially at slow speeds. However, I am generally quite persistent and so am continuing to explore various options to see if I can overcome some of the limitations of Arduino which I have identified so far.

My next line of enquiry is to explore using a Bluetooth module in place of the phone app as a transmitter. I am hoping that the more positive features of Bluetooth can be combined with the advantages of having a handheld transmitter with a knob and switches. It's early days yet, but I will let you know of progress in my next report.

Other

Workshop

I am now beginning to settle into my new workshop and am in the process of making it more homely and have started reorganising the storage. In the past, I have tended to throw things willynilly into drawers and storage boxes, but have now started partitioning the various containers to make life easier when trying to find things.


I have now installed a couple of security measures, the details of which I will not share here for obvious reasons. Needless to say, it is handy having a knowledge of basic electronics and radio control .....

I am now considering installing a sink, using the rainwater supply from the roof as my primary use of water is for watering-down acrylic paints and cleaning paint brushes.

Magazine articles

I have had another couple of magazine articles published in Garden Rail since my last progress report.


Since starting my blog fifteen years ago, I have not sought monetary reward when sharing my thoughts and experiences, so it is now quite gratifying to receive a modest fee for my scribblings which, of course, I will plough into further developments on the railway.

Future plans

There is always plenty to do on the railway but, as always, I have to prioritise jobs. The most immediate are:

  • Finishing painting the figures and allocating the railway personnel to particular station related roles;
  • Experimenting with Bluetooth modules to make a more reliable handheld Arduino based transmitter;
  • Titivating Bulkeley and Bickerton stations
  • Applying weathering to the locos and coaching stock;
  • Enhancing the detailing on some of the more basically finished wagons.
There are clearly plenty of jobs which need to be done, but these are probably the most urgent.

As mentioned earlier, this is the quietest time in terms of running sessions. However, it is probably the busiest in terms of construction and maintenance. I am looking forward to an improvement in the weather and am already planning my next video productions. 

As they say, watch this space!

Tuesday, July 03, 2018

Progress Report 73

It's been quite a busy month since my last Progress Report (see Progress Report 72). A prolonged spell of fine weather has enabled me to get out into the garden to run some trains and to finish off some of the projects which have been on the to do list.

  • The sawmill interior has been finished off
  • A gantry crane has been constructed for the timber yard
  • Peckforton Station yard has been landscaped and re-ballasted
  • Peckforton Station platform has been rebuilt
  • The approach to Beeston Market station has been landscaped
  • A couple of conifers have been removed from the garden, opening up an area which was previously overgrown
  • A new storage shed has been acquired for the recently finished buildings
  • More rolling stock has been equipped with replacement PLR couplings
  • I have modified the clipboard I use when working out freight movements
  • Loco No. 2 (Beeston) has been equipped with a replacement li-ion battery pack
  • I have been able to engage in a couple of full operating sessions

Lineside

The Sawmill Interior

Using information gleaned from the web, I worked out what sort of equipment a small sawmill might have as a minimum and then positioned it in the mill in what seemed to be the most logical arrangement.

The logs enter the mill on the saw carriage (top right) and are then cut into flitches by the headsaws. The flitches are stacked on the transfer bench before being trimmed to the required widths on the first bench saw. The planks are then cut to length on the second bench saw before exiting the mill on the top left to be stacked in the yard.

All the machinery was constructed from stripwood, plasticard and oddments picked up in my local 50p shop.

The mill engine was bashed from an Airfix model of a beam engine and the overhead pulleys were 3D printed for me by a fellow modeller.

For more information see - How I detailed the interior of my sawmill

The gantry crane

To load and unload the wagons, I figured a gantry crane (with a wooden structure) would be appropriate. There were very few images of suitable cranes on the internet and so my model was largely based on the one drawing which I did manage to track down on this wonderful website - http://myweb.tiscali.co.uk/gansg/

I've assumed the crane would have been manually powered in the period in which my railway is set (ie 1932) and so made some assumptions about how the mechanisms would have been constructed. Hopefully, what I have produced is feasible.

For more information on the construction of the crane see - How I constructed a timber gantry crane


Rebuilding Peckforton Station platform

When the timber yard sidings were extended at Peckforton (see How I extended the sidings at Peckforton Station), I also took the opportunity to even out a dip in the tracks through the station. However, raising the track alongside the platform meant the platform ended up a couple of centimetres lower than the track.

While landscaping the area around the sawmill (see below), it seemed opportune to also raise the level of the platform. Platform edging sections were cast using a JigStones mould.

A 1:1 mix of rapid setting cement with a small quantity of brown cement dye .......

Water was added until the mix had a consistency of thick cream.

To economise, I mixed sufficient to fill two cobble stones moulds as well as the platform edging mould (on the right).

The concrete mix was poured into the mould and left for half an hour or so (dependent on the weather conditions) before the moulding was carefully removed from the mould. 

Thirty blocks were needed for the length of the platform and so, after these had been cast, a stiff mix of concrete (1 part cement to 3 parts sand) was applied to bring the platform area up to the level of the sleepers, the Jigstones sections were then placed alongside the track and the area behind them filled with more concrete mix.

The platform now looks a lot more realistic - compare this shot with the 'before' one above.

Landscaping and ballasting Peckforton Station yard

After sorting out the platform, the area surrounding the sawmill building was landscaped with brown dyed concrete......

...... bringing the ground up to sleeper height for the main loops and rail height in the sidings.

Once this had set, I applied a dry mix of coarse sand, fine gravel, sifted soil and cement over the whole area. This was brushed into place with an old paintbrush.

This mix was then watered with a mist spray, dribbled with SBR additive and then given another mist spray.

This was left a couple of days to dry. A very thin wash of cement dye was then painted over the whole station area, .........

....... varying and blending the colours (black and brown), to provide variety - the running tracks were generally coloued darker and the other areas lighter.

The area was left to dry off, before the rail running surfaces were scraped clean of grit and glue.

Landscaping the approach to Beeston Market Station

Having constructed some coal staithes (see How I constructed some coal staithes) and a cafe (see How I constructed a cafe) for the approach to Beeston Market station, I needed to finish off the landscaping for this area.

I used a combination of Jigstone mouldings for setts and concrete to create the sub surface,


Although this area still needs some additional detailing, it is looking a lot less spartan than it did previously.

For more information, see How I landscaped the approach to Beeston Market Station.


Clearing undergrowth

The fence at the back of the garden has, for many years, been obscured by large shrubs and bushes. However, these were overhung by three large conifers (rampant leylandii) and laurel from next door's garden. When my neighbours had one of their conifers and some of their laurel cut back and so I commissioned the tree feller to remove the two conifers on my side of the fence. At the same time, the shrubs and bushes were cut back to ground level.

The fence (somewhat neglected and decrepit) is now very much apparent. Whereas previously,  photos and videos of trains travelling along this section of the railway had a backdrop of foliage, ......

.... the fence is now unavoidable. 

However, new shrubs and some alpines have been planted and so, in time, the background will become more photogenic. In the meantime, I have been experimenting with post production photographic fixes to disguise some of the less attractive backgrounds to my railway.

 After draping some blue plastic sheeting in front of the offending backgrounds .......

...... I was then able to replace the areas of blue with a more appropriate background image.

I am not entirely convinced by the outcome; I think a lot more attention needs to be paid to matching the lighting in the two shots. However, it might prove useful in trying to disguise some of the less attractive areas of the garden to allow previously unphotographed aspects of the railway to be portrayed.

New storage shed 

With the completion of new buildings and structures around the layout, most of which need to be stored inside when not in use, I was rapidly running out of indoor storage space. A refurbished garden storage cupboard has been acquired. 

It's already full, and so another solution will have to be sought for the next phase of building construction.

Stock

Couplings

I have always retained LGB couplings from the early days when my garden railway modelling adventure began with an LGB starter set. I really enjoy marshalling, running and shunting goods trains and so need a coupling which is reliable and easy to couple and uncouple. Whilst the LGB coupling meets these needs, it is unprototypical and ugly. In the previous Progress Report, I showed how I had been experimenting with direct replacements for LGB couplings using bent wire. I have now developed these further, replacing the paper clip loops with loops from more substantial (1.5mm) brass rod and the thin brass hooks with phosphor bronze versions. I have tweaked the dimensions of the mounting plates to ensure more uniformity over loop height and length, and made a jig for bending the loops to ease construction and to improve consistency.

Several wagons of different types have now been fitted with the replacements to evaluate their effectiveness and I have found a way of replacing the smaller LGB centre buffers to enhance their function when wagons are being propelled.

As the replacements are compatible with LGB couplings, replacement can be on an ongoing basis. For more information,  see How I have constructed replacements for LGB couplings

Loco No. 2 (Beeston)

During the most recent operating session (see below), Barclay 2-4-0 loco No. 2 (Beeston), suddenly stopped working.  After turning her off  has been equipped with a replacement 11.1v li-ion battery pack

Operation

I have modified the clipboard I use when working out freight movements. A row of magnets inserted behind the plastic cover, .........

 .........enables me to temporarily store my wagon destination boards which I use when assigning wagons to destinations (see Video of freight operations on my railway)

I have been able to engage in a couple of full operating sessions
 Owing to the failure of Loco No. (Beeston), Loco No. 3 (Bickerton) was sent to pilot her back to Beeston Market
Fowler DM 0-4-0 loco No. 7 (Tollemache) passing the mill with an Up ore train
Hunslet 0-4-0T loco No. 3 (Bickerton) pounding up Gallantry Bank with the Up pickup goods
Black Hawthorn Loco No. 10 at Bickerton with a special goods train
No. 3 (Bickerton) approaching Bulkeley with an Up passenger
while No. 10 approaches Beeston Castle with a Down special goods