Contents
- Introduction
- What sort of railway do you want?
- How much space have you got?
- What sort of layout would suit you best?
- How will your railway be operated?
- How will your locos be powered?
- Where and how will you store your rolling stock?
- How much do you want to spend?
- How much work do you want to do?
- What are you waiting for?
Introduction
I suppose I've been planning the installation of a garden railway for most of my life, since I first became interested in model railways around sixty years ago. After a couple of abortive attempts, my plans came to fruition around fourteen years ago. I could argue that I have had over fifty years experience of planning garden railways - though most of those plans were little more than pipe dreams.When I knew my planning was for serious implementation, I spent around three years, drawing, doodling and mapping, before I had a plan which I thought was going to be workable and provide me with the operating potential I craved. This blog post is really a summation of that experience, which I hope might prove interesting and useful for anyone who might be intending to step out into the garden with a spade and a length of railway track.

I hasten to add that I do not profess to be an expert - I am merely passing on some ideas which I have gained through experience.
What sort of railway do you want?
This question may seem somewhat fatuous, but it is surprising that, over the years, I have seen several examples of garden railways which were created, then modified, neglected or abandoned because their owners appeared unsure as to what they were actually trying to create.So, is your railway going to be:
- a test track,
- or represent a real or imagined working railway?
Test track
A simple test track could range from little more than a metre length of track to an elaborate circuit with sidings, loops and spurs to accommodate stock needed for attaching to prototypes undergoing testing. Complicated pointwork might be required to ensure that the stock being tested will happily negotiate a range of track configurations on other people's railways. You will also need to consider:- Where will your workshop be located?
- How close will your track run to the workshop (or even inside)?
The representation of a working railway
If you adopt this type of railway it will probably also, at times, be used as a test track as new stock is bought and/or built. So, the above questions will inevitably still apply. The track on my railway runs alongside the conservatory which houses my workshop and so I am able to nip outside and test run stock with ease.In addition:
Will your railway represent:
- a mainline,
- a branchline,
- an industrial railway,
- a preserved railway,
- a leisure railway,
- or a combination of the above?
Will your railway be:
- real,
- or imaginary?
I am aware of modellers who have recreated sections of the Isle of Man Railway system (eg see https://sites.google.com/site/iom15milgroup/home ), the Welsh Highland Railway (eg see https://gardenrails.org/forum/viewtopic.php?f=41&t=6418 ) and the Southwold Railway, (eg see https://youtu.be/sKZOFd3oez8 ) whilst others have created imaginary extensions to real systems which could feasibly have been constructed.
Although it's not essential to give your railway a setting, I've found that it does add to the enjoyment. The fact that my railway is set in a real location is an added bonus - as I walk or drive (or even fly over) the supposed route, my imagination creates the sights and sounds of one of my trains passing by.
 |
| A microlight flight over the imagined route of my railway (60th birthday present) |
How much space have you got?
Having decided on the sort of railway you want to create, the next stage is to survey the intended site.
You can be as sophisticated or as basic as you like. I've known of modellers who have painstakingly measured their back yards and then used 3D modelling software to recreate the intended site on their computers. By contrast, I surveyed my back garden with a tape measure to get a general idea of the size of the site and then made numerous sketches of possible layouts which might fit it (see How I planned my railway).
You need to decide on the scale of your model and the gauge of the track. Garden railway modellers tend to opt for large scale models - there is usually plenty of space for reasonably realistic layouts and larger models look more at home in the garden environment.
The choice of scale and gauge can be quite baffling to a novice modeller (and sometimes even to quite experienced modellers!). I will attempt a simplified explanation, starting with the largest scales and working downwards.
Miniature (ride-on) railways
These tend to be somewhere between 12" and 3.5" gauge and a variety of scales, dependent on whether the model depicted is standard or narrow gauge. |
| Source: http://www.corrishill.co.uk/ - Reproduced with permission from Chris Rennie |
Garden (model) railways
Although any gauge and scale could be used in the garden (even N scale!), generally larger scales are used. Here's a brief overview of those which might be most suitable:| Name | Scale | Gauge | Comments |
|---|---|---|---|
| Gauge 3 | 13.5mm = 1 ft (1:22.6) | 63.5mm | Mostly used for standard gauge models |
| Gauge 2 | 2.5" = 1 ft (1:29) | 50.8mm | Mostly used for standard gauge. More prominent in USA |
| Gauge 1 | 10mm = 1 ft (1:32) | 45mm | Mostly used for standard gauge |
| SE or 7/8ths | 7/8" = 1 ft (1:13.7) | 45mm | Represents 2' narrow gauge railways (or 18" gauge if used with 32mm track) |
| G scale | various | 45mm | Many commercial suppliers (eg LGB). Scales vary dependent on prototypes being modelled (standard gauge or narrow gauge) |
| SM32 16mm scale | 16mm = 1 ft (1:19) | 32mm | Represents 2' narrow gauge railways. Most common in UK. |
| Fn3 scale | 15mm = 1 ft (1:20.3) | 45mm | Represents 3' narrow gauge railways. More prevalent in USA |
| Gauge 0 | 7mm = 1 ft (1:43.5 or 1:48 in USA) | 32mm | Mostly used for standard gauge |
Ready-to-run (RTR) models and kits are available for most scale and gauge combinations but some (eg G Scale) have a greater range and availability than others. So, your choice of gauge and scale may be dependent on your budget, your skills of model construction and the availability of relevant models depicting the sort of railway you want to run.
In my case, when I started my garden railway (in 2004), there were plenty of off-the-shelf (RTR) models in G Scale and very few in 16mm scale. As I had a demanding job, I opted for G scale as I figured I would have insufficient time to make my own kits or scratchbuild models. However, as I wanted my railway to represent a UK narrow gauge railway, I had to adapt the available RTR models which were mostly of continental or US prototypes. If I was making the same decision now, I might well choose SM32 as there are far more RTR UK-based models available.
Once you have decided what type of railway you want to operate, the amount of space you have and the scale and gauge combination which will suit your needs the best, you then need to consider what type track to use.
What sort of track will you be using?
Unless you are planning to make your own track, then your choice of plain trackwork will be:
- pre-shaped sectional track
- or flexible track.
Sectional track
Sectional track is very useful where space is tight or you may want to change your layout in the future. Sectional track is easier to lay than flexible track and gives inexperienced modellers the reassurance that curves are uniform and that stock from the same manufacturer will be able to negotiate them.
 |
| Source: https://www.lgb.com/products/product-information/overview-of-the-track-system/ |
There are computer programs which enable you to plan your layout, the more advanced programs include the most common types of commercially available track sections to 'build' your layout on screen (eg see https://www.anyrail.com/en). These programs are particularly helpful if you have a small or constricted site where space is at a premium and you want to maximise the potential of the space available.
Flexible track
The beauty of flexible track is that you can lay the track to match your landscape rather than vice versa. Curves can be flowing with gentle transitions from the straights to give a more realistic appearance. However, flexible track has a tendency to try straightening itself out and so either has to be fixed down to a firm base or curves need to be made with a rail-bender.

I used flexible track on my railway, largely because that was what I was used to with my indoor model railways. I've never used a rail-bender but fix my track down to concrete blocks with screws and rawl-plugs or to wooden planks on the raised sections.

The subjects of trackbed and ballasting are quite contentious in garden railway circles - everyone tends to have their preferred method and, of course, considers theirs to be the best. Rather than entering into a debate about the merits of various approaches here, it might be worthwhile to spend some time researching and/or meeting with a few garden railway modellers to decide which approach will suit your skills, pocket and preferences. eg see If I knew then what I know now
Station loop sizes
Something else you will need to consider is what length of train will you intend to run? This will dictate the size of run-round loops at termini and passing-loops at intermediate stations.
I decided that, on my narrow gauge railway, goods trains would be limited to eight wagons plus a guard's van and passenger trains to three coaches. This meant that each loop needed to be at least 2 metres in length. All my locos are quite short and so, if you are intending to use larger locos, then you will need to take account of that when planning your layout.
You will also need to work out the optimum length for sidings at your stations, dependent on what sort of goods and passenger traffic you are planning to use.The majority of sidings at my intermediate stations face in one direction. This means that shunting is easier when a goods train is travelling Up the line rather than Down. I've discovered that this mirrors practice on real branch lines.
What sort of layout would suit you best?
Basically, model railway layouts can be categorised as:- Continuous circuit
- End to end
- Out and back
- Dumbbell
- A combination of the above
Continuous circuit
This is, in effect, a circle of track. The circle could take the whole garden to negotiate and even cross over and/or double back on itself in a figure of eight, as it does in my garden, but if a train can carry on from where it started without reversing, then it is a continuous circuit. This is particularly useful if you have live steam locos and want them to run around the track without too much interference, or if you have visitors and just want to have a train running while you entertain them.
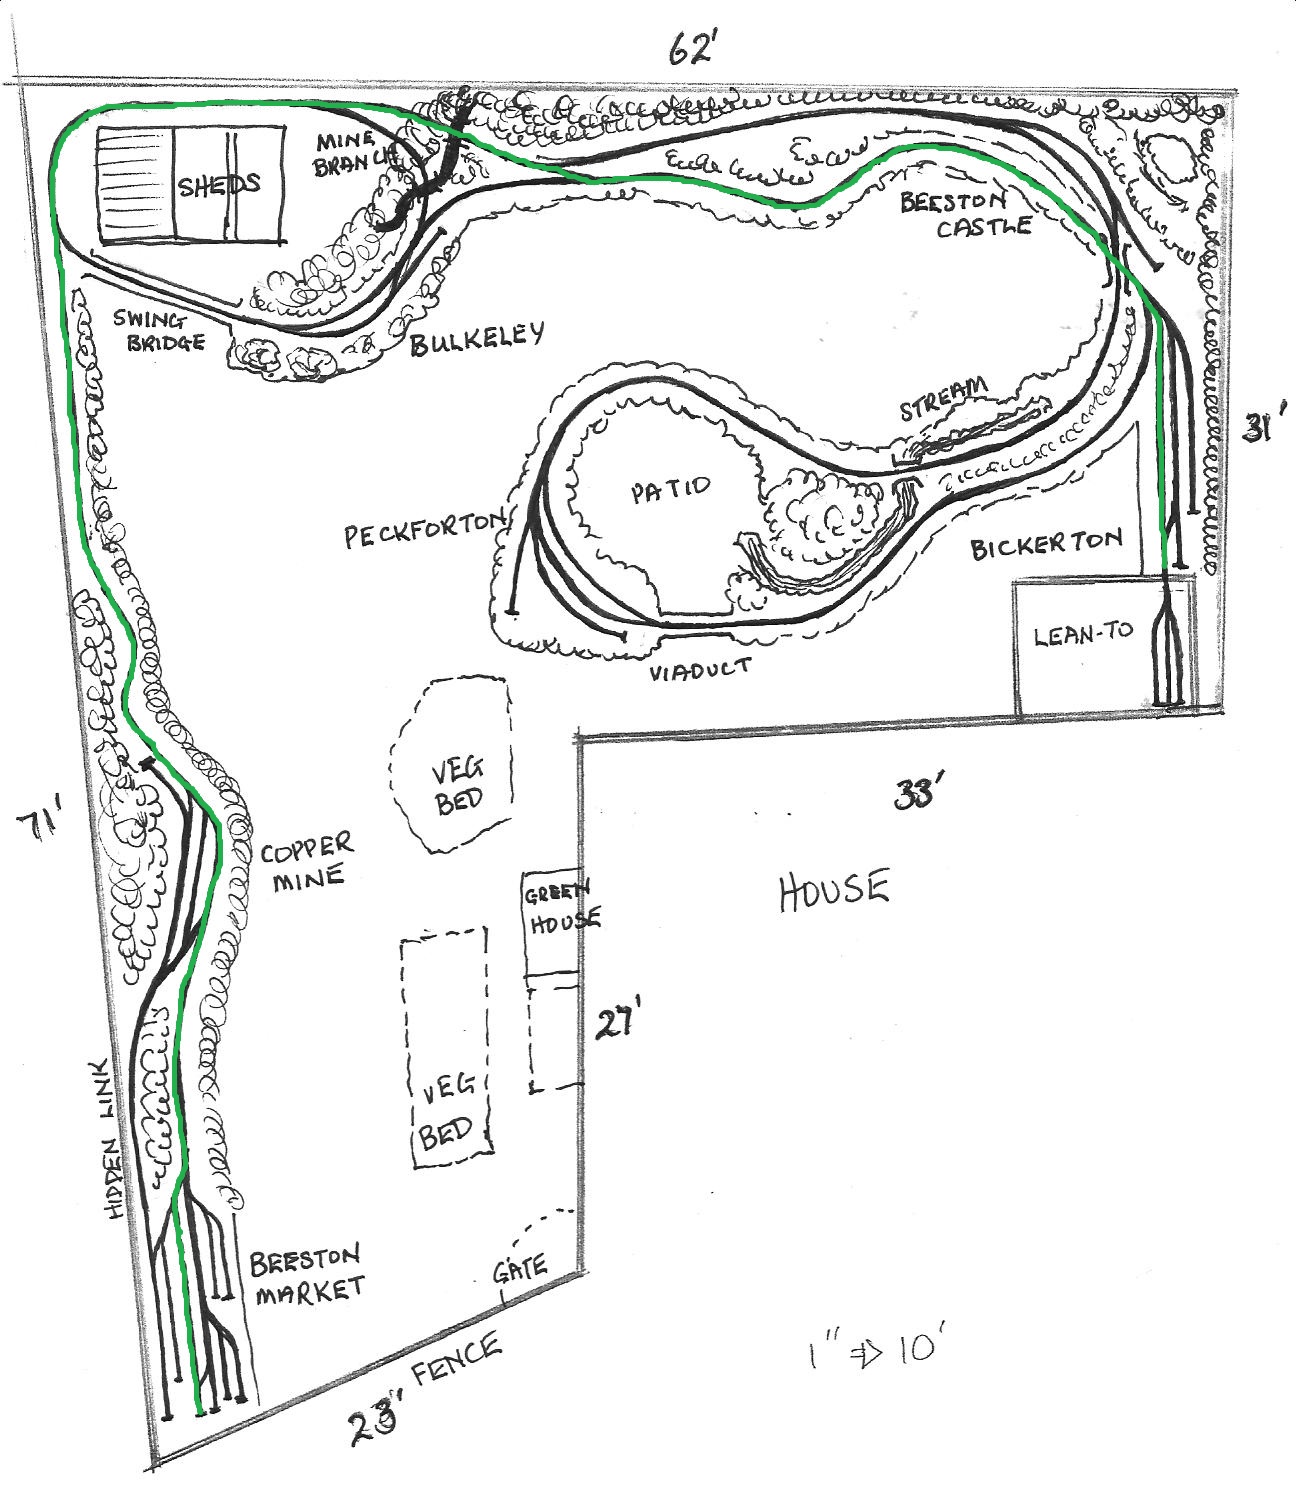
I have a continuous run on my railway, which I use from time to time - for example, while I'm doing some gardening. As you can see from the red line on this plan, the circuit crosses over itself to make a figure of eight.

End to end
Sometimes also called 'Terminus to Terminus'. If you think about it, most railways operate 'end to end' - trains travel from one terminus to another, with various stops in between. Only rarely do they operate continuous runs (eg the Circle Line on the London Underground). End to End running is quite satisfying if you want to run your railway realistically, but it does require the operator to control the trains rather than set them running and leave them, as is possible with a continuous circuit.
I have end-to-end running on my railway. I can run trains from one terminus to the other as shown on the plan below. In reality, the trains run through every station rather than taking a short cut as shown in green on the plan.
Out and back
As implied by the name, a train runs out of a terminus, negotiates a reverse loop (or balloon loop) and returns to the station. The operator can focus on train movements at the terminus, despatching and receiving trains which happily chuffs (or chugs) their way around the rest of the garden.I have a reverse loop on my railway which enables me to send trains out and back from either of the two termini. Rather than the short out and back route shown in blue, the train can also traverse the rest of the continuous circuit before returning.

Dumbbell
Also known as a dogbone. The Dumbbell is actually two reverse loops joined end to end, usually with a station (or more) in between. As with 'out and back', the operator can focus on movements at the station and send out and receive trains from either of the loops. It also allows for continuous running, particularly if the reverse loops have spring-loaded points controlling them (eg see - https://gardenrails.org/forum/viewtopic.php?t=8718 )
Any combination of the above
of course, as with my layout, you can combine together any of the above elements to make a more interesting and flexible track plan. The more options you include in your plan, the less likely you will tire of it. I would also suggest, at the planning stage, incorporating possibilities for future expansion if space permits. My present layout has grown over the years as funds and time have permitted.How will your railway be operated?
Will you- just run complete trains with no shunting,
- or will you try to represent real railway practices and shunt goods wagons into and out of stations?
Another fascinating insight into operations on a garden railway is provided by the Llyfni Vale Railway and Harbour Co.
 |
| Reproduced with permission |
Before cutting your first sod, you might want to spend a while with your plan, working out what trains could travel where and when to transport goods around your railway. Better to screw up a few sheets of paper than have to rebuild your railway at a later date!
How will your locos be powered?
There are three principal ways in which large scale locos could be powered:- Electric - track / overhead catenary,
- Electric - battery,
- Live steam.
- Clockwork,
- Live internal combustion
The advantages and disadvantages of these approaches can be summarised:
| Power source | Advantages | Disadvantages | Comments |
|---|---|---|---|
| Electric track / catenary power | Plenty of commercial suppliers Knowledge of indoor modelling can be transferred outdoors DCC allows for high level of control and sound systems Good for slow running and control |
The track needs to be cleaned regularly for effective running Electrical continuity can be affected by weather and corrosion DCC can be expensive |
Approach most favoured in USA, Australia and Europe |
| Electric battery power | No need for track cleaning Modern batteries are more reliable and maintain their charge Radio control systems are relatively cheap Good for slow running and control |
Battery packs need to be carefully charged and cared for Fewer off the shelf models and so some knowledge and expertise needed |
Becoming increasingly popular with the recent developments in battery technology and radio control systems (eg Bluetooth) |
| Live Steam | Just like the real thing Plenty of good quality off the shelf models available |
Locos can be expensive Expertise needs to be developed in operating them effectively Difficult to achieve slow running and control |
More popular in UK than other parts of the world You will need to create a steam-up area at waist height to enable you to prepare your locos |
| Clockwork | Low tech Good quality mechanisms can provide realistic speeds Traditional |
Specialist area - expertise needed Very few suppliers of equipment |
Has long historical pedigree and there are some enthusiasts who can be contacted for support |
| Live internal combustion | Just like the real thing | Specialist area - considerable expertise needed Very few suppliers of equipment |
A few dedicated modellers around but involves a lot of scratch-building and expertise |
Where and how will you store your rolling stock?
You might decide to store your rolling stock:- in boxes or crates inside the house,
- in portable cassettes,
- a mobile train trolley
- in secure storage sidings,
- underneath the layout,
- or a combination of the above.
In boxes or crates
You might start out with the intention of having very little rolling stock and then just carry out into the garden only the locomotive and coaches or wagons which you want to run during a particular running-session. If so, a few plastic crates will be sufficient for your needs. However, it is quite amazing how quickly a collection can grow and before long it is likely you will find the business of carting out a series of crates and boxes a disincentive to running your railway.Portable cassettes
Provided you have a suitable space (eg a garage, outbuilding or spare room), then portable cassettes are a preferable alternative to miscellaneous crates and boxes. Whole trains of rolling stock can be stored in the cassette and rolled out on to the track directly from the cassette saving considerable time and effort.I used cassettes on my railway - with one cassette for each siding on the railway so that I could store wagons and coaches exactly where they were at the end of a running session and restore them again at the start of the next session.

They were made simply from a few sheets of shaped plywood and made stackable so they could be stored in the lean-to.

A mobile train trolley
If you have somewhere to store your stock which is on the same level as your railway, then you could consider making a mobile train trolley, such as this made by fellow modeller Bob G (Trent Valley Branch Line).
Storage sidings
If you have a suitable shed or outbuilding then storage sidings provide a great way of storing stock when not in use. The great advantage is that the stock need never be handled and so is less likely to suffer accidental damage. Another advantage for me was that, having slipped a couple of disks in my neck, I was finding carrying the cassettes in and out exacerbated the problem and so, the sidings have been a boon.
As all my locos are battery powered, I was able to save on track for the sidings in the garage by using stripwood rails.

Underneath the layout
If you have sections of your railway on wooden or plastic boards, then you could create storage shelves or even sidings beneath your railway. The storage shelving could be made weatherproof and secure to protect your stock from damage or theft. You could use cassettes to ease the process of transferring the stock from storage to track.A combination of the above.
For a while, I used my cassettes with storage sidings in the lean-to until my collection of goods vehicles (now more than 70) outgrew the space.
I store my locomotives inside the house, where controlling the temperature and humidity is easier. Although my locomotives are not wildly expensive (I mostly make my own), I would be devastated if they were stolen and so prefer the added security which my burglar-alarmed house offers me.
A consideration you will have to make when planning your railway is deciding on the most suitable way to store your collection of rolling stock - taking account of future plans for expansion.
How much do you want to spend?
Of course, with unlimited funds we would all want to build complex and ambitious railway systems in our gardens but, in reality, we are constrained by the limits of our budget. As indicated above, the whole railway does not need to be completed from the outset. A simple circuit can be extended over time.One way of making meagre resources stretch further is to buy secondhand track. The majority of my track was pre-owned. Track intended for garden railways tends to be quite robust and so it is possible to buy track from other modellers' abandoned schemes at reasonable prices.

I have found that specialist garden railway shops tend to have stocks of track at prices which are generally lower than those on online auction sites, though their stocks will vary (eg See Garden Railway Specialists - https://www.grsuk.com/shop/Secondhand_Track-D703500 )
Whilst large scale garden railways are attractive, it must be borne in mind that they are more time-consuming to maintain and manage - and so a compromise solution is sometimes the best. Which brings us to the next issue........
How much work do you want to do?
Generally, the most effective garden railways are those which have been landscaped to most effectively fill the space which has been allotted to them. There are some spectacular garden railways in existence with mountain landscapes, towns, villages, waterfalls, streams and impressive infrastructure. However, some of the more modest garden railways are equally remarkable for their subtle use of landscaping.So, will your railway be.....
- ground-based,
- raised in planted beds,
- raised on boards well above the ground,
- or a combination of the above?
Ground-based railways
Some garden railway modellers prefer this type of railway as it blends into the pre-existing garden with the minimum of additional landscaping. There is something very pleasing about watching trains weaving in and out of patches of growing plants.
If your garden is sloping, then a ground-based line can become even more interesting - keeping the track level but building-up and/or digging into the ground with embankments and cuttings, much like the real thing.
However, whilst ground-based railways can become an integral part of the existing landscape, their disadvantages are that they:
- require the operators to do a lot of bending,
- do not always show off the rolling stock to its best advantage.
Raised beds offer a compromise between a completely ground-based railway and an elevated railway.
Raised beds
Raised beds can be constructed from wooden edging, wooden sleepers, brick, concrete blocks, stone or simply rammed earth. They enable you to have the benefits of a ground-based railway (ie watching your trains negotiate a miniature, growing landscape) with those of an elevated railway (ease of maintenance and getting a better view of your rolling stock). However, raised beds have to be constructed and so require a fair degree of investment in both cash and time - unless your garden already features them.The majority of my railway is on raised beds - ranging from around three inches above the surrounding garden, to two feet. Once I had decided on the track plan, it took me around a month of part time work to landscape the garden, moving soil from the sunken areas to the raised areas and building the retaining walls. I used concrete blocks clad in sandstone.

Raised boards
Constructing a garden railway on raised boards is a great way of showing off rolling stock and also helping to prevent back problems. It's also a good way of overcoming difficulties landscaping a sloping site. It's also a relatively quick and easy way of getting a railway up and running - driving posts into the ground and interconnecting them with the trackbed is far less onerous and time consuming than creating a trackbed on the ground or making raised beds. The drawback is that it is more difficult to create a scenic backdrop to the railway.Part of my railway is on raised boards, where it runs along the edge of the garden beside a fence and raised beds would have been difficult to construct. To disguise the boards, I have grown a hedge beneath and behind the boards.

A combination of the above
There is no reason why you can't have part of your railway at ground level, some of it on raised beds and another section on boards - particularly if you have a sloping site or you are prepared to include gradients. Garden trains can cope happily with gradients up to around 1:40, but any steeper and you will start restricting the length and weight of trains your locos will be able to haul. One of the most essential pieces of equipment you will need when constructing your railway, no matter whether it is ground-based or raised, is a decent long spirit level. This not only ensures you keep your trackbed level, it can also be used to construct regular gradients.
Gradients
You will need to plan carefully for any gradients on your line. As indicated above, the maximum workable gradient is 1:40 - you can go steeper but it will limit the trains you are able to haul. To give you six inches (150mm) clearance needed to allow one track to pass over the over, at 1:40 you will need 240" (ie 20 feet or 6 metres) of gradient. You will also need to ensure that the gradient is evenly spaced along that length - which is why the spirit level is essential.If you are intending to run live steam locos without radio control, then you will need to keep the track as level as possible and try to avoid too many sharp curves. Manually operated live steam locos are adversely affected by gradients and curves which can lead to a fair degree of frustration.
What are you waiting for?
I took around three years to plan my garden railway before I actually laid hands on a spade. That time was spent accumulating funds and buying the raw materials I needed as I eventually decided that, to get the most out of the space I had available, I would have to engage in some serious civil engineering (including building the lean-to on the right of this photo).
However, your plans might be more modest. Some modellers start with a circle of track laid around their existing lawns.
In the meantime, drawing up plans costs nothing, apart from a little time. And the more plans you create, the more likely you are to come up with an idea which motivates you to grab that spade and start digging.


