Before the Grand Opening Ceremony, there were a few loose ends which needed tidying up - some related to the railway and others to do with the garden itself.
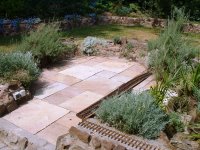
The patio-to-be becomes a very 'cosy' patio
Indian sandstone (cheaper than 'riven' concrete slabs) was laid to form the patio. As this was very much last-minute, the slabs were laid on a bed of dry-mix concrete (four parts sand to one part cement). I found the levelling of the slabs quite easy with this method as the slabs are of varying thicknesses. It also meant the could be walked on sooner than if I'd used a wet mix. I watered them in and so far (touch wood) none seems to have sunk.
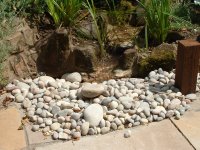
The stream sump is beautified
Reading 'How I created the stream' you will see I used a plastic dustbin (£10.00) for the sump. Until recently it resembled nothing more than a plastic dustbin sunk into the ground with a rather prominent tube disappearing into the stream bed. After pricing purpose-made sumps, I decided to use my initiative. I drilled a series of holes in the plastic dustbin lid it, then placed it, inverted, on top of the dustbin. A couple of £5.00 bags of pebbles and, tra-lah - one rather elegant end to the stream. A purpose made sump of the same size would have cost £70+!
[Update - April 2009] Each spring I clean out the stream and unclog the pump. I was alarmed to find the decomposing bodies of three small frogs in the sump. Presumably, they had managed to squeeze in where the pipe comes out of the lid but were unable to climb back out again and so drowned. I decided therefore to modify the lid to provide an escape route for adventurous frogs.
 With a piercing saw, I cut a flap in the lid of the dustbin which was then bent downwards to act as a platform for the froglets. Whenever I run the pump I now make sure I top up the sump to ensure the water level is up to the flap. I will check again next spring to see if my cunning scheme has worked.
[Update November 2017] - I am pleased to report that since making this hatch, I have not found another dead froglet in the sump.
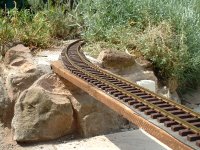
The switch-back leading to the patio bridge is evened-out
As mentioned in the previous progress report, there was a nasty hump on the approach to the switch bridge leading to the patio. To iron this out, the three blocks leading to the bridge were lifted and relaid, and the concrete and stone abutment was chiselled out to a lower level. There is still a very slight hump but nowhere near as noticeable as before.
The patio-to-be becomes a very 'cosy' patio
Indian sandstone (cheaper than 'riven' concrete slabs) was laid to form the patio. As this was very much last-minute, the slabs were laid on a bed of dry-mix concrete (four parts sand to one part cement). I found the levelling of the slabs quite easy with this method as the slabs are of varying thicknesses. It also meant the could be walked on sooner than if I'd used a wet mix. I watered them in and so far (touch wood) none seems to have sunk.
The stream sump is beautified
Reading 'How I created the stream' you will see I used a plastic dustbin (£10.00) for the sump. Until recently it resembled nothing more than a plastic dustbin sunk into the ground with a rather prominent tube disappearing into the stream bed. After pricing purpose-made sumps, I decided to use my initiative. I drilled a series of holes in the plastic dustbin lid it, then placed it, inverted, on top of the dustbin. A couple of £5.00 bags of pebbles and, tra-lah - one rather elegant end to the stream. A purpose made sump of the same size would have cost £70+!
[Update - April 2009] Each spring I clean out the stream and unclog the pump. I was alarmed to find the decomposing bodies of three small frogs in the sump. Presumably, they had managed to squeeze in where the pipe comes out of the lid but were unable to climb back out again and so drowned. I decided therefore to modify the lid to provide an escape route for adventurous frogs.
 With a piercing saw, I cut a flap in the lid of the dustbin which was then bent downwards to act as a platform for the froglets. Whenever I run the pump I now make sure I top up the sump to ensure the water level is up to the flap. I will check again next spring to see if my cunning scheme has worked.
[Update November 2017] - I am pleased to report that since making this hatch, I have not found another dead froglet in the sump.
The switch-back leading to the patio bridge is evened-out
As mentioned in the previous progress report, there was a nasty hump on the approach to the switch bridge leading to the patio. To iron this out, the three blocks leading to the bridge were lifted and relaid, and the concrete and stone abutment was chiselled out to a lower level. There is still a very slight hump but nowhere near as noticeable as before.
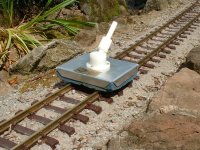
A decent track cleaning rubber has been bought
Relatively expensive at £20 from GRS (Garden Railway Specialists), but as track cleaning is now down to around 30 minutes as opposed to the 2 hours or more it took previously, I consider this well worth the investment!!
<< Go to Progress Report 6
Relatively expensive at £20 from GRS (Garden Railway Specialists), but as track cleaning is now down to around 30 minutes as opposed to the 2 hours or more it took previously, I consider this well worth the investment!!
<< Go to Progress Report 6


.JPG)


No comments:
Post a Comment