Having previously scratchbuilt two cattle wagons based loosely on Welshpool and Llanfair originals (see How I made two cattle wagons from plasticard), I decided to make my next pair from IP Engineering wooden kits.
The kits included everything needed, including laser-cut wooden parts, whitemetal fittings, steel wheels a pre-curved steel roof and various oddments.

The underframe
Following the instructions, two lines were drawn 30cm either side of the centre line on the base to later position the solebars for 45mm gauge.

In addition, I marked the position of the axles, 50cm either side of the centre line. I have found from experience that this is useful to help ensure the axles are square and parallel.

Rather than fitting the solebars first as per the instructions, I firstly glued the buffer beams in place.

I then glued the solebars between them.

The body
Back to the instructions, holes were drilled in the corner posts and door posts to take the bars across the van openings. Lines were drawn 62cm from the base to guide the fitting of the side panels.

The side panels were then glued in place .......

..... as were the lower planks.........

....... on all four side units.

The vertical frames were then glued to the end panels.

The side units were then joined to the doors. Rather than fitting the doors flush with the inside edges of the door frames as per the instructions, I decided to glue the doors flush with the outside edges. I felt this would be more realistic, particularly when fitting the hinges.

The top rails were then glued to the top of the door frames and between the end posts.


At this point I glued the framing for across the centres of the side panels. To help with alignment, I drew marks either side of the frame.


The sides and ends were then glued to the base.

The roof
I decided to fit roof support panels to the ends of the wagon. The roof was used as a template to mark out the profile for the roof panels on 2mm plywood.

The panels were then marked out and trimmed to fit between the corner posts.

They were then glued in place, using the roof for correct alignment.

Rather than gluing the roof in place, I decided to make it removable. The roof was used as a template to mark out framing for inside the ends of the roof.


These were then cut out with a craft knife and glued with expoxy to the underside of the roof.

The framing for the sides of the roof were made from offcuts from the kit fret.

Detailing
The hinges were then superglued to the doors and wagon base.

The brass bearings were pressing into the axle guards in the vice.......

....... before the axle guards were epoxied to the solebars, using the lines drawn earlier as guides.

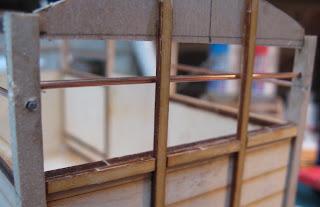
The bars for the windows were then cut and fixed in place in the holes drilled previously with superglue.
Then the buffers were screwed to the buffer beams.

Rather than finishing the kit at this point, I decided to add cosmetic brake gear. A brake lever was fashioned from a lolly stick, 105mm long, tapering from 4mm to 2mm and rounded at each end with sand paper.

A 10mm x 10mm triangular bracket was cut from a lolly stick together with a mounting plate.

The mounting plate was glued to the back of the solebar ......

..... and the bracket was glued to it.

Two pieces of offcuts from the kit's fret were cut to a length of 25mm and two small pieces of lolly stick were cut to act as spacers. Holes were drilled at 3mm intervals in one of the brackets.

The hanger was glued together - one end being rounded with emery paper.
The hanger was glued to the solebar, and the lever was inserted into it and glued to the bracket.

The wagon was then ready for painting.

Two coats of Halfords grey primer were applied and then rubbed down with fine emery before a final coat was added. The underframe and hinges were then picked out with black acrylics. The roof was primed with grey primer and then given a coat of acrylics - an equal mix of black and silver.

I have found that the steel roof makes the wagons somewhat heavy, which may not prove to be a problem for live steam locos, but my 0-4-0 electric locos struggle with them in a train. I intend to replace the roofs with plasticard at the earliest opportunity (See Progress Report 41)
UPDATE (15/8/12) - The wheels originally supplied with the kit proved to be incompatible with LGB R1 points. I solved the problem by fixing plasticard washers behind each wheel (see How I made IP Engineering wheels compatible with LGB pointwork).
The kits included everything needed, including laser-cut wooden parts, whitemetal fittings, steel wheels a pre-curved steel roof and various oddments.

The underframe
Following the instructions, two lines were drawn 30cm either side of the centre line on the base to later position the solebars for 45mm gauge.

In addition, I marked the position of the axles, 50cm either side of the centre line. I have found from experience that this is useful to help ensure the axles are square and parallel.

Rather than fitting the solebars first as per the instructions, I firstly glued the buffer beams in place.

I then glued the solebars between them.

The body
Back to the instructions, holes were drilled in the corner posts and door posts to take the bars across the van openings. Lines were drawn 62cm from the base to guide the fitting of the side panels.

The side panels were then glued in place .......

..... as were the lower planks.........

....... on all four side units.

The vertical frames were then glued to the end panels.

The side units were then joined to the doors. Rather than fitting the doors flush with the inside edges of the door frames as per the instructions, I decided to glue the doors flush with the outside edges. I felt this would be more realistic, particularly when fitting the hinges.

The top rails were then glued to the top of the door frames and between the end posts.


At this point I glued the framing for across the centres of the side panels. To help with alignment, I drew marks either side of the frame.


The sides and ends were then glued to the base.

The roof
I decided to fit roof support panels to the ends of the wagon. The roof was used as a template to mark out the profile for the roof panels on 2mm plywood.

The panels were then marked out and trimmed to fit between the corner posts.

They were then glued in place, using the roof for correct alignment.

Rather than gluing the roof in place, I decided to make it removable. The roof was used as a template to mark out framing for inside the ends of the roof.


These were then cut out with a craft knife and glued with expoxy to the underside of the roof.

The framing for the sides of the roof were made from offcuts from the kit fret.

Detailing
The hinges were then superglued to the doors and wagon base.

The brass bearings were pressing into the axle guards in the vice.......

....... before the axle guards were epoxied to the solebars, using the lines drawn earlier as guides.

The bars for the windows were then cut and fixed in place in the holes drilled previously with superglue.

Then the buffers were screwed to the buffer beams.

Rather than finishing the kit at this point, I decided to add cosmetic brake gear. A brake lever was fashioned from a lolly stick, 105mm long, tapering from 4mm to 2mm and rounded at each end with sand paper.

A 10mm x 10mm triangular bracket was cut from a lolly stick together with a mounting plate.

The mounting plate was glued to the back of the solebar ......

..... and the bracket was glued to it.

Two pieces of offcuts from the kit's fret were cut to a length of 25mm and two small pieces of lolly stick were cut to act as spacers. Holes were drilled at 3mm intervals in one of the brackets.

The hanger was glued together - one end being rounded with emery paper.
The hanger was glued to the solebar, and the lever was inserted into it and glued to the bracket.

The wagon was then ready for painting.

Two coats of Halfords grey primer were applied and then rubbed down with fine emery before a final coat was added. The underframe and hinges were then picked out with black acrylics. The roof was primed with grey primer and then given a coat of acrylics - an equal mix of black and silver.

I have found that the steel roof makes the wagons somewhat heavy, which may not prove to be a problem for live steam locos, but my 0-4-0 electric locos struggle with them in a train. I intend to replace the roofs with plasticard at the earliest opportunity (See Progress Report 41)
UPDATE (15/8/12) - The wheels originally supplied with the kit proved to be incompatible with LGB R1 points. I solved the problem by fixing plasticard washers behind each wheel (see How I made IP Engineering wheels compatible with LGB pointwork).
2 comments:
Interesting - so the roof is pre-curved then?
Yes. It's a chunk of steel so also adds some weight to the model. I'm thinking of adding wooden strips around it to thicken it cosemtically - it looks a bit too thin to my mind.
Post a Comment