It's been quite a busy month since my last Progress Report (see Progress Report 72). A prolonged spell of fine weather has enabled me to get out into the garden to run some trains and to finish off some of the projects which have been on the to do list.

The logs enter the mill on the saw carriage (top right) and are then cut into flitches by the headsaws. The flitches are stacked on the transfer bench before being trimmed to the required widths on the first bench saw. The planks are then cut to length on the second bench saw before exiting the mill on the top left to be stacked in the yard.
All the machinery was constructed from stripwood, plasticard and oddments picked up in my local 50p shop.


The mill engine was bashed from an Airfix model of a beam engine and the overhead pulleys were 3D printed for me by a fellow modeller.

For more information see - How I detailed the interior of my sawmill
I've assumed the crane would have been manually powered in the period in which my railway is set (ie 1932) and so made some assumptions about how the mechanisms would have been constructed. Hopefully, what I have produced is feasible.


For more information on the construction of the crane see - How I constructed a timber gantry crane
A 1:1 mix of rapid setting cement with a small quantity of brown cement dye .......

Water was added until the mix had a consistency of thick cream.

To economise, I mixed sufficient to fill two cobble stones moulds as well as the platform edging mould (on the right).
The concrete mix was poured into the mould and left for half an hour or so (dependent on the weather conditions) before the moulding was carefully removed from the mould.


The platform now looks a lot more realistic - compare this shot with the 'before' one above.


...... bringing the ground up to sleeper height for the main loops and rail height in the sidings.

Once this had set, I applied a dry mix of coarse sand, fine gravel, sifted soil and cement over the whole area. This was brushed into place with an old paintbrush.

This mix was then watered with a mist spray, dribbled with SBR additive and then given another mist spray.

This was left a couple of days to dry. A very thin wash of cement dye was then painted over the whole station area, .........

....... varying and blending the colours (black and brown), to provide variety - the running tracks were generally coloued darker and the other areas lighter.

The area was left to dry off, before the rail running surfaces were scraped clean of grit and glue.


I used a combination of Jigstone mouldings for setts and concrete to create the sub surface,

Although this area still needs some additional detailing, it is looking a lot less spartan than it did previously.

For more information, see How I landscaped the approach to Beeston Market Station.


The fence (somewhat neglected and decrepit) is now very much apparent. Whereas previously, photos and videos of trains travelling along this section of the railway had a backdrop of foliage, ......

.... the fence is now unavoidable.

However, new shrubs and some alpines have been planted and so, in time, the background will become more photogenic. In the meantime, I have been experimenting with post production photographic fixes to disguise some of the less attractive backgrounds to my railway.
After draping some blue plastic sheeting in front of the offending backgrounds .......


It's already full, and so another solution will have to be sought for the next phase of building construction.


- The sawmill interior has been finished off
- A gantry crane has been constructed for the timber yard
- Peckforton Station yard has been landscaped and re-ballasted
- Peckforton Station platform has been rebuilt
- The approach to Beeston Market station has been landscaped
- A couple of conifers have been removed from the garden, opening up an area which was previously overgrown
- A new storage shed has been acquired for the recently finished buildings
- More rolling stock has been equipped with replacement PLR couplings
- I have modified the clipboard I use when working out freight movements
- Loco No. 2 (Beeston) has been equipped with a replacement li-ion battery pack
- I have been able to engage in a couple of full operating sessions
Lineside
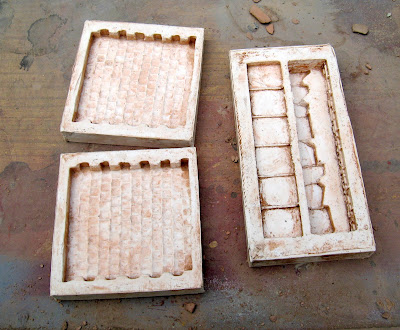
The Sawmill Interior
Using information gleaned from the web, I worked out what sort of equipment a small sawmill might have as a minimum and then positioned it in the mill in what seemed to be the most logical arrangement.
The logs enter the mill on the saw carriage (top right) and are then cut into flitches by the headsaws. The flitches are stacked on the transfer bench before being trimmed to the required widths on the first bench saw. The planks are then cut to length on the second bench saw before exiting the mill on the top left to be stacked in the yard.
All the machinery was constructed from stripwood, plasticard and oddments picked up in my local 50p shop.


The mill engine was bashed from an Airfix model of a beam engine and the overhead pulleys were 3D printed for me by a fellow modeller.

For more information see - How I detailed the interior of my sawmill
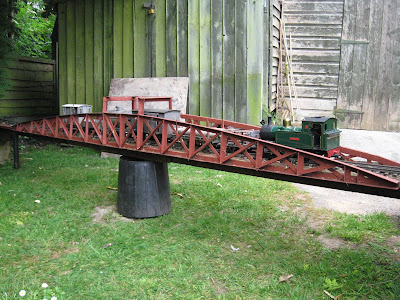
The gantry crane
To load and unload the wagons, I figured a gantry crane (with a wooden structure) would be appropriate. There were very few images of suitable cranes on the internet and so my model was largely based on the one drawing which I did manage to track down on this wonderful website - http://myweb.tiscali.co.uk/gansg/I've assumed the crane would have been manually powered in the period in which my railway is set (ie 1932) and so made some assumptions about how the mechanisms would have been constructed. Hopefully, what I have produced is feasible.


For more information on the construction of the crane see - How I constructed a timber gantry crane
Rebuilding Peckforton Station platform
When the timber yard sidings were extended at Peckforton (see How I extended the sidings at Peckforton Station), I also took the opportunity to even out a dip in the tracks through the station. However, raising the track alongside the platform meant the platform ended up a couple of centimetres lower than the track.


While landscaping the area around the sawmill (see below), it seemed opportune to also raise the level of the platform. Platform edging sections were cast using a JigStones mould.
A 1:1 mix of rapid setting cement with a small quantity of brown cement dye .......

Water was added until the mix had a consistency of thick cream.

To economise, I mixed sufficient to fill two cobble stones moulds as well as the platform edging mould (on the right).

The concrete mix was poured into the mould and left for half an hour or so (dependent on the weather conditions) before the moulding was carefully removed from the mould.

Thirty blocks were needed for the length of the platform and so, after these had been cast, a stiff mix of concrete (1 part cement to 3 parts sand) was applied to bring the platform area up to the level of the sleepers, the Jigstones sections were then placed alongside the track and the area behind them filled with more concrete mix.

The platform now looks a lot more realistic - compare this shot with the 'before' one above.

Landscaping and ballasting Peckforton Station yard
After sorting out the platform, the area surrounding the sawmill building was landscaped with brown dyed concrete......
...... bringing the ground up to sleeper height for the main loops and rail height in the sidings.

Once this had set, I applied a dry mix of coarse sand, fine gravel, sifted soil and cement over the whole area. This was brushed into place with an old paintbrush.

This mix was then watered with a mist spray, dribbled with SBR additive and then given another mist spray.

This was left a couple of days to dry. A very thin wash of cement dye was then painted over the whole station area, .........

....... varying and blending the colours (black and brown), to provide variety - the running tracks were generally coloued darker and the other areas lighter.

The area was left to dry off, before the rail running surfaces were scraped clean of grit and glue.

Landscaping the approach to Beeston Market Station
Having constructed some coal staithes (see How I constructed some coal staithes) and a cafe (see How I constructed a cafe) for the approach to Beeston Market station, I needed to finish off the landscaping for this area.
I used a combination of Jigstone mouldings for setts and concrete to create the sub surface,

Although this area still needs some additional detailing, it is looking a lot less spartan than it did previously.

For more information, see How I landscaped the approach to Beeston Market Station.

Clearing undergrowth
The fence at the back of the garden has, for many years, been obscured by large shrubs and bushes. However, these were overhung by three large conifers (rampant leylandii) and laurel from next door's garden. When my neighbours had one of their conifers and some of their laurel cut back and so I commissioned the tree feller to remove the two conifers on my side of the fence. At the same time, the shrubs and bushes were cut back to ground level.

The fence (somewhat neglected and decrepit) is now very much apparent. Whereas previously, photos and videos of trains travelling along this section of the railway had a backdrop of foliage, ......

.... the fence is now unavoidable.

However, new shrubs and some alpines have been planted and so, in time, the background will become more photogenic. In the meantime, I have been experimenting with post production photographic fixes to disguise some of the less attractive backgrounds to my railway.

After draping some blue plastic sheeting in front of the offending backgrounds .......

...... I was then able to replace the areas of blue with a more appropriate background image.

I am not entirely convinced by the outcome; I think a lot more attention needs to be paid to matching the lighting in the two shots. However, it might prove useful in trying to disguise some of the less attractive areas of the garden to allow previously unphotographed aspects of the railway to be portrayed.

I am not entirely convinced by the outcome; I think a lot more attention needs to be paid to matching the lighting in the two shots. However, it might prove useful in trying to disguise some of the less attractive areas of the garden to allow previously unphotographed aspects of the railway to be portrayed.
New storage shed
With the completion of new buildings and structures around the layout, most of which need to be stored inside when not in use, I was rapidly running out of indoor storage space. A refurbished garden storage cupboard has been acquired.

It's already full, and so another solution will have to be sought for the next phase of building construction.

Stock
Couplings
I have always retained LGB couplings from the early days when my garden railway modelling adventure began with an LGB starter set. I really enjoy marshalling, running and shunting goods trains and so need a coupling which is reliable and easy to couple and uncouple. Whilst the LGB coupling meets these needs, it is unprototypical and ugly. In the previous Progress Report, I showed how I had been experimenting with direct replacements for LGB couplings using bent wire. I have now developed these further, replacing the paper clip loops with loops from more substantial (1.5mm) brass rod and the thin brass hooks with phosphor bronze versions. I have tweaked the dimensions of the mounting plates to ensure more uniformity over loop height and length, and made a jig for bending the loops to ease construction and to improve consistency.

Several wagons of different types have now been fitted with the replacements to evaluate their effectiveness and I have found a way of replacing the smaller LGB centre buffers to enhance their function when wagons are being propelled.

As the replacements are compatible with LGB couplings, replacement can be on an ongoing basis. For more information, see How I have constructed replacements for LGB couplings
Loco No. 2 (Beeston)
During the most recent operating session (see below), Barclay 2-4-0 loco No. 2 (Beeston), suddenly stopped working. After turning her off has been equipped with a replacement 11.1v li-ion battery pack
Operation
I have modified the clipboard I use when working out freight movements. A row of magnets inserted behind the plastic cover, .........

.........enables me to temporarily store my wagon destination boards which I use when assigning wagons to destinations (see Video of freight operations on my railway)

.........enables me to temporarily store my wagon destination boards which I use when assigning wagons to destinations (see Video of freight operations on my railway)
I have been able to engage in a couple of full operating sessions

 |
| Owing to the failure of Loco No. (Beeston), Loco No. 3 (Bickerton) was sent to pilot her back to Beeston Market |
 |
| Fowler DM 0-4-0 loco No. 7 (Tollemache) passing the mill with an Up ore train |
 |
| Hunslet 0-4-0T loco No. 3 (Bickerton) pounding up Gallantry Bank with the Up pickup goods |
 |
| Black Hawthorn Loco No. 10 at Bickerton with a special goods train |
 |
| No. 3 (Bickerton) approaching Bulkeley with an Up passenger while No. 10 approaches Beeston Castle with a Down special goods |

No comments:
Post a Comment