 One of the driving forces behind the construction of the Peckforton Railway was the desire to create a complete self contained light railway. One thing which attracts me to railway modelling is operation. To this end, the line will be operated according to a timetable with freight traffic generated by a computer program (see Progress Report 16 - Freight Operation). This means that at the end of each operating session I will need to store the wagons located on every siding so they can be relocated to resume operations from where they left off. After all, at the end of each day on a real railway the wagons remain where they end up. To solve this problem, and also to save the effort of carrying stock in and out the house I decided to construct a set of stock boxes.
Firstly, I roughly measured each of the sidings on the line to determine the length of each box. My measurements concluded that I needed 11 stock boxes to accommodate all the stock from the sidings on the line:
- Beeston Market = 3 x 150cm (2 sidings yet to be constructed)
- Beeston Castle = 1 x 100cm
- Peckforton = 1 x 120cm + 1 x 100cm
- Bulkeley = 1 x 120cm
- Copper Mine = 2 x 150cm + 1 x 60cm
- Bickerton = 1 x 150cm
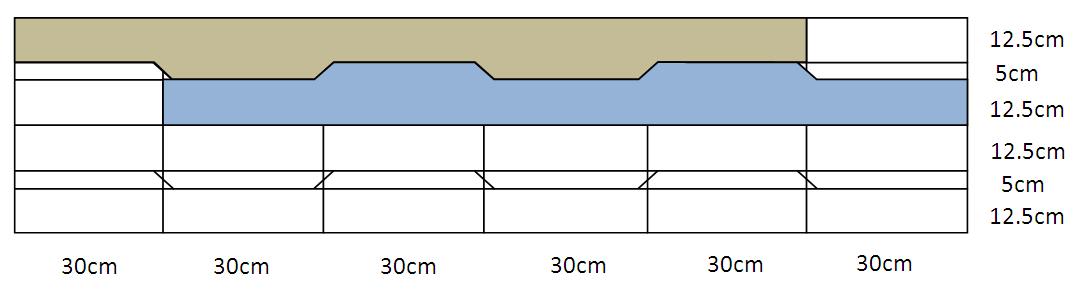
After some rough measurements of the stock, I realised the boxes needed to be 17.5cm tall x 15cm wide. I quickly realised I would be unable to get four lengths 17.5cm strips from the 60cm wide sheets. Being a skinflint, I had a rethink. I realised the sides didn't need to be 17.5cm tall throughout their length so opted for sides which are 12.5cm tall with a couple of taller sections 17.5cm wide. This would enable two sides to dovetail together thereby enabling me to get four sides from each sheet of ply.
 The 9mm ply was marked out:
 and then cut using a jig-saw.
 The 6.3mm ply was cut into 15cm wide strips. These were then screwed and glued to the sides. Off-cuts of 6.3mm ply were screwed & glued across the tops and some simple rope handles were then fixed to these to aid carrying. An end-stop was fashioned from an offcut of 9mm ply and a swinging arm from a redundant wire coat hanger created at the other (open) end to prevent the stock from rolling out when in transit.
 I've since learned that the wire stop needs to be fixed lower down otherwise less tall stock can slip underneath it.
 At then end of a running session, goods stock from each siding is run into the relevant box and carried into the lean-to for storage.
 The stock is then restored to the appropriate siding at the start of the next session.
 The next job is to label the boxes and to give them a coat of varnish.
As requested (see comments), I've now added a couple of videos showing how the stock is wheeled in and out of the boxes. I use LGB couplings and find it's better if the wagons have hooks at both ends as they tend to uncouple themselves as they enter and leave the box.
I may experiment with putting some guides on the inside of the base at the end of the box, but for now they don't really seem necessary.
3 comments:
That's neat. How easy do you find it to get the stock on and off the rails without track in the box and a ramp in and out?
Haven't found it to be a problem. Getting the stock into the boxes is easy, it just rolls straight in from the rail. Getting the stock out and on to the rails is also no problem. I keep the stock coupled together and once I've aligned the first wagon the others follow on with a slight bit of adjustment. Certainly easier than craning each item in by hand. I deliberately went for thin ply for the base of each box (6.3mm). I might glue some thin ply guides 45mm apart inside the base of each box, but that's only to keep the stock from rattling about in the boxes.
PS - I might make a video to show how they work in practice (time and weather permitting)
Post a Comment