A month or so since my last report (see Progress Report 73) and quite a few developments.

I am in the process of making a smoke unit for it so that, intermittently, smoke will emerge from the chimney (see How I constructed a smoke unit for the boiler house - pending)


The water tower and boiler house need to be properly bedded-in to the locations at the station, but they do seem to fit the bill quite nicely.


I am now in the process of adding more detailing at Beeston Castle Station to, for example, allow passengers to access the site of the castle.
To assist with the loading and unloading of apples and soft fruit, I felt a reasonably substantial loading bank would have been required, and so I cast one in concrete:

For more information see - How I cast a loading bank in concrete.


Before .........

..... and after.

For more information about the conversion see How I anglicised an LGB box car


For more information about this build see - How I constructed an IP Engineering Albert loco from a kit
I am now about 2/3 of the way through converting the rolling stock and have had a couple of operating sessions using a mix of couplings. There are a few teething problems, particularly when linking the new couplings to LGB couplings, but overall I am pleased with the way in which the new couplings are faring. For more information see How I constructed my own LGB style hook and loop couplings
Before......

..... After

The netting seems to be more effective if it is a fair distance from the camera and/or is viewed through foliage in the middle distance.
Less effective .......

...... more effective

For this session, I used my two ex Southwold locos to handle the bulk of the traffic
And this one employed principally my Bagnall 0-4-2T and ex Davington Manning Wardle 0-6-0T. In this video the mix of new and old couplings is clearly visible from 1:50 to 2:10.
- I have completed a boiler house and water tower for the sawmill at Peckforton
- I have constructed a loading bank for Bulkeley station
- I have constructed the ruins of Beeston Castle
- I have added a siding to Beeston Castle Station
- I have started construction of fruit boxes for the loading bank
- I have converted an LGB US style box car into something more appropriate for the PLR
- I have written-up the construction of the IP Engineering Albert loco kit
- I have pressed ahead with the development and fitting of my LGB coupling replacements
- I have purchased and deployed camouflage netting to help disguise ugly backgrounds when filming or photographing scenes on my railway
- I have had a couple of very satisfying operating sessions
Lineside
Boiler House and Water Tower for the sawmill at Peckforton
After finishing the sawmill (see How I constructed the sawmill and How I detailed the interior of the sawmill), I realised that the mill engine powering the equipment at the sawmill would need a boiler to generate steam. Although, in reality, it would have been unlikely that an elaborate structure would have been used to house the boiler, I decided to make a fairly substantial structure from PVC foamboard using the skills I had acquired when constructing the water mill (see How I constructed the water mill from foamboard).
I am in the process of making a smoke unit for it so that, intermittently, smoke will emerge from the chimney (see How I constructed a smoke unit for the boiler house - pending)

To accompany the boiler house, I realised I would need a water tower. Again, I opted for something quite substantial as I reasoned that it could also serve to replenish locomotive tanks as Peckforton is the midway station on the system. PVC foamboard, plasticard and the barrel from a ball point pen were pressed into service to make the tower (see How I constructed the water tower at Peckforton station).

The water tower and boiler house need to be properly bedded-in to the locations at the station, but they do seem to fit the bill quite nicely.

Beeston Castle
For more than ten years, Beeston Castle has been represented by a cluster of small sandstone pebbles concreted together. These have now been replaced by a gatehouse, a representation of the walls of the outer bailey and some walls of the inner bailey, carved from a couple of Thermalite blocks. For more information see How I constructed Beeston Castle from Thermalite blocks.
I am now in the process of adding more detailing at Beeston Castle Station to, for example, allow passengers to access the site of the castle.
Loading bank at Bulkeley
I have always assumed that one of the prime sources of traffic from Bulkeley station would be fruit-growing - eg see http://billpearson.co.uk/foodmap/CheshireApples.htmlTo assist with the loading and unloading of apples and soft fruit, I felt a reasonably substantial loading bank would have been required, and so I cast one in concrete:

For more information see - How I cast a loading bank in concrete.
Fruit boxes
To hold the fruit, I needed some fruit boxes. These were kindly donated to me by a fellow modeller who had some laser-cut frets surplus to his requirements. I am in the process of acquiring more 1/24 scale apples to load into them but my original source seems to have run out. I may have to resort to making my own from Fimo.
Permanent Way
New siding at Beeston Castle Station
A new siding has now been added to the passing loop at Beeston Castle. The old siding at Beeston has always been rather short - accommodating no more than three wagons. The new siding should be able to hold up to seven wagons. I am trying to decide whether to add a lineside industry to the siding - either a brewery or a dairy.

Rolling Stock
Anglicisation of a US style box car
These days, I don't often add more rolling stock to the roster as my railway has more or less reached its capacity. However, I have had an LGB US style box car sitting on my shelves for a couple of years and, after using it as a test-base for the development of my LGB replacement couplings (see below), I decided it was about time I resolved its ignominy and let it enter service.Before .........

..... and after.

For more information about the conversion see How I anglicised an LGB box car
IP Engineering Albert loco
Since my last Progress Report, I have completed this little loco, by adding some detail and giving her (or him?) a paint-job.

For more information about this build see - How I constructed an IP Engineering Albert loco from a kit
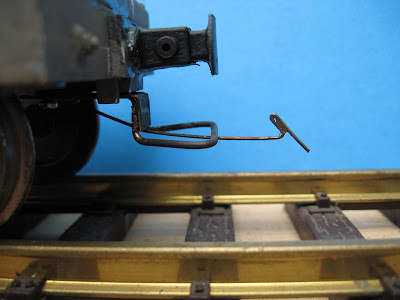
Couplings
As mentioned in my previous Progress Report, I am in the process of replacing all the large (and to my mind ugly) plastic LGB hook and loop couplings on my rolling stock with smaller alternatives. I have decided to retain the hook and loop style of coupling as I want something with is simple, reliable, cheap and compatible with LGB couplings. I couldn't afford to replace the couplings on all 75+ items of rolling stock with realistic models of couplings and so opted for a much cheaper alternative, which is compatible with LGB couplings to enable me to replace them over time rather than all at once.
I am now about 2/3 of the way through converting the rolling stock and have had a couple of operating sessions using a mix of couplings. There are a few teething problems, particularly when linking the new couplings to LGB couplings, but overall I am pleased with the way in which the new couplings are faring. For more information see How I constructed my own LGB style hook and loop couplings
Operations
Camouflage netting
The range of photos and videos I have been able to shoot on the railway has been restricted in the past because I have considered the house, garage, sheds and fencing to have been unsuitable backdrops. I did experiment with using blue screen superimposition to hide backgrounds, but was never really convinced by the result (see Progress Report 73). A fellow modeller suggested using camouflage netting to disguise unwanted backgrounds. I duly invested in some and am so far quite pleased with the results.Before......

..... After

The netting seems to be more effective if it is a fair distance from the camera and/or is viewed through foliage in the middle distance.
Less effective .......

...... more effective

Operating sessions
As indicated above, I have had a couple of full operating sessions since the last Progress Report to, among other things give the now couplings some rigorous testing.For this session, I used my two ex Southwold locos to handle the bulk of the traffic
And this one employed principally my Bagnall 0-4-2T and ex Davington Manning Wardle 0-6-0T. In this video the mix of new and old couplings is clearly visible from 1:50 to 2:10.
No comments:
Post a Comment