Introduction
Well, my intention to produce more regular progress reports has already fallen by the wayside. Like most things, life keeps getting in the way! Quite a few things have happened since my last report, not least Coronavirus and lockdown and also one of the warmest Springs since records began. All this has given me plenty of opportunities to run trains and work on various projects in the workshop.Permanent Way and Lineside
Further work has been done on sorting out Bulkeley Station since the last report. The main developments have been the extension to the platform, the widening of the loading bank and the provision of a roadway for the goods yard.Platform extension
Having previously made the curved platform with cast concrete pre-fabricated sections (see How I cast curved platforms in concrete), I decided the extension also needed to be in concrete. Rather than prefabrication, I wanted to cast it in situ as I had done with the loading bank (see How I cast a loading bank in concrete). Because the platform was fairly low, I opted for plasticine shuttering rather than wood with hot glue mortar courses.
The beauty of plasticine is the ease with which it can be indented to create stonework, the disadvantage is that it is difficult to get a crisp edge. However, I am very pleased with the outcome and will certainly explore this technique further.

For more information on the process see How I cast a platform in concrete with a plasticine mould.
Roadways
The roadways beside the loading bank and the overbridge just outside the station were cast in a far more conventional manner. A trench, approximately six inches deep was dug along the route of the roadway and a two inch layer of crushed stone laid in the bottom. Plywood shuttering was then cut to line the sides and a 3:1:1 mix of sand, gravel and cement mixed with water and poured in.
This was left for a couple of days to harden off and then the shuttering was removed (the fabric was used to cover the concrete as protection against frost - remember those days?).

The approach road to the overbridge was cast in the same way, though it was given an unexpected speckled texture by a sudden heavy rain shower just after the concrete had been poured.

Loading bank
This was widened in the same way as the loading bank was originally cast with wooden shuttering screwed down into the underlying trackbed, to which hot glue mortar courses have been applied .
Once the poured concrete was in its green state it was smoothed off and textured slightly with a wire brush.

It now looks more serviceable, though I've realised I need to widen the access road further - another job for the list!
Rolling stock
Most of the developments here have been maintenance related but the most significant change has been the addition of another railcar to the the roster.Railcar
Having admired the County Donegal railcars for some time, a chance conversation with John Campbell at the Llanfair Garden Railway Show two years ago resulted in the arrival of a bare-bones etched brass kit. Having never constructed an etched brass kit it sat untouched in the workshop until Coronavirus appeared and I bit the bullet, fired up the soldering iron and dived in.
As there were no resin, whitemetal or plastic fittings supplied in the kit, I had to make my own using carved and sanded basswood, various oddments of plasticard and some 3D printed seats (see below).
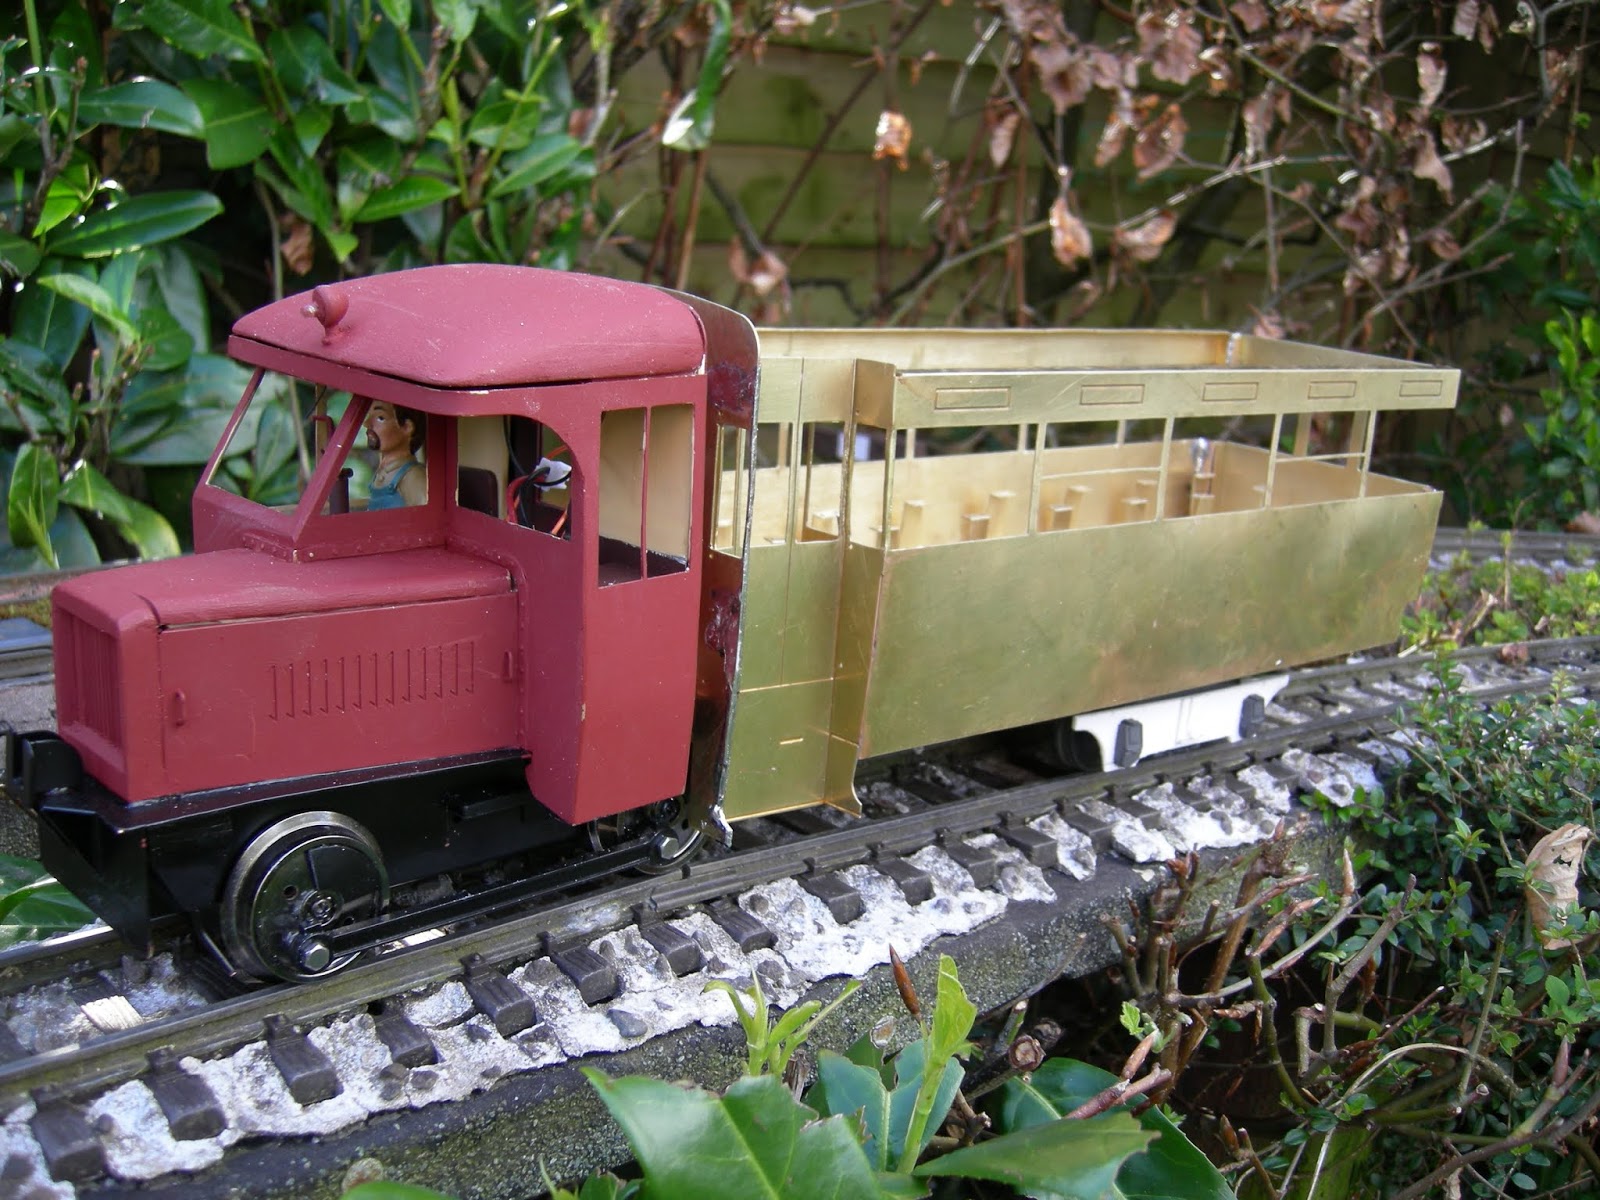
The motor block was supplied by G-Bits, three 18650 li-ion batteries were squeezed in under the bonnet and the Deltang Rx65c receiver/controller and Dallee Soundcard were secreted in the cab roof.

I certainly learned a great deal during its construction and, although my soldering skills were challenged to their limits, I have ended up with a reasonable looking model, which is probably more in credit to John's kit than my constructional methods.

Furthermore, she runs quite well too.
See How I constructed ex-Clogher Valley railcar - pending for more information
IP Engineering Albert Diesel loco modification
After assembling an IP Engineering Albert diesel loco kit for the 32mm gauge copper mine feeder railway (see How I constructed an IP Engineering Albert diesel loco), I realised it was too tall to fit under the canopy for the copper mine crusher shed.
I was faced with two solutions - either raise the height of the canopy or lower the height of the loco. I opted for the latter solution. The cab was sawn off half-way down and a new control panel and seat added using offcuts of plasticard and fittings from Cambrian Models.

A couple of coats of primer and brown paint and she was finished.....
[Awaiting photo]
The next job is to fit a reed switch and reprogram the Deltang receiver to operate in auto-shuttle mode, like her 32mm gauge HGLW sister loco (see How I reprogrammed a Deltang Rx65 for auto shuttle).
Operation
As indicated in the introduction, the weather this spring has been hot, dry and sunny and, as a consequence, I have been able to run a lot of trains. This has included two complete operating sessions where I run a full day's timetable with freight movements and quite a few impromptu sessions - to test run the railcar, just run a couple of trains in an ad hoc way or one-off sessions to fill gaps in videos.Here's a selection of the videos made since my last progress report.
Shunting the Afternoon Mixed
A trip along the line
Lineside industries
Newsreel
Freight management
In addition, I have tweaked my Psion freight management program (see A portable freight management program) to sort out a glitch and to improve the generation of more realistic freight movements. I've not entirely ironed out the anomalies as the water mill siding seems to be getting a lot more traffic than would be expected (including, for some reason, a load of pit-props), but these movements do make for some interesting operational puzzles.
[Awaiting photo]
Other
The most significant addition to the workshop has been a 3D printer.

I have always fancied the idea of having a 3D printer but felt they were too far outside my price range. However, a chance find on eBay has now allowed me to join this exclusive club. Note: This screenshot was taken a week after I took delivery when the price had risen - the week before I bought mine the price was £69.99.

A fellow modeller on the Garden Railway Forum suggested that I was probably taking on a project rather than just a printer and he wasn't far short. The printer does need a lot of attention to produce prints of reasonable quality but, for the price, I'm not complaining.
The primary reason for buying the printer was to produce 14 identical seats for the railcar (see above). This was achieved with a fair degree of effort in getting to grips, not only with the printer, but with a 3D drawing program.

All the luggage (including the bicycle) in the roof rack on top of the railcar was 3D printed....

...... using drawings which were downloaded for free off the internet. I am presently printing out the parts for a diesel locomotive - another freebie off the web. It's a bit of a challenge to get these larger parts to be of consistent quality - but I have never shied away from a challenge!

As they say, watch this space!
For more information, see How I assembled my Anet A8 3D printer kit - pending

No comments:
Post a Comment